This article is written for Office 365 Business subscribers who use the software as their internal and external mailing system. When your business is growing, you can start facing a mess in your mailbox. This indicates that you need to integrate your mailing system with ERP or CRM, so you can continue to use your favorite mail client. Then, all communications will be synced in a structured way into ERP/CRM for managing sales, tasks, support tickets, and more.
In this guide, learn how to configure emails to work seamlessly with Office 365 and Odoo. Utilize the Odoo Outlook for bidirectional communication, access Office 365 emails in Odoo, and vice versa. Optimize the Odoo SMTP server for reliable email delivery. Configure incoming emails in Odoo to handle customer queries efficiently. Customize Odoo’s email settings for a professional brand image and streamlined communication. Boost productivity and collaboration with this integration.
As an A–Z guide, we have provided you with a full set of instructions on how to configure your Office 365 Exchange to work with the Odoo ERP system. This guide was written with the goal to be an A-Z guide. If you find that this article is not complete enough or something is unclear, please leave your comments down below and we will correct these instructions and add clarifications to it.
Prerequisites
1. Assumption is that you are already a user of the Office 365 Business subscription that includes Exchange Server. E.g. “Office 365 Business Premium”.
2. You are already using mailing features from Office 365. Meaning you are not a new Office 365 subscriber. If you just purchased a subscription and haven’t configured anything yet, you first need to perform an initial setup by following the official Microsoft guide. It is especially important that you already have properly configured your custom domain. This Microsoft guide can help you with this.
3. People executing the steps below need to have Administrative access (Role: Global Administrator) to https://www.office.com. That is needed in order to create new users and groups on the Portal.
4. According to official Odoo documentation, You can use an Office 365 server if you run Odoo on-premise. Office 365 SMTP relays are not compatible with Odoo Online or Odoo.sh.
For Odoo Online or Odoo.sh or at instances where it is not possible to use 25 port or without a static IP address you can configure it by following article.
If all above preconditions are already fulfilled, then you can go ahead with next steps.
Table of contents
- Configure Outgoing mail Server in Office 365 as Relay Server
- Configure Catchall Email in Office 365
- Install Odoo module to inform users that they used the wrong email
- Configure Outgoing Mail Server in Odoo
- Configure Incoming Mail Server in Odoo
Configuring Outgoing mail Server in Office 365 as Relay Server
Principle of Operation
In this section, you will learn how to configure Office 365 to act like a relay server.
Why is it needed?
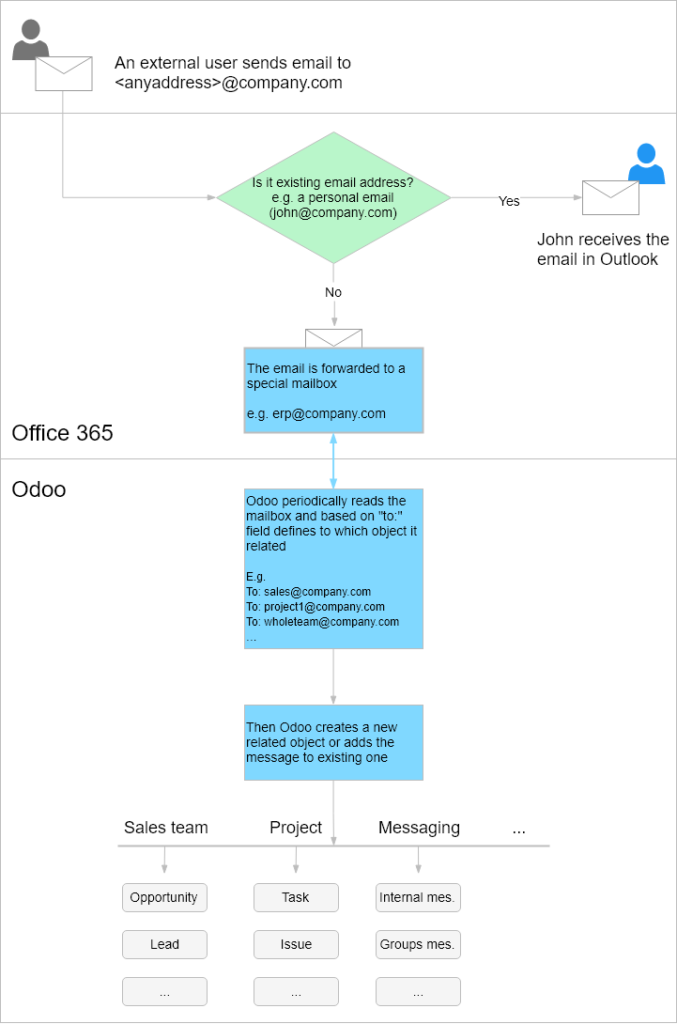
Odoo ERP is trying to operate as a relay server. Meaning that it is used as an intermediate layer to send emails from ANY mail address to ANY mail address. For example, after this mail configuration Odoo will be able to send emails from any email (for example [email protected])
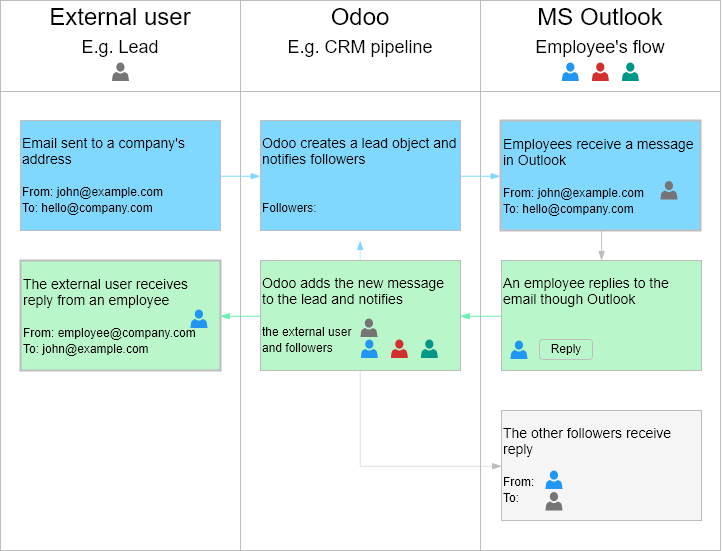
A little bit of clarification on why Odoo acts like this
Let’s imagine that you are getting an email from a potential lead to the address [email protected]. Imagine that potential lead’s email address is [email protected]. Odoo ERP catches this email and creates a new Opportunity in the CRM Pipeline. And after Odoo creates it – it needs to send automatic emails to all followers, to inform everybody about the new Opportunity. As it is now implemented in Odoo ERP, the email will attempt to send FROM the email of the lead (e.g. [email protected]) and not from some generic email like [email protected]. The reason why Odoo is doing it is to make sure that this email will be beautifully displayed as belonging to a real person and not to look like an automatic notification from ERP. And obviously when you respond to the person through Odoo CRM, your lead will also see that email is coming from [email protected] instead of some generic email [email protected]. So the intention of Odoo is clear – they want to ensure all messages from ERP are personal and do not look like an automatic notification. But that gives additional headache relating to the mailing system configuration.
Configuring of a SMTP relay connector
The configuration of the outgoing mail server is based on the following documentation.
- Login with your Global Admin user account to https://admin.microsoft.com and click on the “Admin centers -> Exchange” menu in the left panel
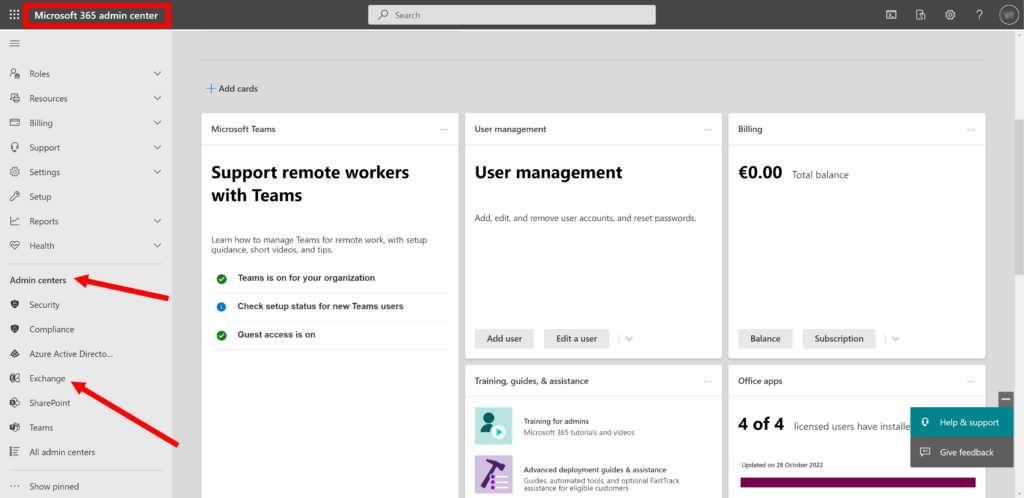
- In the Opened Window click on the section “Mail flow -> Connectors”
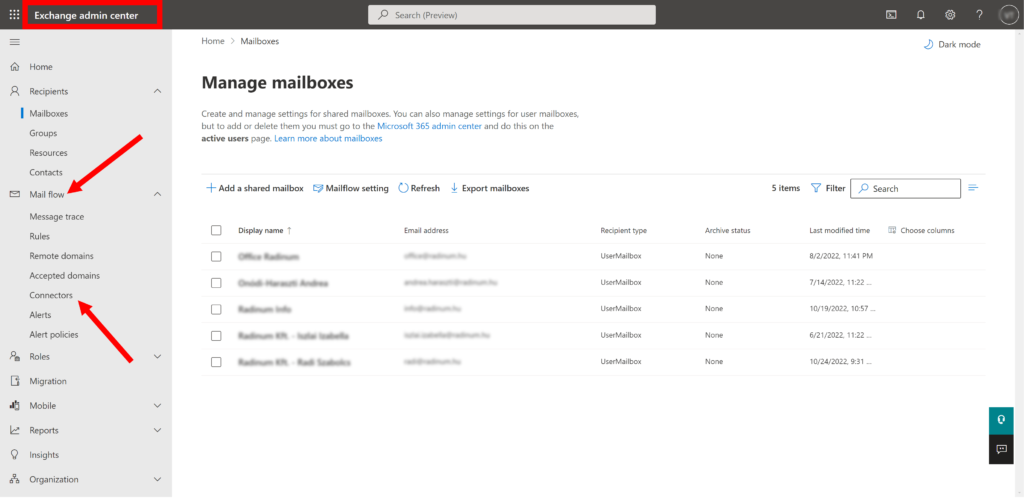
- Click the “Add a connector” on the opened page to add a new connector.
- On the first screen with mail flow scenario, select the following values and click “Next”
From = “Your organization’s email server”
To = “Office 365”
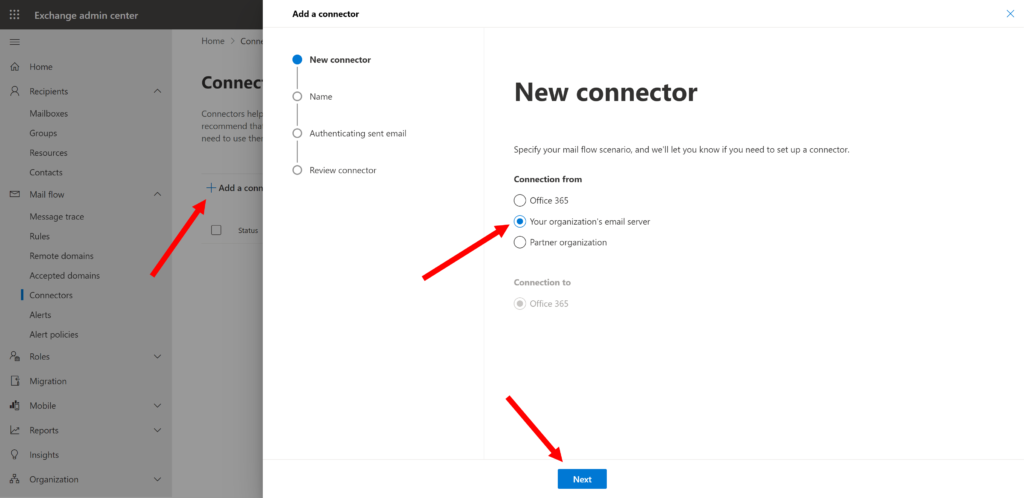
- Give a name to the connector. E.g. “OdooMail”. All checkboxes should be checked (default behavior). And click Next

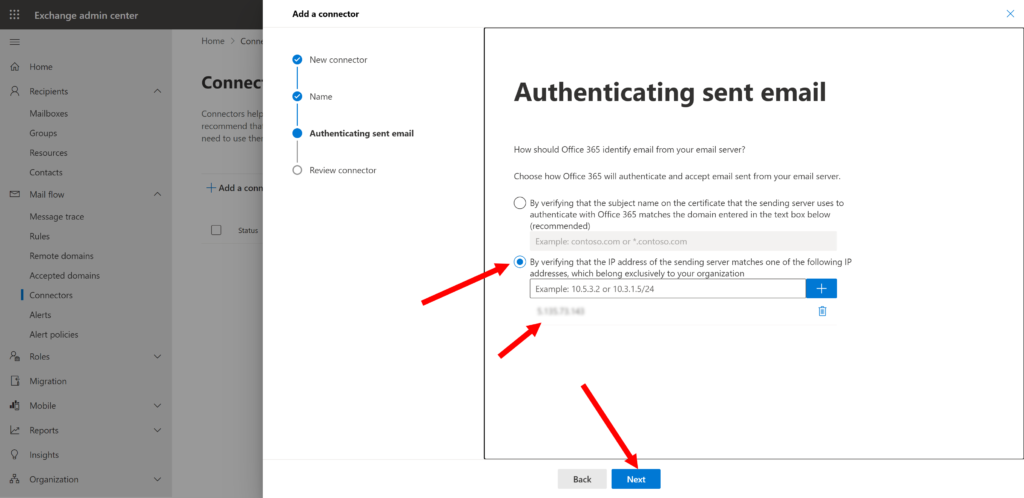
- Select checkbox to verify allowed senders by IP address and add IP addresses of all your Odoo ERP instances. That is a type of whitelist. Office 365 will trust messages sent from those IP addresses as safe.
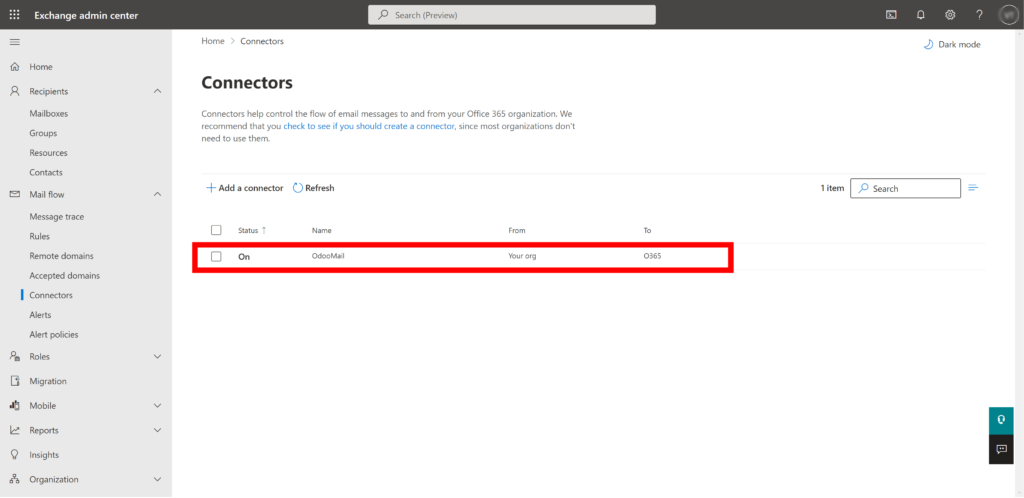
- After clicking “Create Connector” you should get the following screen with an already created connector

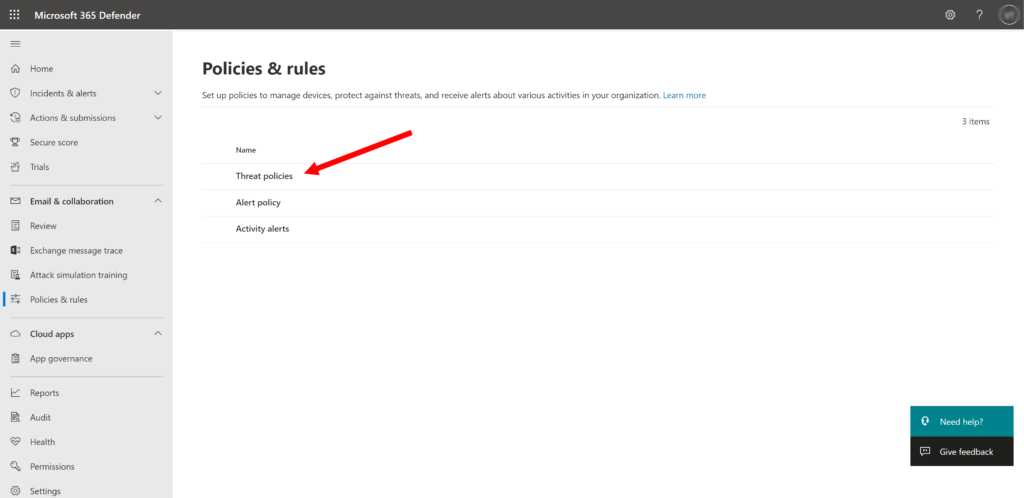
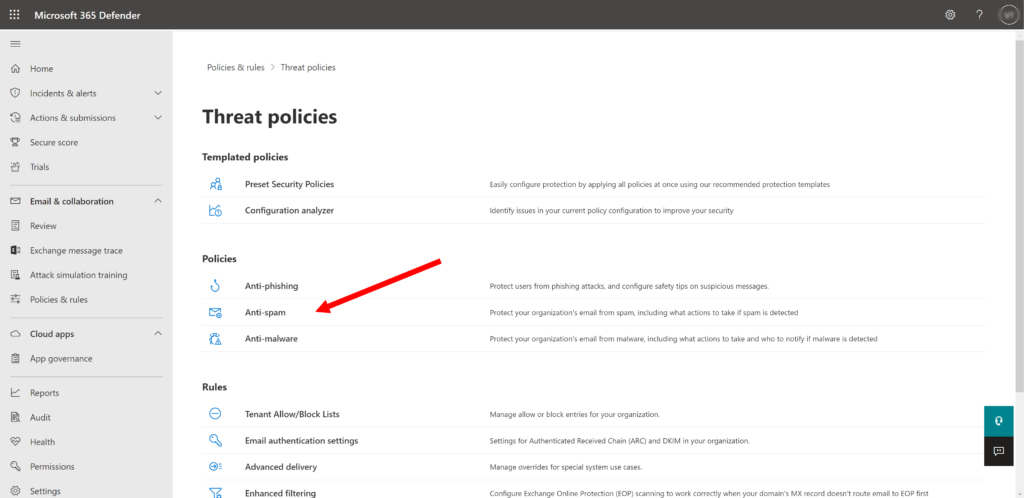
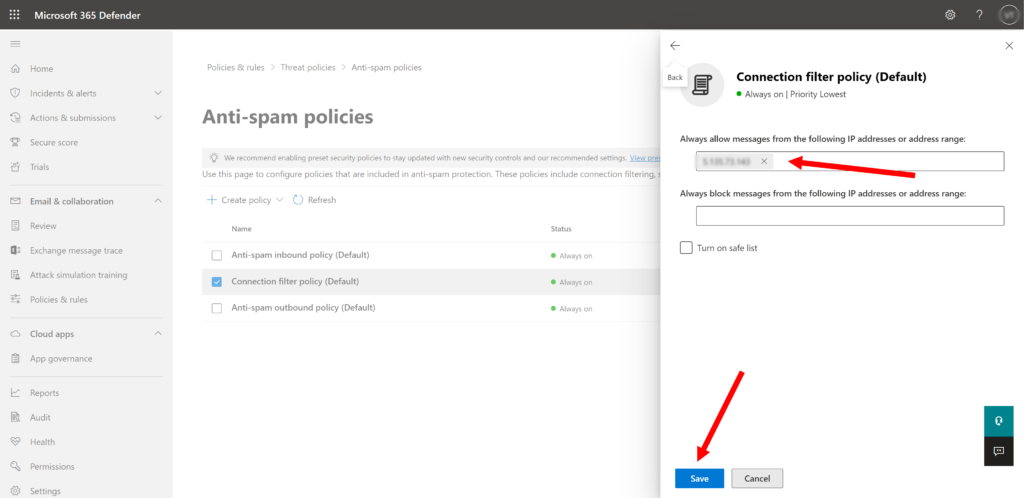
Configuring of a Anti-spam thread policy
- Go back to Admin center click on the “Admin centers -> Security” menu in the left panel.
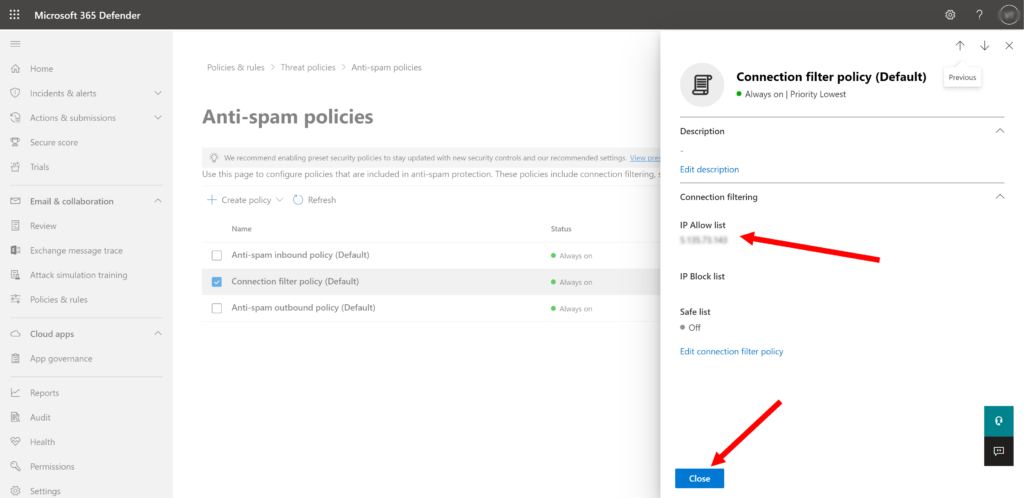
- In the Opened Window move by following path “Policies & rules -> Threat policies -> Anti-spam -> Connection filter policy (Default)” and click on “Edit connection filter policy”

- Add to “Always allow messages from the following IP addresses or addresses range” field IP addresses of all your Odoo ERP instances and click on “Save”.
Configuring of a Domain DNS records
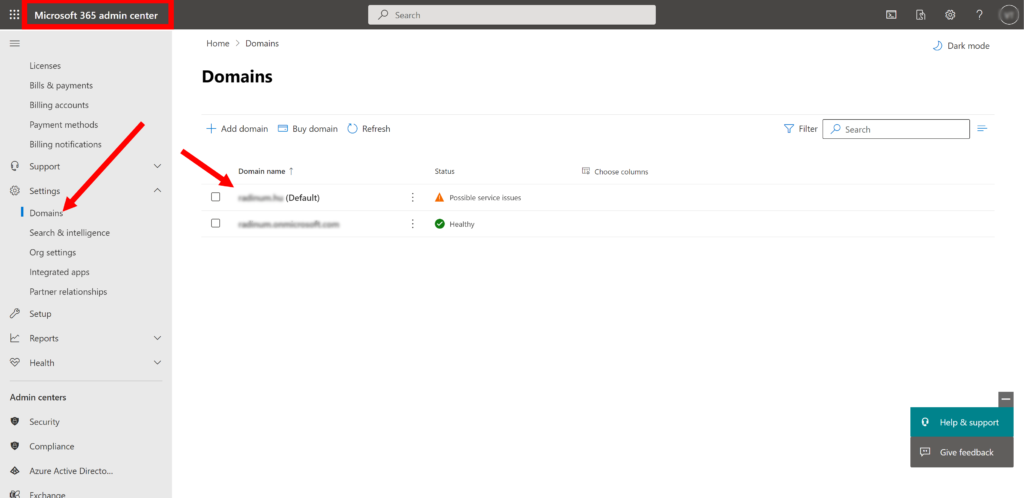
- You need to make sure that your domain has required DNS records. For this go back to Admin center and move by following path: “Settings -> Domains -> Your Domain -> DNS records”
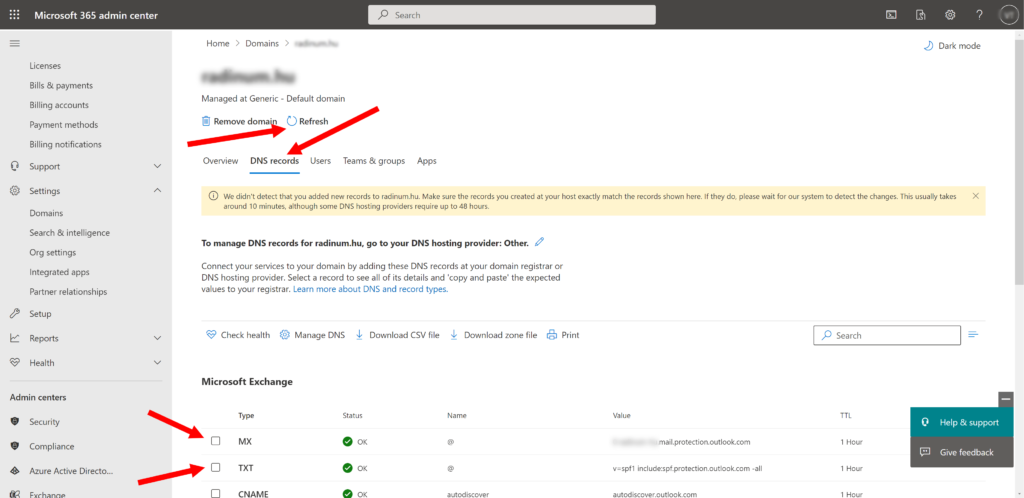
- We are interested in MX and SPF records. Check that the MX record looks like following structure:
<subdomain(optional)>-<second level domain(SLD)>-<top level domain (TDL)>.mail.protection.outlook.com
Example: contoso-com.mail.protection.outlook.com (domain with replaced dots to dash before .mail.protection.outlook.com).
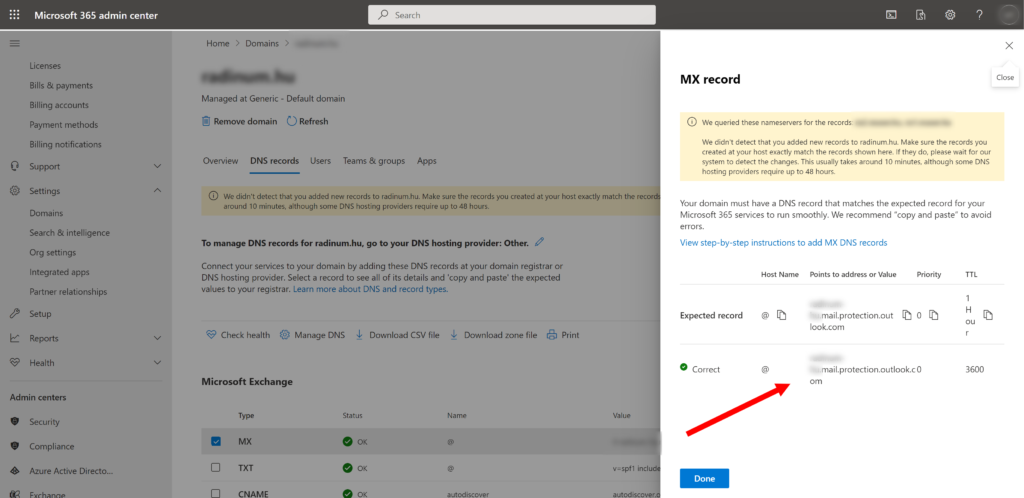
If the MX DNS record does not match with mentioned structures, you should add them by the Admin panel of your domain provider.
- Check that SPF record contain IP addresses of all your Odoo ERP instances and looks like following structure:
v=spf1 ip4:<your_ip> ip4:<your_other_ip(optional)> include:spf.protection.outlook.com ~all
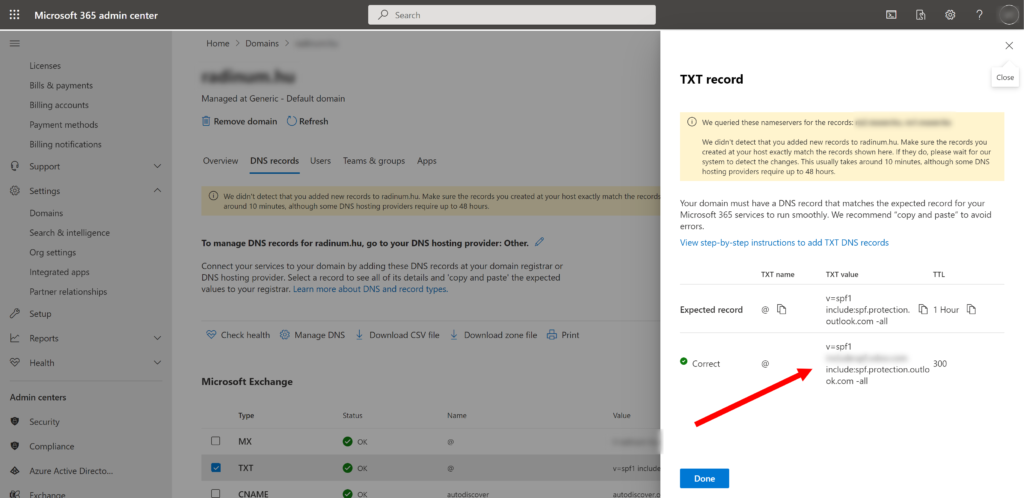
If the SPF DNS record does not match with mentioned structures, you should add them by the Admin panel of your domain provider.
IMPORTANT!
If you are trying to integrate Office 365 emails with Amazon EC2, you will need to follow this article additionally. The reason why you need this – Amazon has additional protection to prevent spammers to send emails from their servers. So you have to explicitly request from them allowance to do that.
Configuring Catchall Email in Office 365
Principle of Operation
In this section, you will learn how to create a special mail address in Office 365 that will collect emails sent to unknown receivers (meaning no User exists in Office 365).
Why is it needed?
In Odoo ERP it is possible to configure multiple Sales Teams, Projects and etc. Any objects you want. For example, you may want to have a Sales Team with the name “Initial Processing Team”. That sales team should process leads that are received to the email address “[email protected]”. Also, you may want to have separate Sales Teams which will be responsible for processing emails sent to addresses “[email protected]” and “[email protected]” or more.
You may configure as many email addresses as you want and obviously those email addresses will not be real emails in your Office 365 Portal.
So to avoid lots of manipulations in the Office 365 Portal when you are adding something new in Odoo ERP (new project, new sales team and etc.), it is better to configure single email addresses that will be the only endpoint for all emails sent to nonexistent mailboxes. That way Odoo ERP can easily process them, and no emails will be lost.
Configuring of a Catchall mailbox user
- Sign into https://admin.microsoft.com, go to menu “Users -> Active users” to see list of already created users
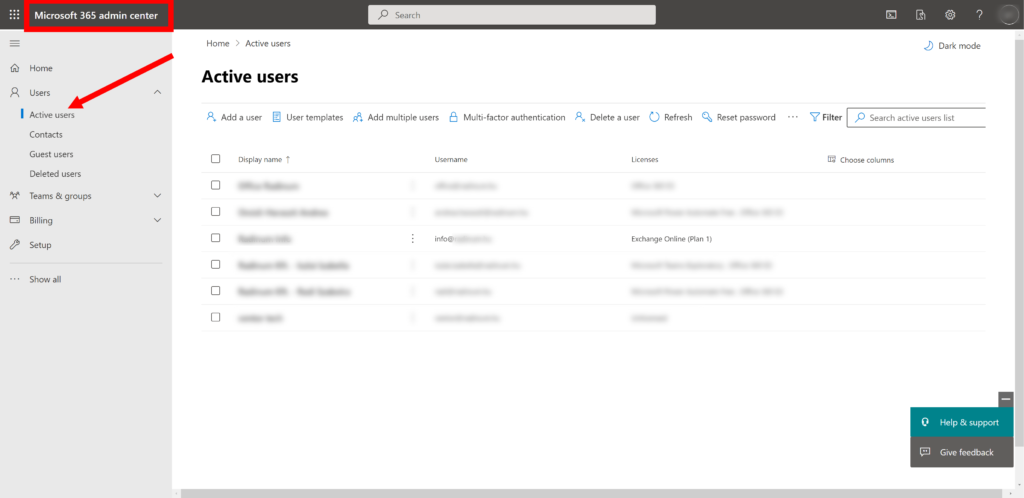
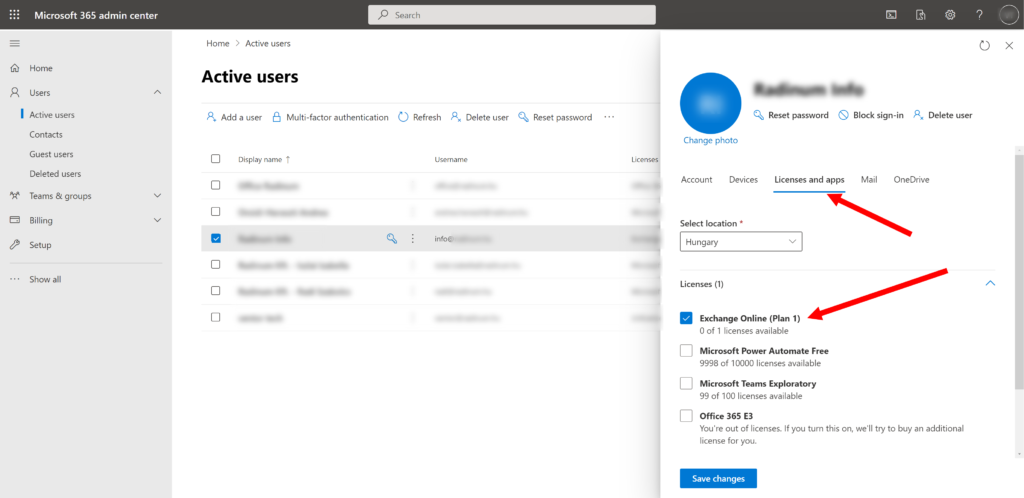
If you don’t have the user which will be used like Catchall mailbox, create it by clicking on the button “Add a user”.The name of the user you can write like “ERP Notification” with email [email protected] (recommended alias is ‘catchall’’ but you cat use any one except ‘bounce’, as example we use ‘info’). Note that Role of this user should be “User (no administrator access)” and Product License should have the status Exchange Online or higher.
If you have the user which will be used like Catch All mailbox, you need to make sure that it has required configuration.
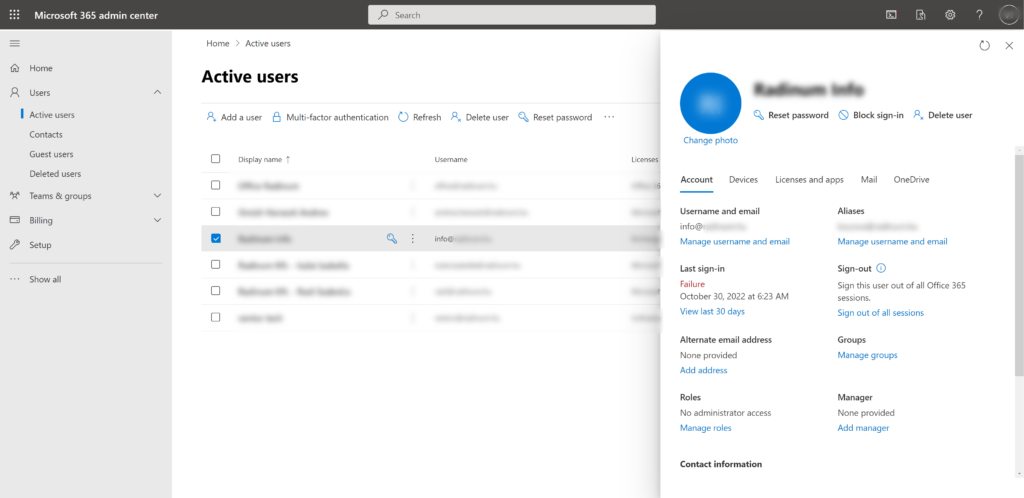
- First of all you should go to the “Licenses and apps” tab and make sure that the user’s Product License has the status Exchange Online or higher.
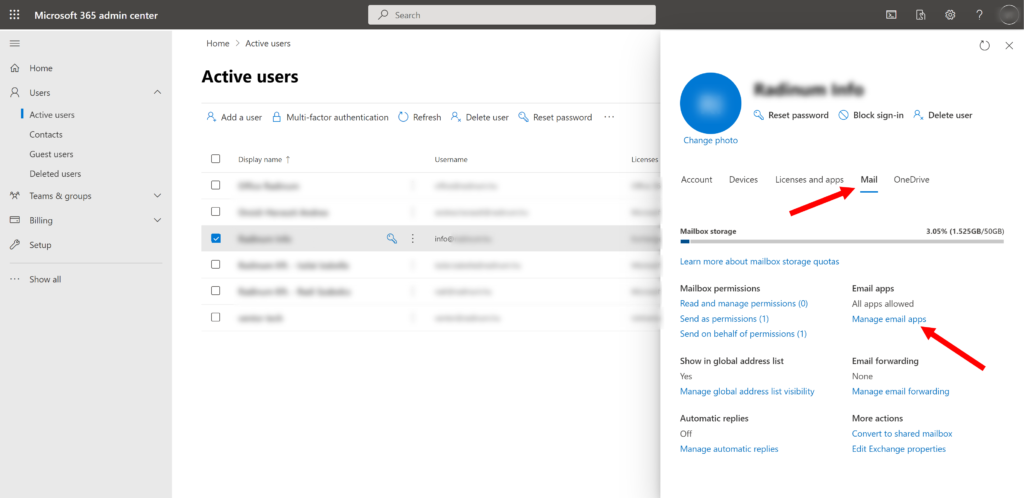
- After that you should go to the “Mail” tab and make sure that the user has permissions for connections by SMTP, IMAP and POP protocols.

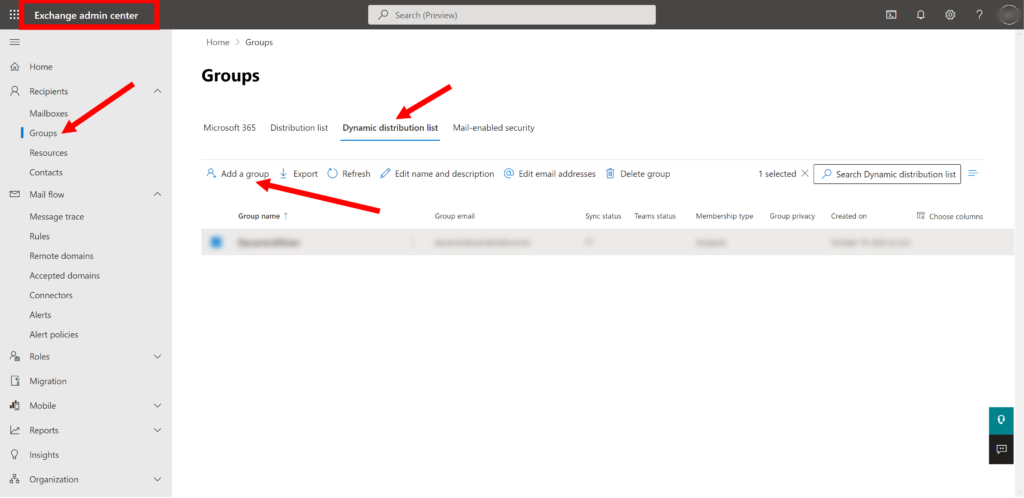
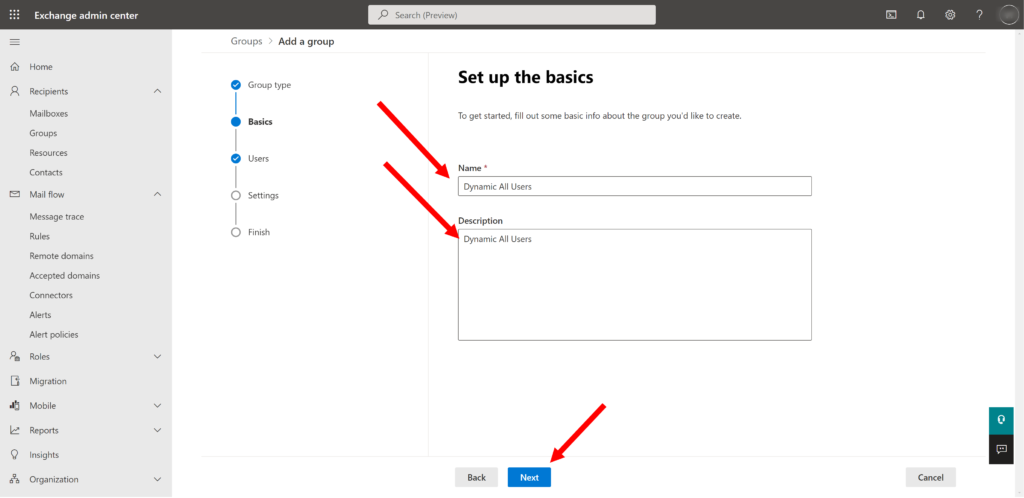
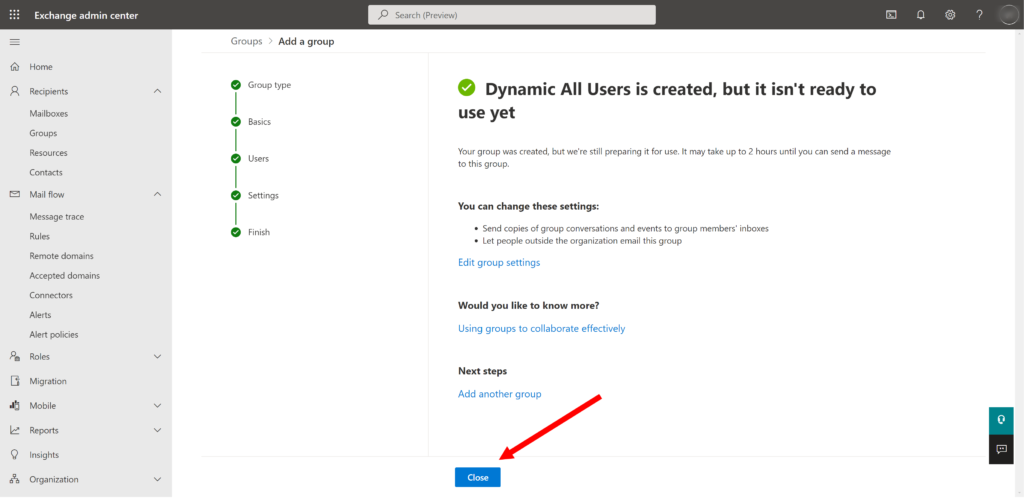
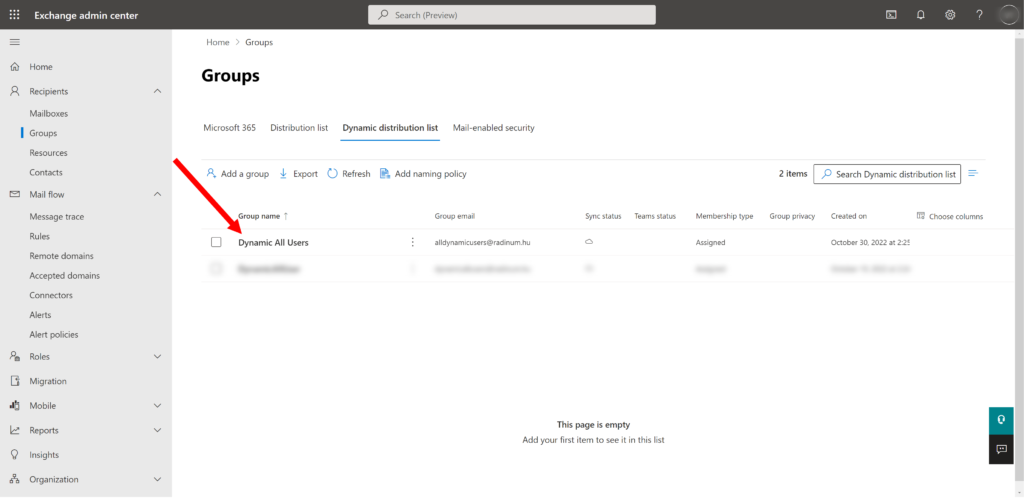
Configuring of a Dynamic Distribution Group
- Go to the menu “Admin Center -> Exchange -> Recipients -> Groups”, choose the “Dynamic Distribution list” tab and click “Add a group”.
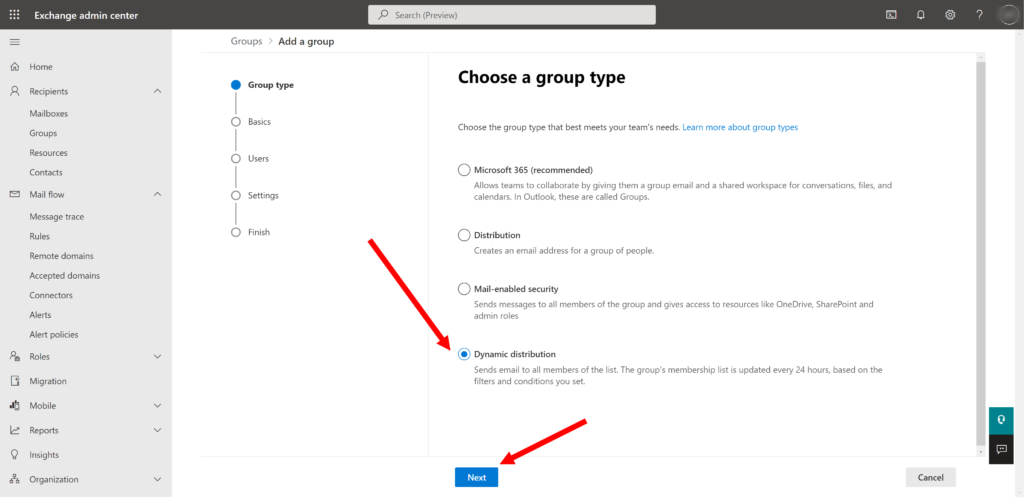
- Choose the “Dynamic distribution” point and click “Next”.
- Now enter the following values in the fields and click “Next”:
- Name = “Dynamic All Users” (you can use any you want)
- Description = “Dynamic All Users” (you can use any you want)
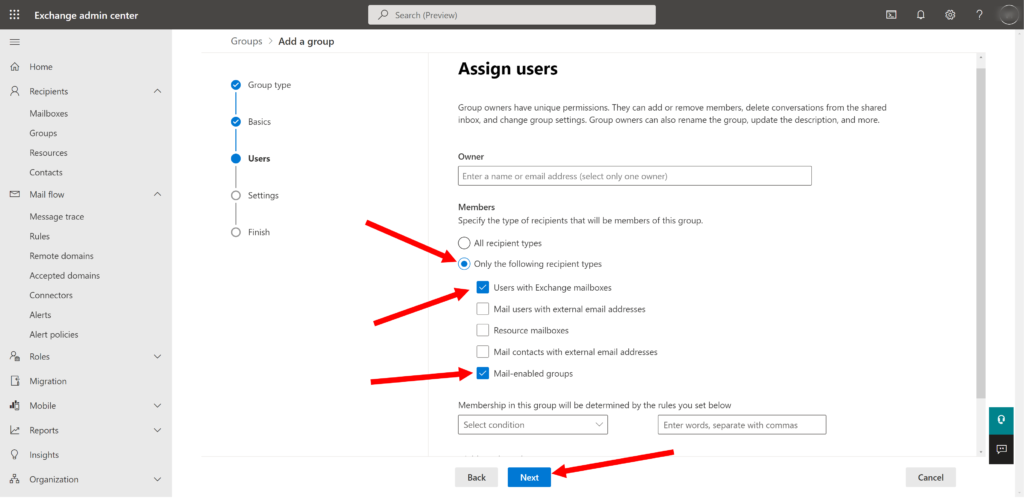
- Choose the following values in the fields and click “Next”:
- Members = “Users with Exchange mailboxes” and “Mail-enabled groups”
- Enter the following values in the fields and click “Next”:
- Alias = “alldynamicusers” (you can use any you want)
- Domain = the same domain like for Catchall mailbox
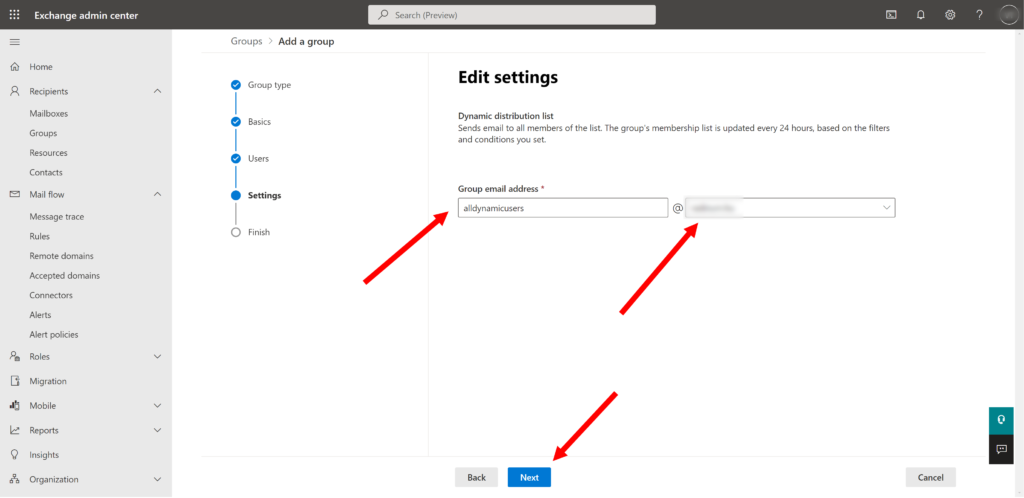
- Confirm the group creation by clicking “Create group”
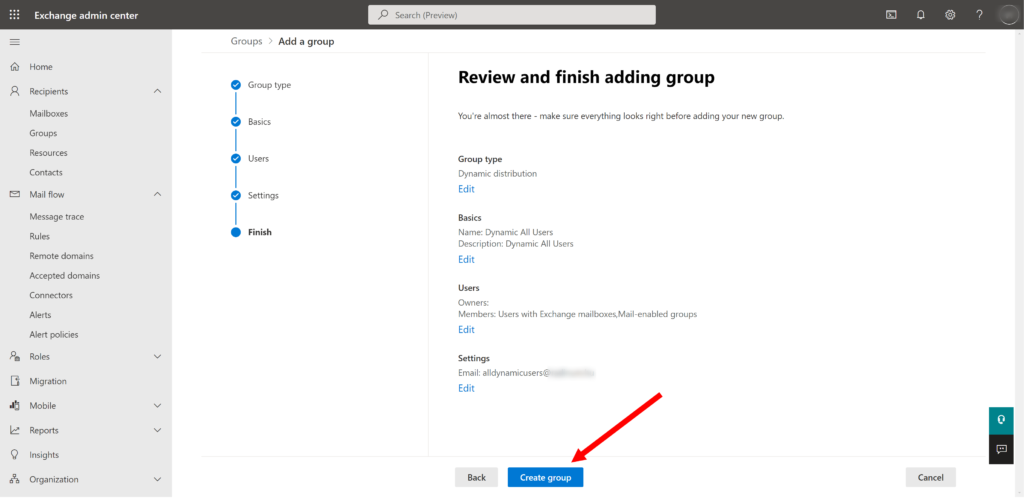
As result you can see the same as at examples below:
Configuring of a Mail Flow Rule
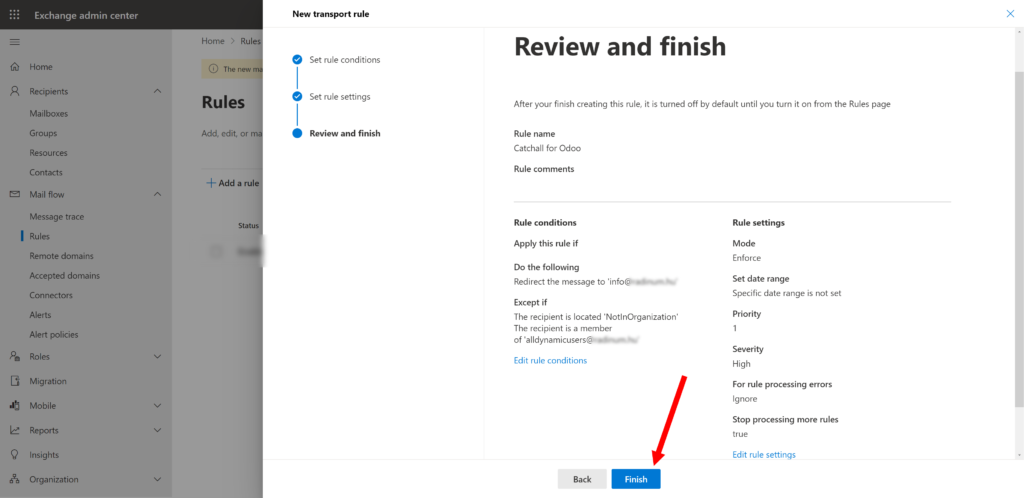
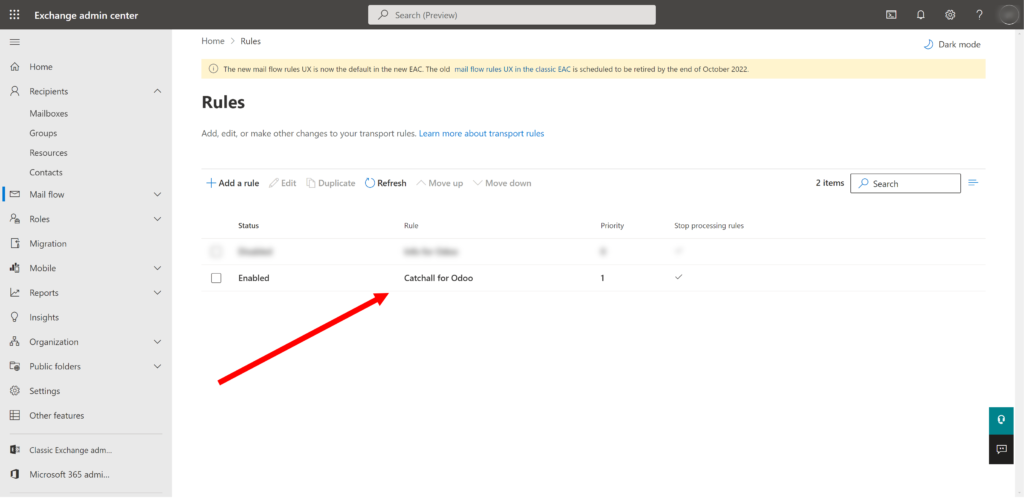
- Go to the menu “Admin Center -> Exchange -> Mail flow -> Rules”. In this section we are going to create a special mail flow rule that will allow you to catch all emails to unknown email addresses and will forward them to [email protected], so Odoo ERP can process and analyze them. Click the “Add a rule” and choose the “Create a new rule”.

- In opened form enter the following values in the fields and click “Next”:
- Name = “Catchall for Odoo”
- Apply this rule if = “Apply to all messages”
- Do the following = Redirect the message to your Catchall user (here you can select email address created in earlier stages)
- Except if = The recipient is located “NotInOrganization” OR The recipient is a Member of All Dynamic Users group (those rules are needed not to do anything with messages that are sent to external email addresses or that are sent to real users in your organization)
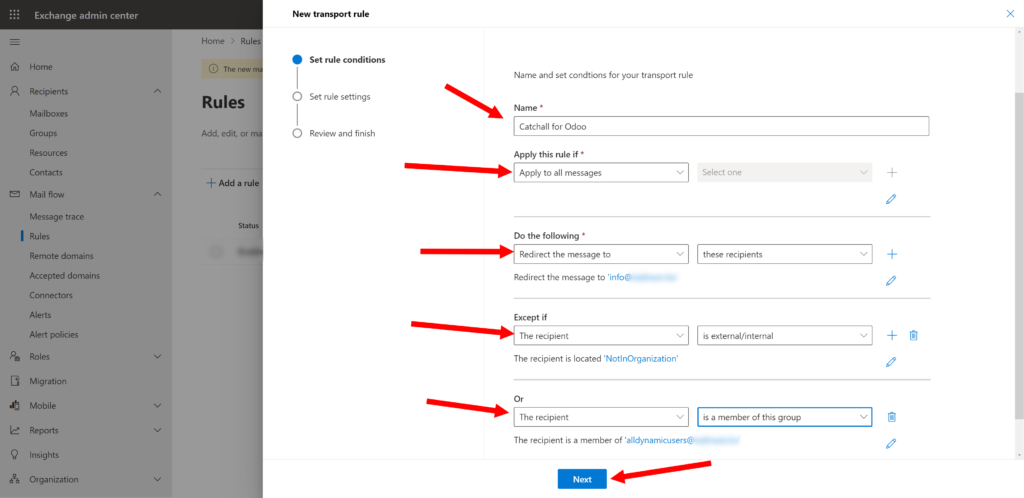
- Then enter the following values in the fields and click “Next”:
- Rule mode = “Enforce”
- Severity = “High” (if any issues we want to debug this)
- Stop Processing more rules = Selected
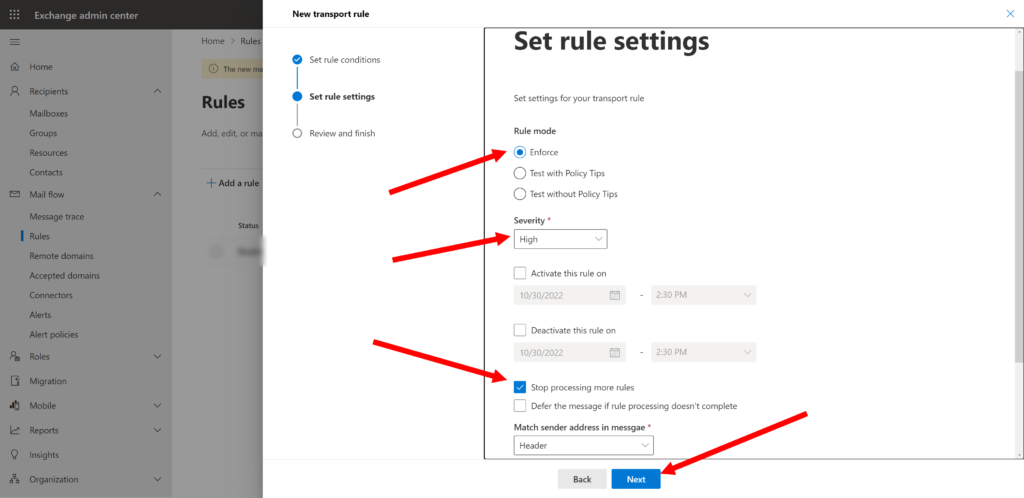
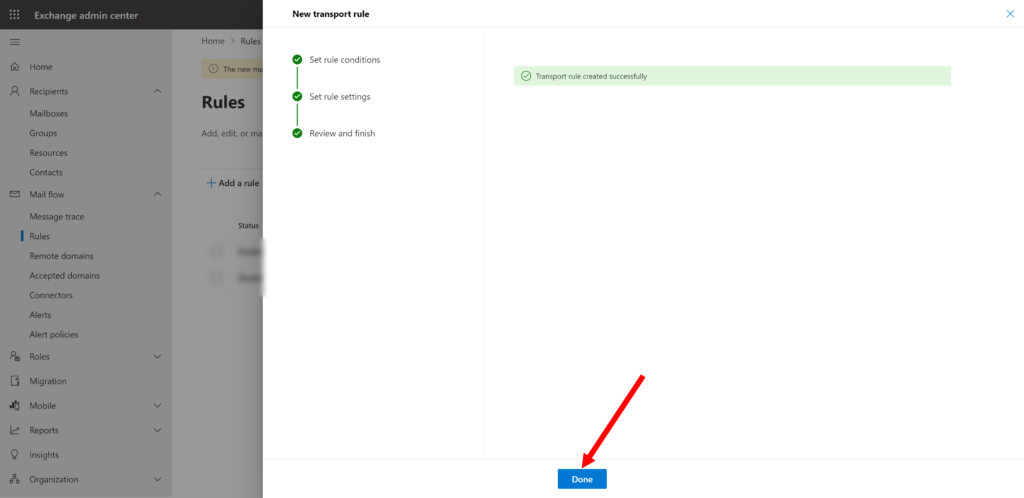
- As a result, after saving your rule it will look like the screens below.
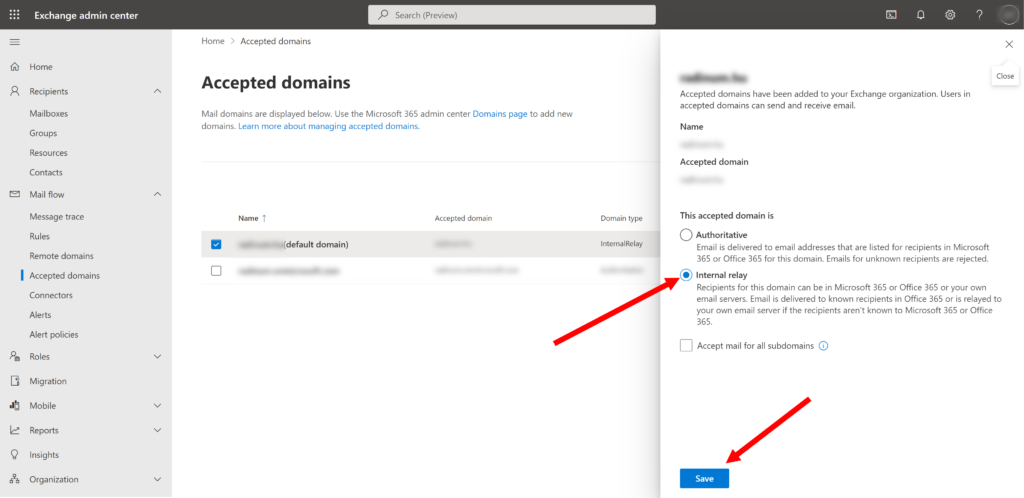
Configuring of a Internal Relay for Accepted Domain
- Note that after executing the above, the process is not finished yet. Now if you try to send email to non-existent email addresses, Microsoft will bounce back this email to the user saying that “Such email address does not exist”. We need to switch off this feature of Microsoft on our domain (but later we will need to replicate it on Odoo side, but that is next steps). For now, we should go to the menu “Admin Center -> Exchange -> Mail flow -> Accepted domains” and find our domain
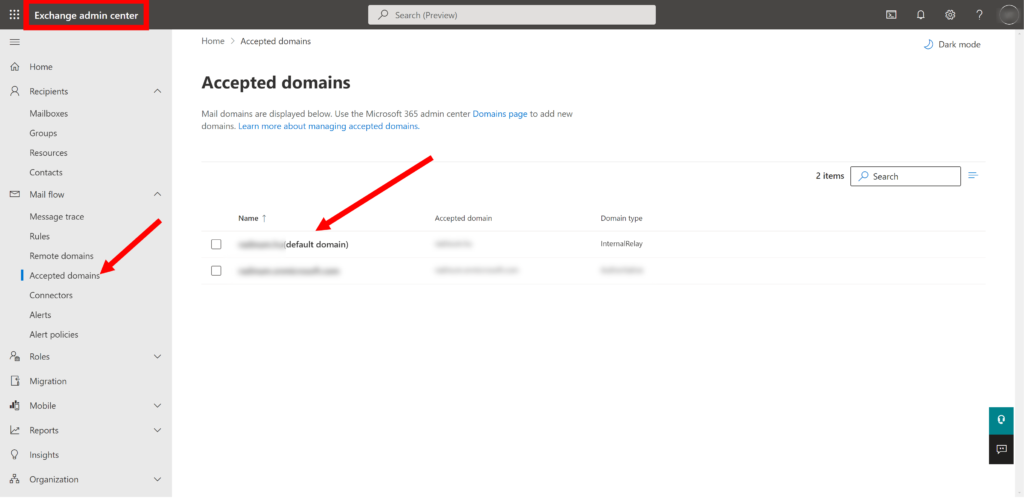
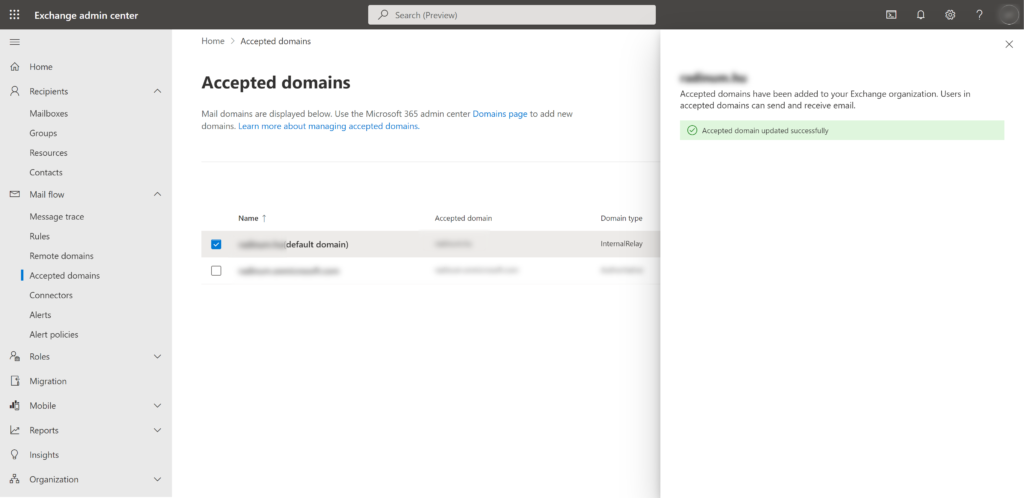
- Now edit your domain and set its type to be an “Internal Relay” as shown on the image below
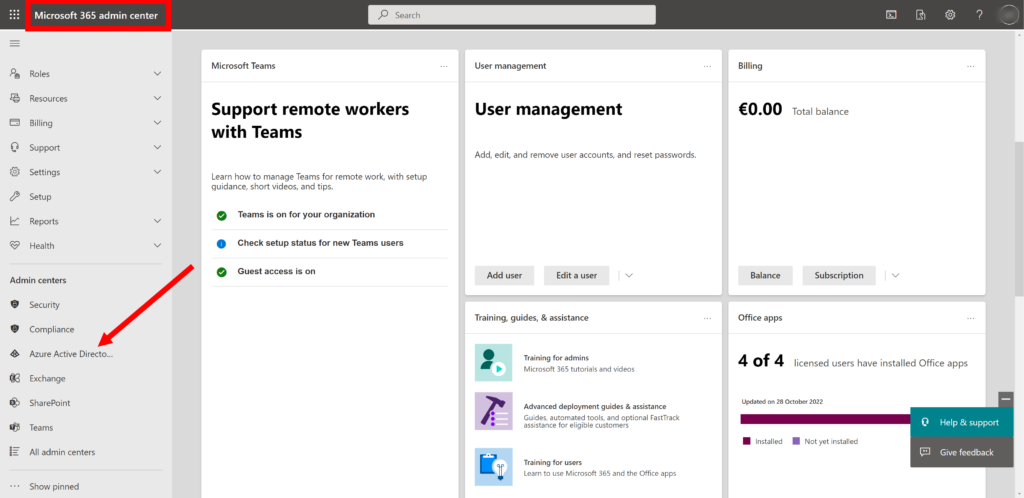
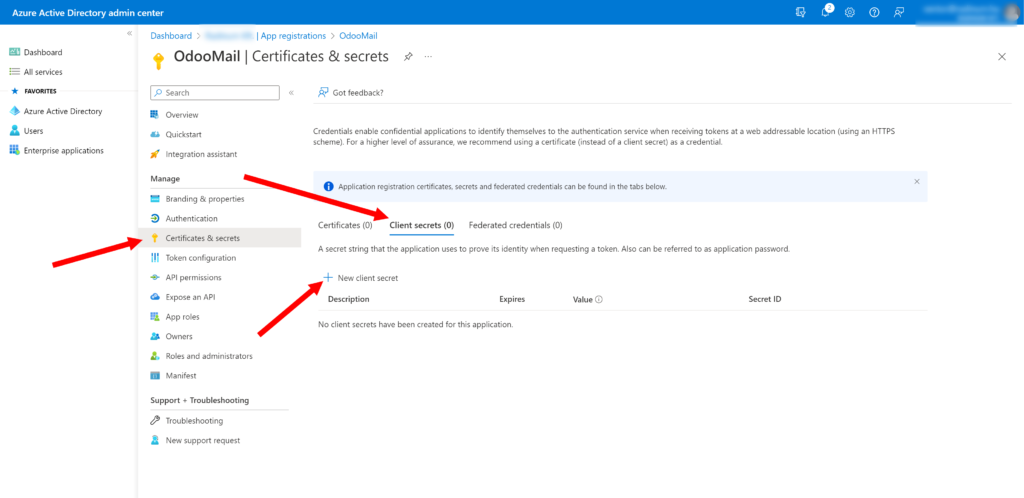
Configuring of a Azure App for connection to Catchall mailbox
- To have the possibility to connect to the Catchall mailbox from Odoo it is needed to create an entrypoint with special permissions. To do this we should go to the menu “Admin Center -> Azure Active Directory admin center -> Azure Active Directory -> App registration” and click “New registration”.
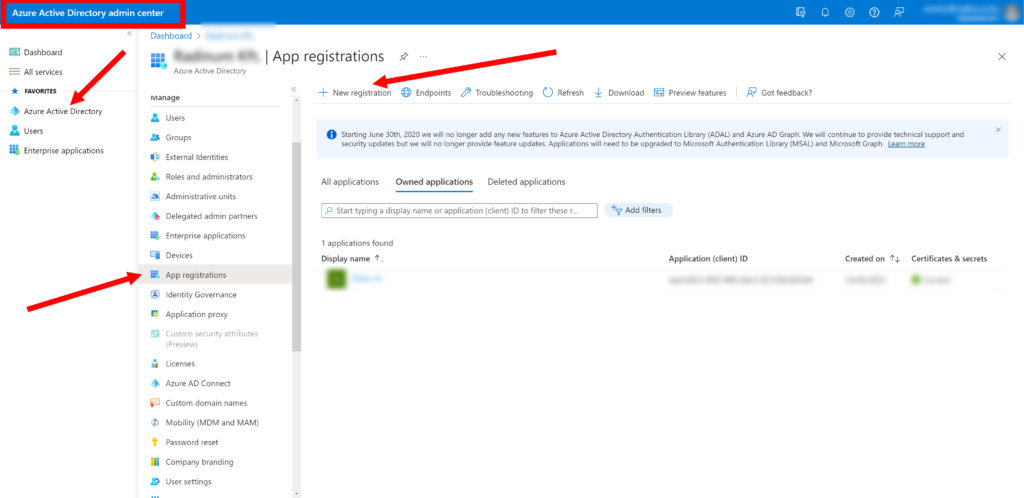
- Enter the following values in the fields and click “Register”:
- Name = “OdooMail” (you can use any you want)
- Supported account types = “Accounts in any organization directory and personal Microsoft accounts”
- Redirect URI = “Web” and “https://your-domain.com/microsoft_outlook/confirm” (domain of your odoo instance, it can be not same as mail domain)
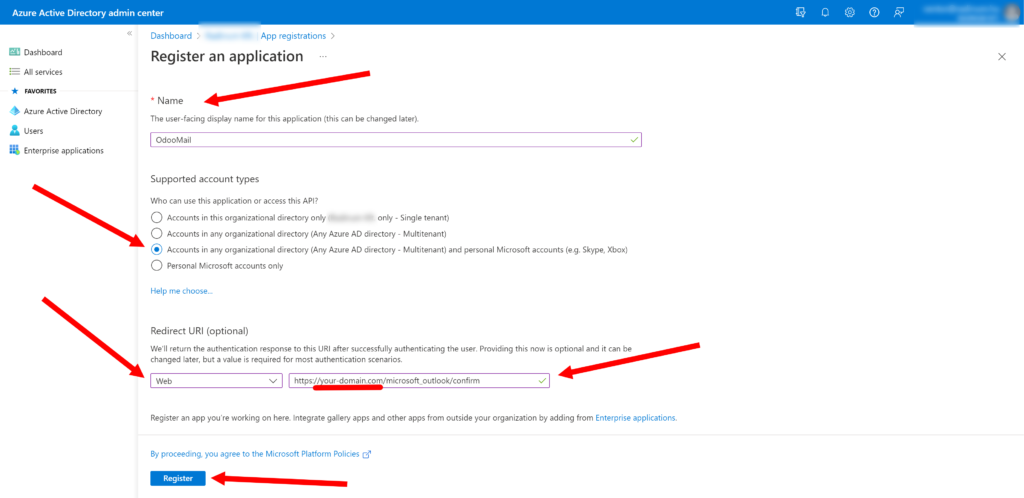
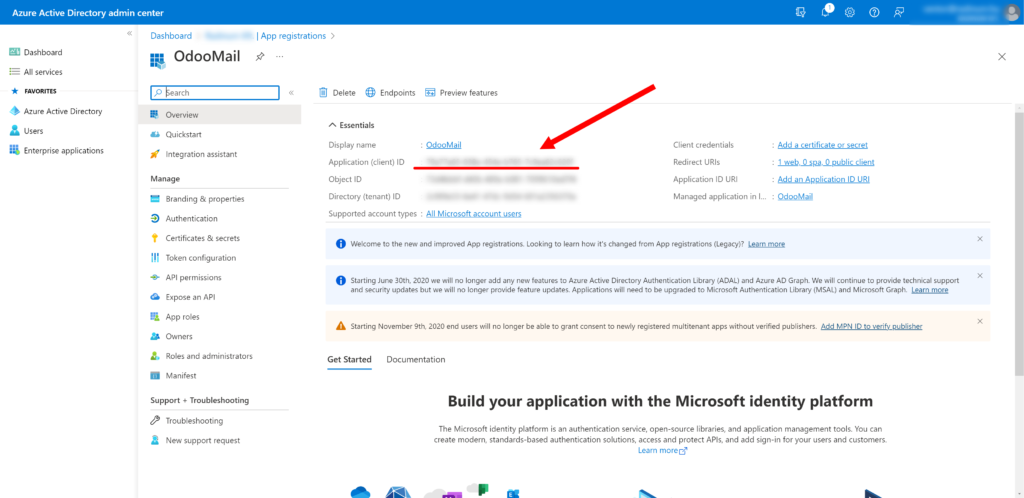
In the result we see a new app. Be sure to copy and save the “Application (client) ID”, it will be required in configuring of a connection to Catchall mailbox from Odoo.
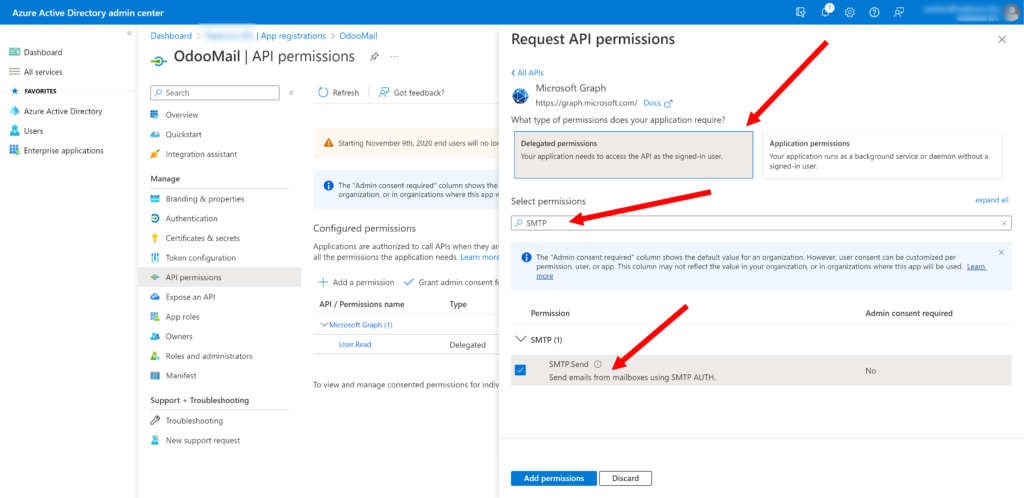
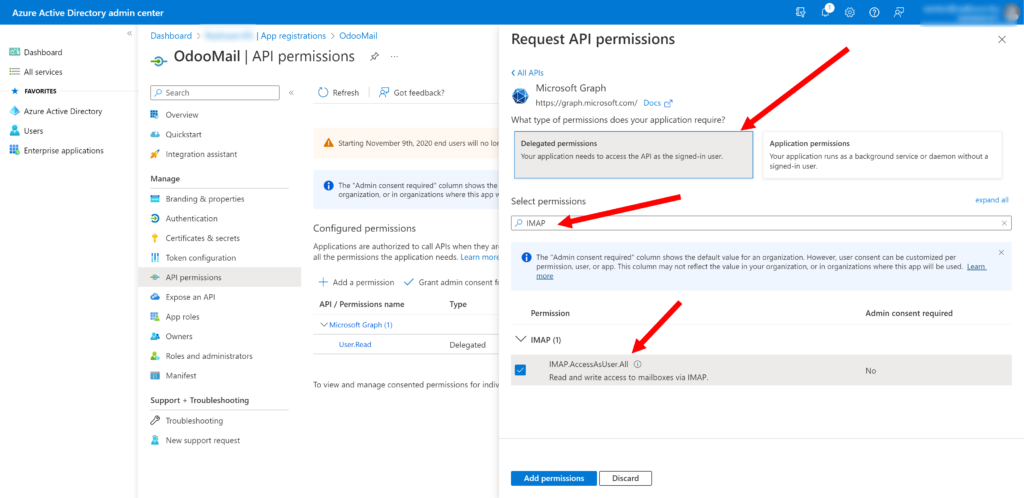
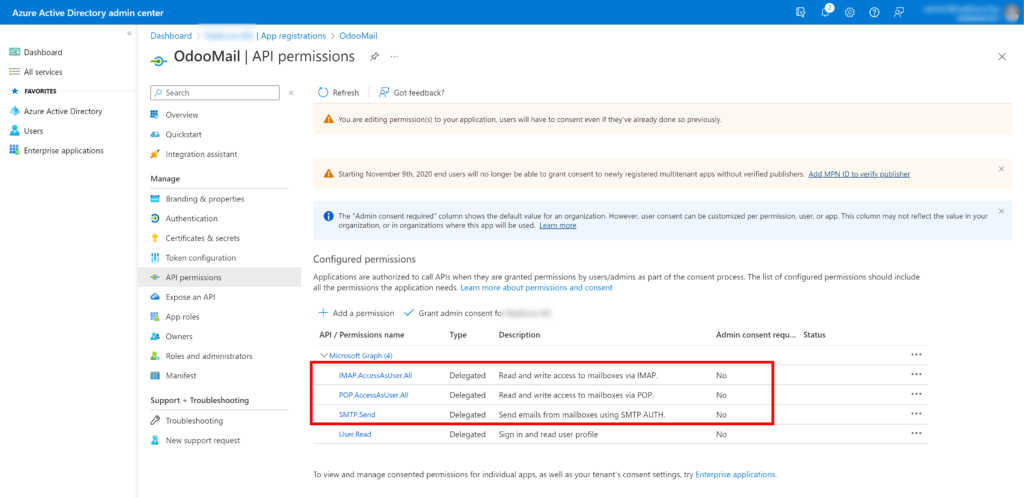
- Then we should give the app special permissions. For this go to the “App permissions” and click “Add a permission”.
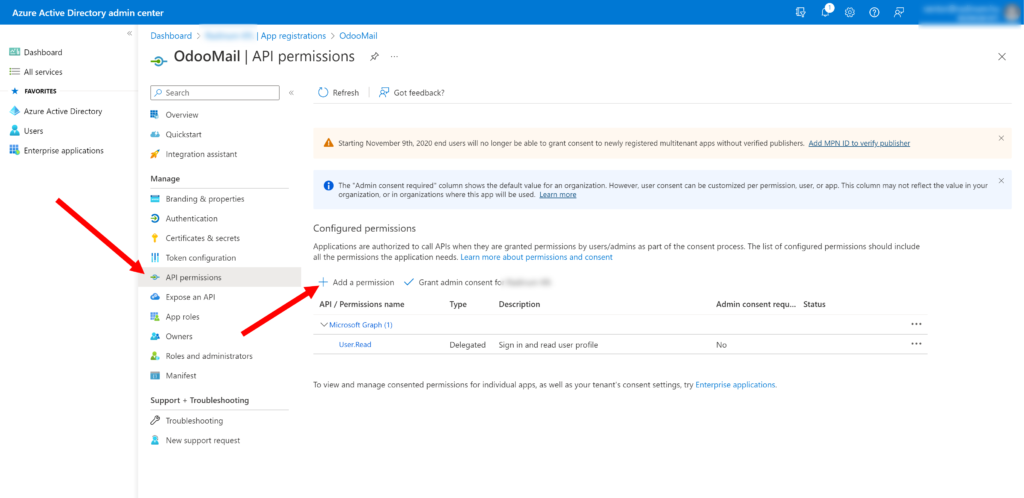
- In the form go to the “Microsoft APIs” tab and click “Microsoft Graph”.
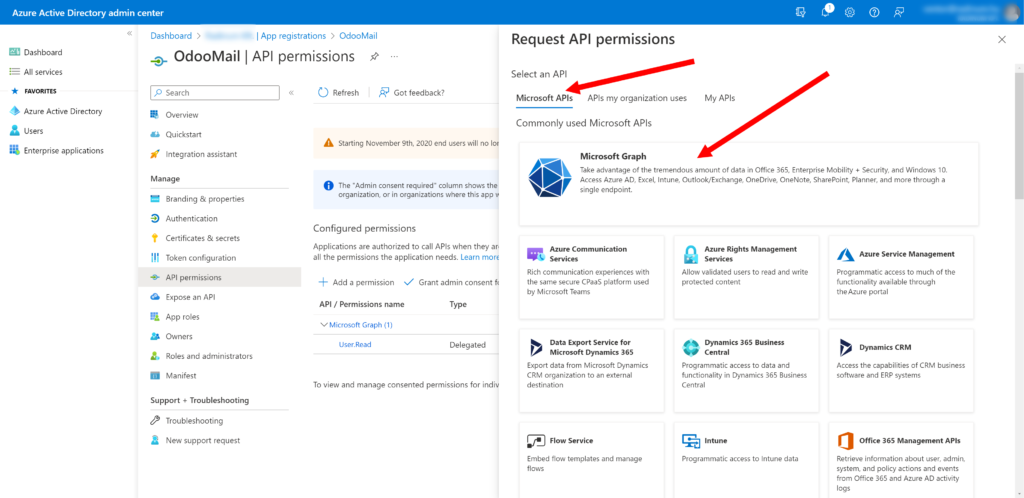
- After that choose “Delegated permissions”, find and check “SMTP.Send”, “IMAP.AccessAsUser.All”, “IMAP.AccessAsUser.All” and then click “Add permissions”.
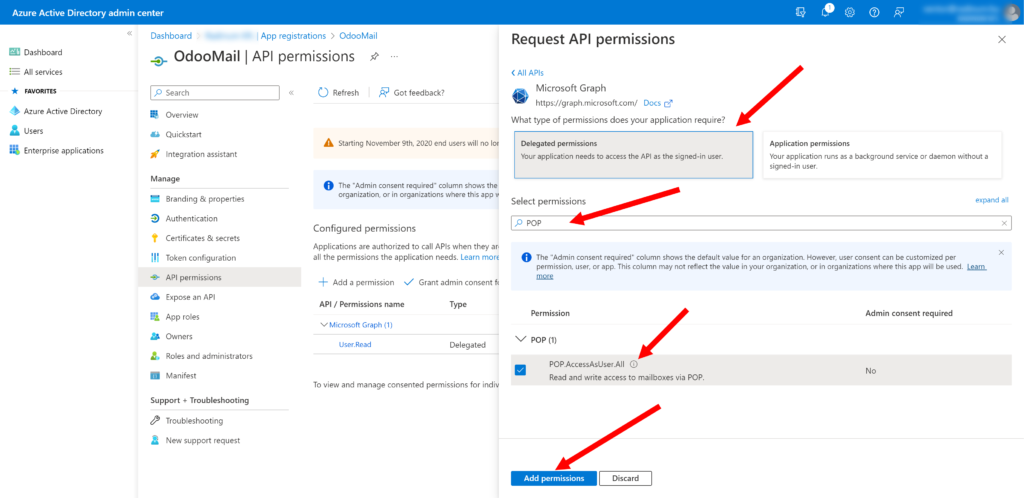
As a result we will see the same as in the example below.
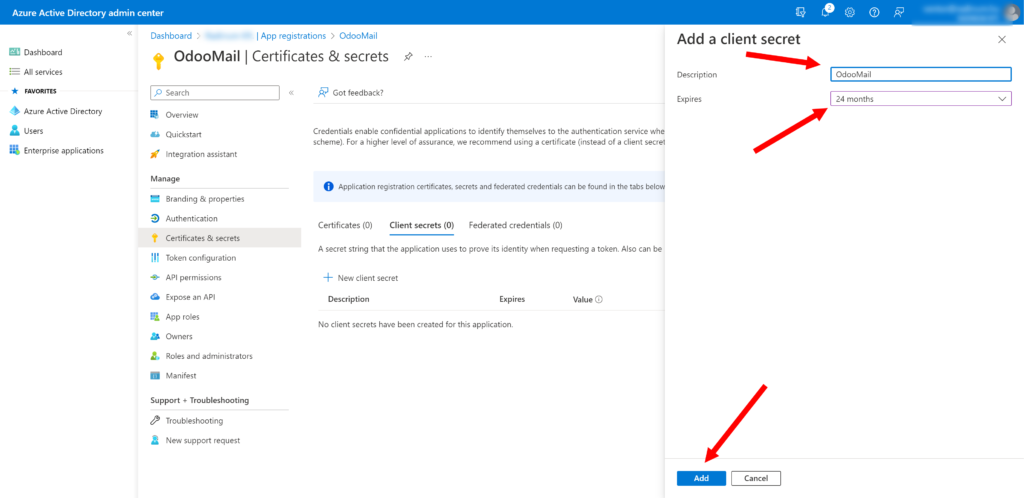
- Now we should create the app secret key. For this go to “Certificates & secrets”, choose the “Client secrets” tab and click “New client secrets”.
- Enter the following values in the fields and click “Add”:
- Description = “OdooMail” (you can use any you want)
- Expiries = Choose any secret expires you want
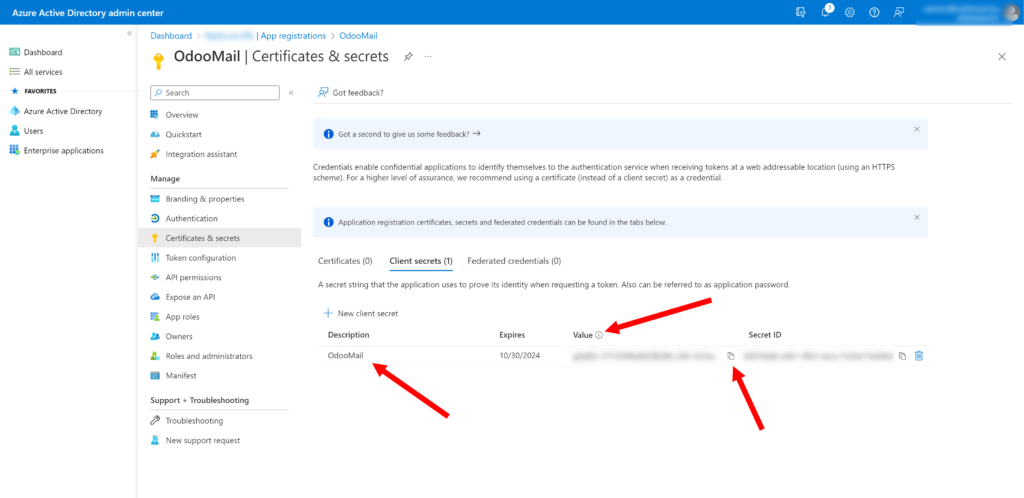
As a result we will see the same as in the example below. Be sure to copy and save the “Value” of the created “Client secret”, it will be required in configuring of a connection to Catchall mailbox from Odoo.
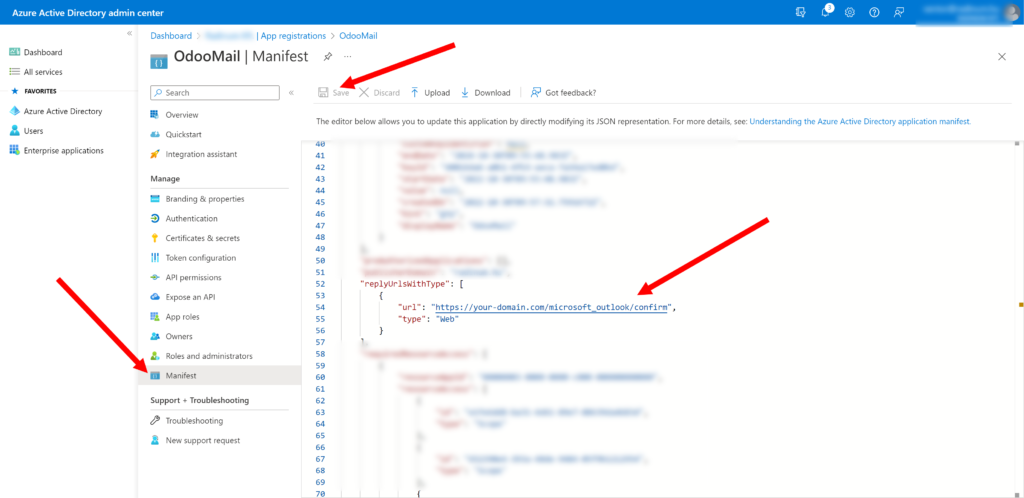
Note. If the domain of your odoo instance was changed you should update “Redirect URL” as shown below.
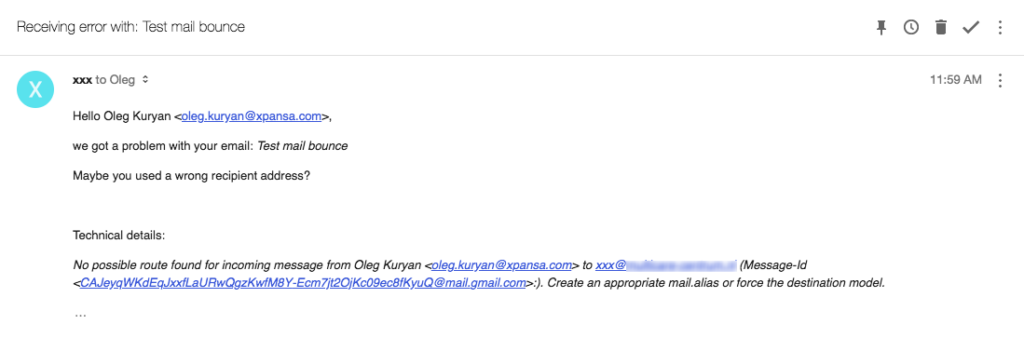
Installing Odoo module to inform users that they used the wrong email
In the previous steps, we have configured Office 365 so it will accept all emails sent to a specific domain, even if those email addresses don’t exist. This means users will not even know that they made a mistake and used the wrong email address. For that purpose you need to perform the following steps:
- You need to install this module https://www.odoo.com/apps/modules/15.0/fetchmail_notify_error_to_sender/ At the moment of writing this module is available only for Odoo 9-15. If you need this module with other versions, please let us know.
- After installing this module, when some user is sending an email to some mail address that does not exist in Office 365 and does not exist in Odoo ERP (no objects are associated with it), then he will receive the message below automatically.
Configuring Outgoing Mail Server in Odoo
Outgoing mail server is needed to allow Odoo to send messages and notifications to mailboxes of recipients that are inside and outside Odoo. Below are the steps needed to make this configuration and health check.
Configuring of Odoo Outgoing connection
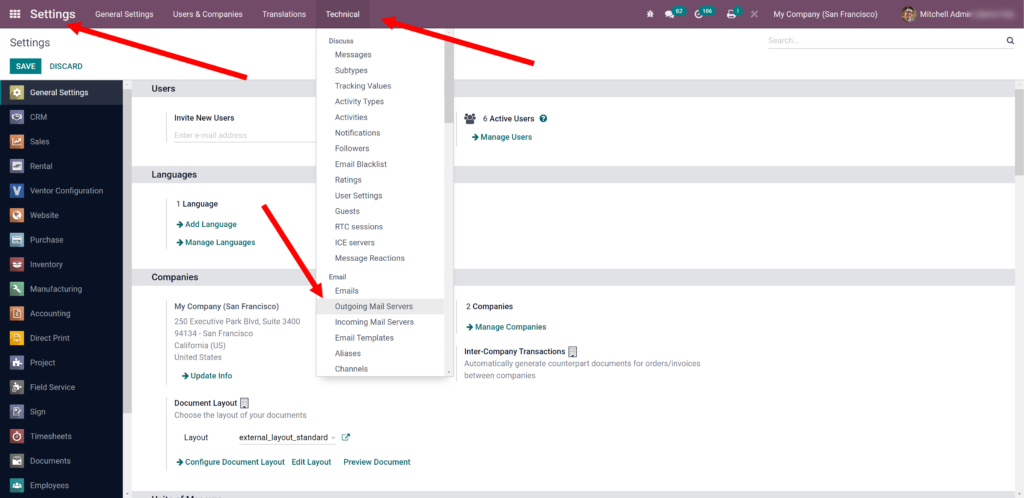
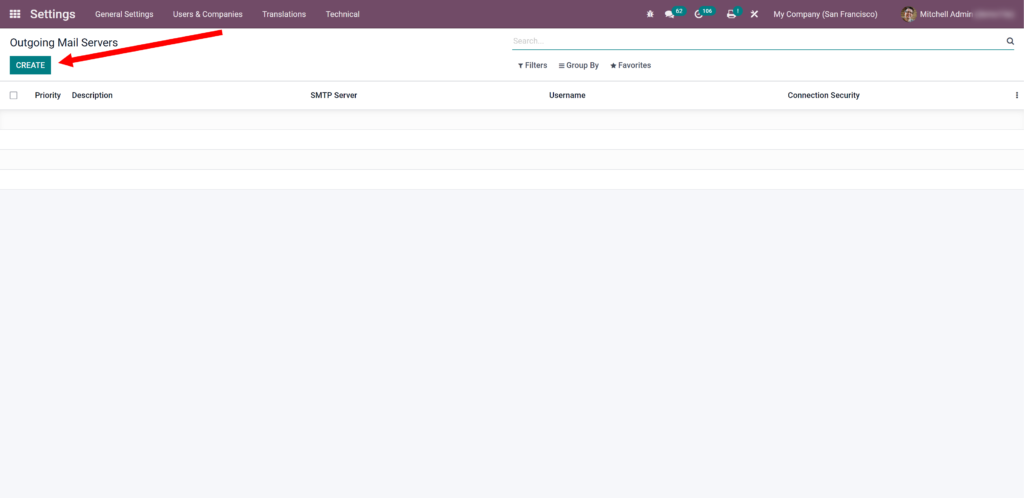
- Login as Administrator in Odoo ERP, enter the Debug mode and go to “Settings -> Technical -> Outgoing Mail Servers”. Either select an existing one (to modify it) or click “Create” to create a new one.
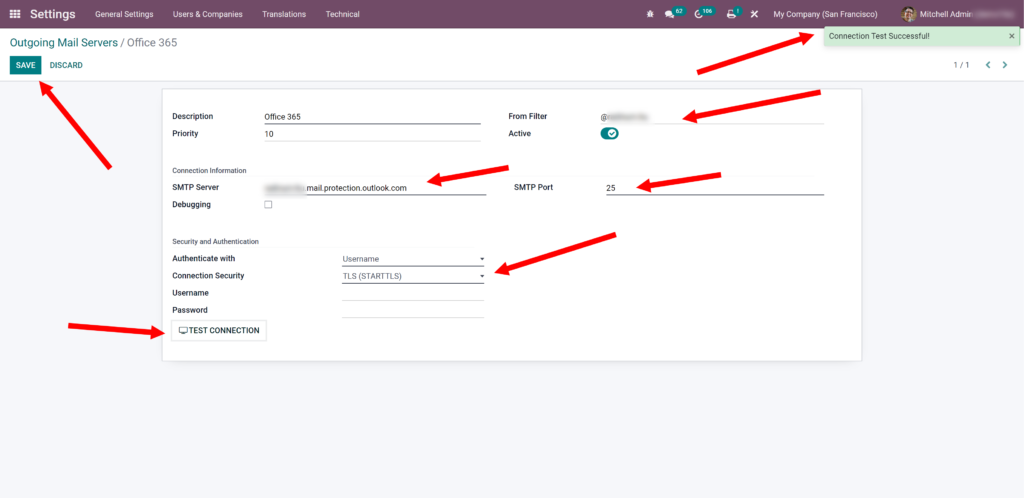
- Then you need to enter the following values, click at “Test Connection” and save settings:
- Description = “Office 365”
- SMTP Server = MX value from DNS records of your mail domain (see here)
- Port = “25”
- Connection Security = “TLS (STARTSSL)”
- From Filter = “@your-domain.com” – it is needed to send messages with sender which has any alias and your mail domain but in case other domain will be used default sender alias (work since Odoo v15)
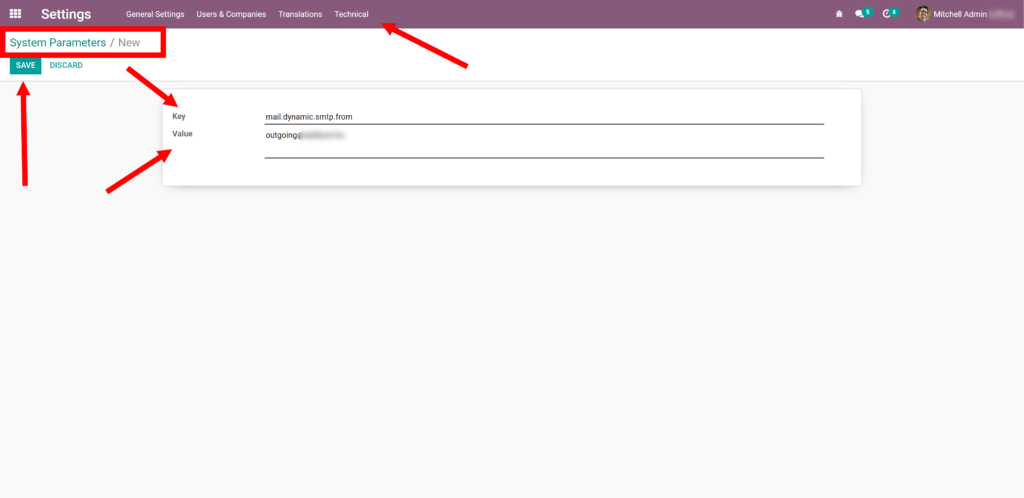
To use analog “From Filter” field in Odoo below v15 you should use the key mail.dynamic.smtp.from and set the value as the email address that should be used in those cases as shown below, for example such as [email protected] (documentation).
Testing of Outgoing Mail Server in Odoo
- Go to your user settings and set “Email” which will contain your mail domain. You can see example below:

- After that, go to any unnecessary contact, set “Email” on which you can receive a message. Then click “Send message”, fill in any text message and click “Send” (before sending make sure that contact is a follower of the current chat).

- Then go to the recipient mailbox and check inbox messages. One of them has to be received from Odoo ERR like at example below.

Configuring Incoming Mail Server in Odoo
Incoming mail server is needed to allow Odoo to scan some particular mailboxes for new emails. And depending on the “To” address, it can create new objects like Leads, Tasks and more (or add messages to existing objects). Below are the steps needed to make this configuration and health check.
Configuring of Odoo Incoming connection
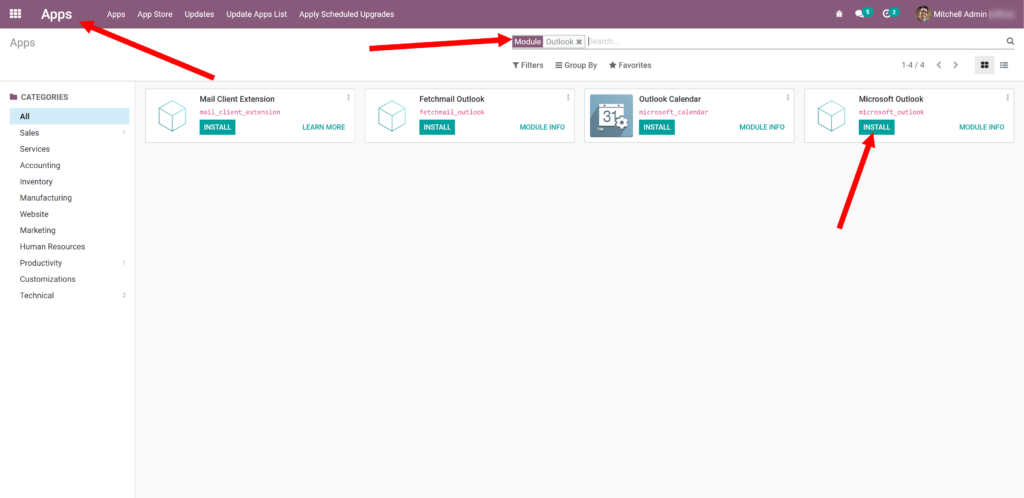
- Login as Administrator in Odoo ERP, go to the “Apps” menu, find the “Microsoft Outlook” app and click “Install”.
- Then go to “Settings -> General Settings -> Discuss”, enter the following values and click “Save”:
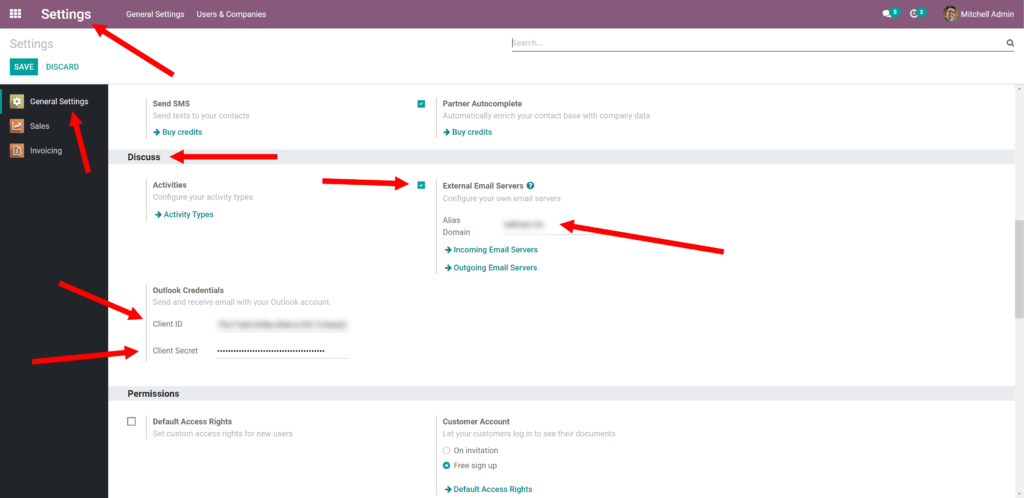
If your Odoo version is v17 you should add Alias Domain in the next way:
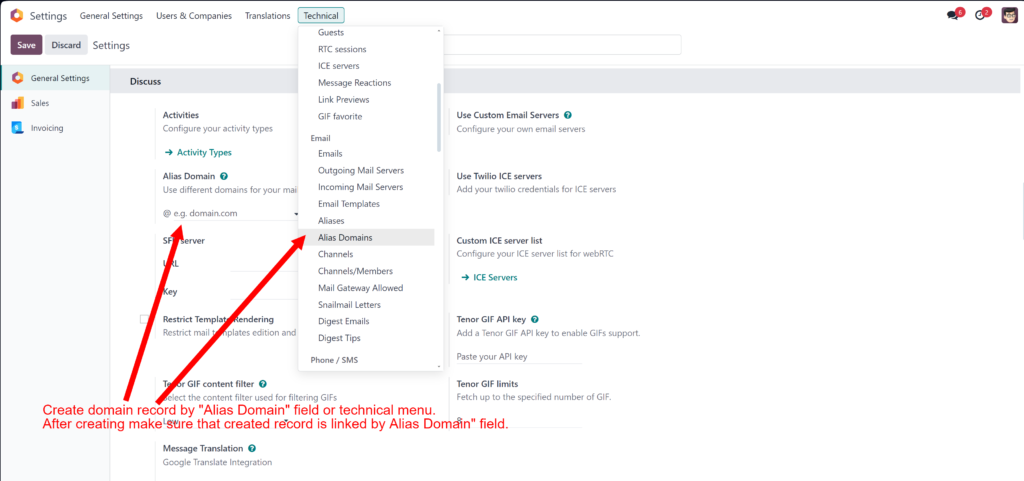
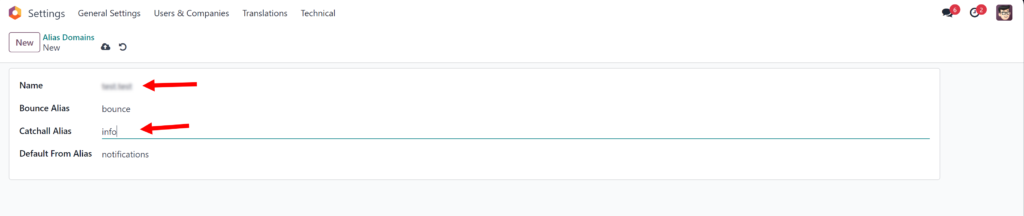
- Name – this parameter should have your-domain.com
- Catchall Alias – enter here part of the email previously configured. For example “info” in case you have previously configured the email [email protected]
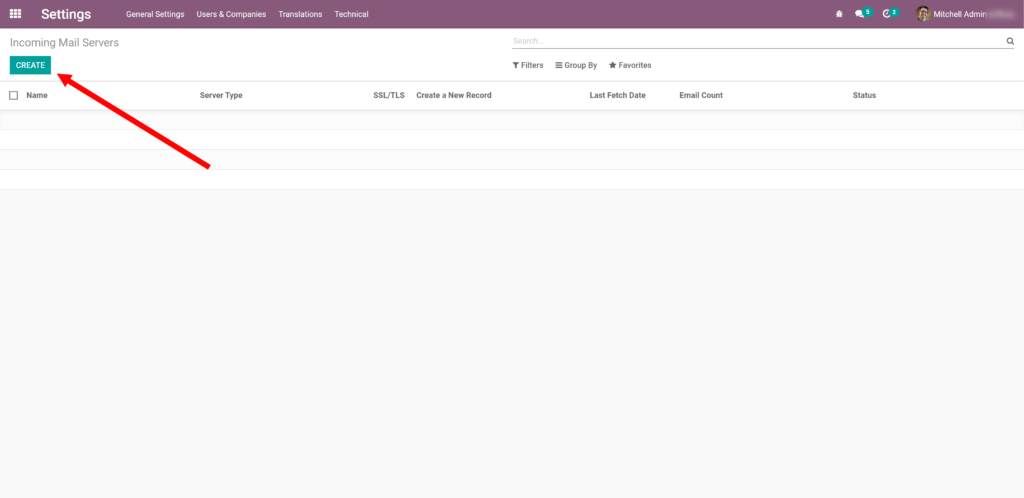
- After that go to “Settings -> Technical -> Incoming Mail Servers”. Either select an existing one (to modify it) or click “Create” to create a new one.

- Now enter the following values and click “Connect your Outlook account”:
- Name = “Office 365”
- Server Type = “IMAP”
- Outlook = Selected
- Username = [email protected] (Catchall mailbox)
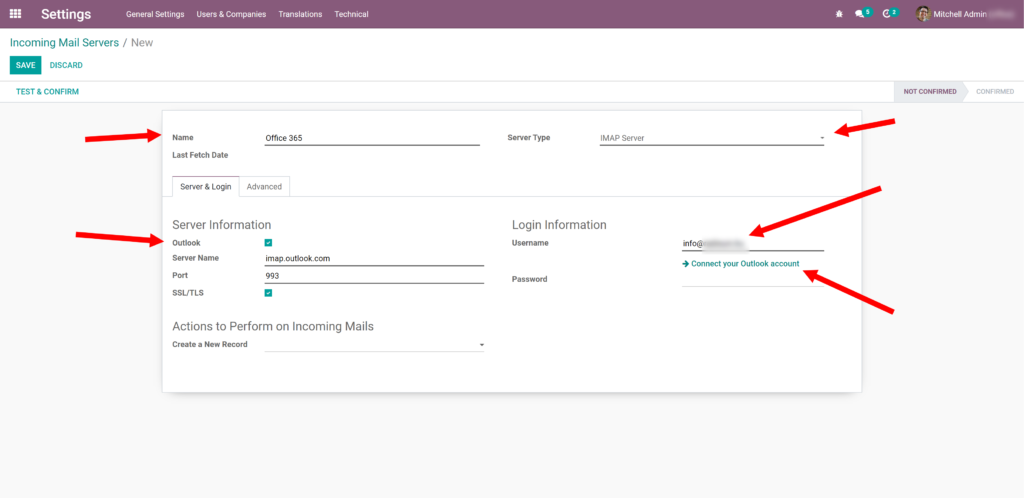
- Then “Login” by your Catchall mailbox user.

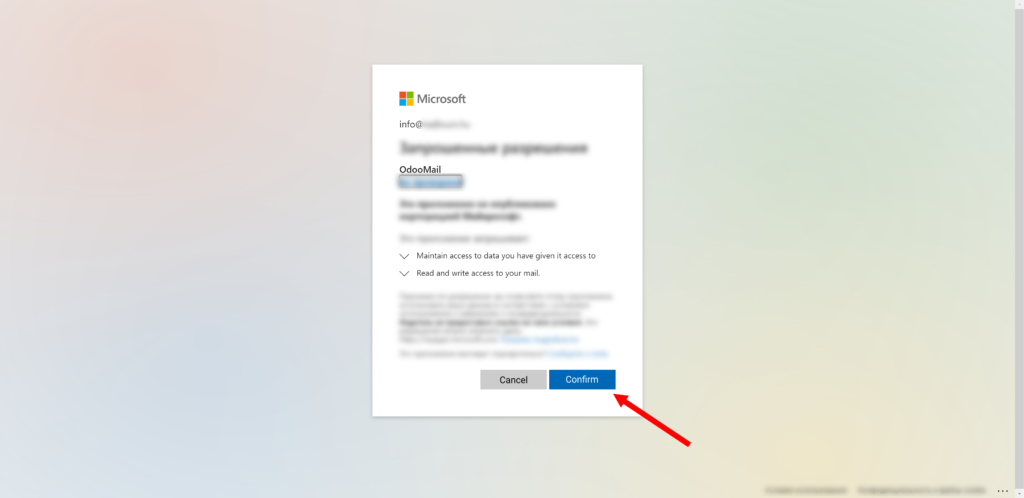
- As a result you will see that Odoo ERP got a Valid Outlook Token. So next click “Test & Confirm”.
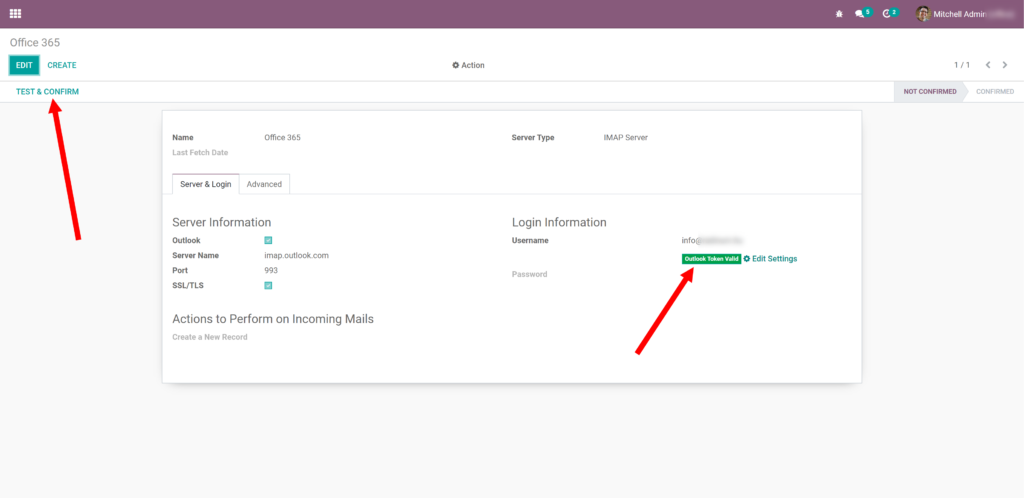
As you can see, the connection to the Catchall mailbox was successful.
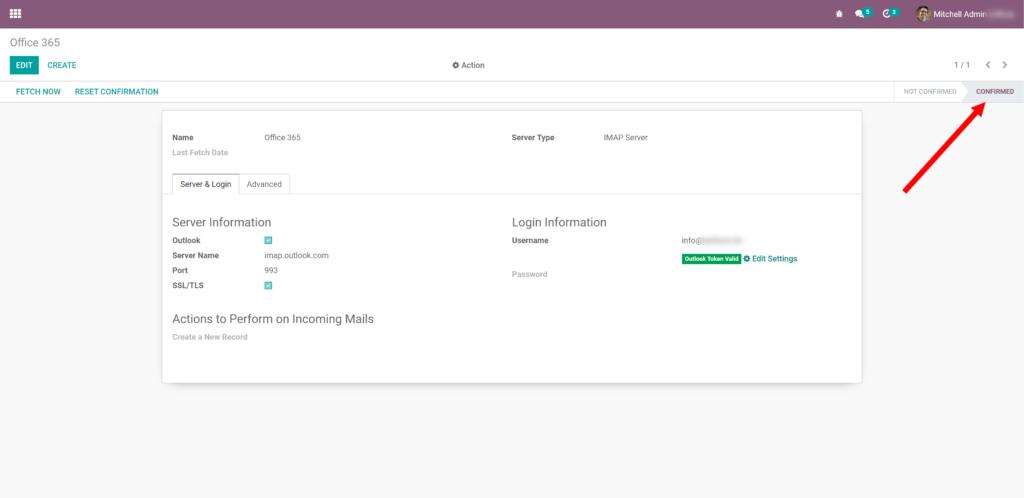
- Check that on “Advanced” Tab you have set field “Error notice template” to the value “Fetchmail – error notice”. Or in other case, when user will send email to nonexistent mailbox that cannot be processed by Odoo – he will not get error message about it.
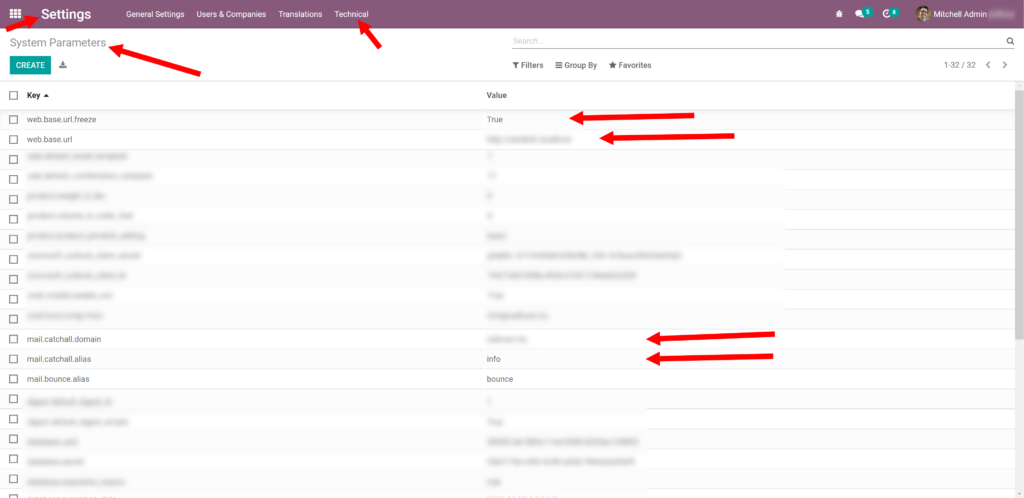
- Then go to the menu “Settings -> Technical -> System Parameters”. And make sure that the properties below are set up correctly:
- web.base.url – should be equal to the URL of your Odoo instance. It is needed in order to include a proper URL in all your emails
- web.base.url.freeze – we recommend to add this parameter also with the value “True”. Odoo ERP’s default behavior on login of administrative user is to replace web.base.url parameter with the current url used by the admin. In most cases it is not desired behavior and we want to preserve the URL we have added
- These settings should be checked if Odoo version is less than v17:
- mail.catchall.domain – this parameter should have your-domain.com
- mail.catchall.alias – enter here part of the email previously configured. For example “info” in case you have previously configured the email [email protected]
Testing of Incoming Mail Server in Odoo
- As Administrator or any powerful user go to menu “CRM -> Sales -> Teams” and open any team’s configuration. On the sales team details, enter the following data:
- Email Alias = “sales” (you can enter any)
- Accept Emails From = “Everyone”
- Team Members – add some real users with real email addresses
- Followers (in the chatter, optional) – add users that should automatically receive mail notifications when a new lead is coming.

- Now send something from your personal email address to the mail address specified in Sales Team. Wait for at least 5 minutes. That is the period that Odoo is configured by standard to download incoming mails.
- Now go to menu “CRM -> Pipeline” and You will see that a new Opportunity was automatically created from the incoming email with the name which is the same with email subject. If you already configured Outgoing Mail Server you can start conversation by chatter from this Opportunity.

Bingo! You are done with your configuration of Office 365 and Odoo ERP.
If you think that this article is helpful, please, share it on social networks. Sharing Icons are
available below the article. Subscribe to our newsletter and follow Ventor.tech twitter to be kept up to date.
If you need help in configuring your Office 365 properly with Odoo ERP or found some issues / mistakes in the article, please leave your comments down below. We will be happy to assist.
Need help with your Office 365 or other Odoo integrations?

Working in IT industry full time since 2006 (as technical and functional expert)
Leading IT teams (technical and non-technical) since 2007
Lots of experience with ERP systems covering different company sizes (Oracle, Odoo)
Co-founded 2 startups (since 2010) before ending up working in business automation. Having 3 publications in Life Science
Since 2012 focusing on business automation using Odoo ERP. Is recognized as well-known expert
Working with customers across the globe (mostly NA, EMEA)
Having huge experience in Finance (managerial accounting) and Supply Chain (Logistics, Inventory, Purchase)
Passionate about creating new IT products. Having high demands to product's quality and level of customer support
Visioner and inventor in the VentorTech company.
----------------------------------------------------------------------
Education: Master.
----------------------------------------------------------------------
Experience:
Software Maintenance Team Leader
EPAM Systems
Co-founder
Boostant
СTO, Co-founder
XPANSA Group
----------------------------------------------------------------------
Current position: CEO & COO at VentorTech
----------------------------------------------------------------------
Since 2012 focusing on business automation using Odoo ERP. Is recognized as a well-known expert
- Working with customers across the globe (mostly NA, EMEA)
- Having a huge experience in Finance (managerial accounting) and Supply Chain (Logistics, Inventory, Purchase)

1+ year of Odoo development experience
3+ years of ensuring electromagnetic compatibility for electric networks
Main skill: Python, JS, SQL, Odoo, Email Flow, S3, Redis, RabbitMQ

59 Comments
Miku
Thanks for the good article.
"And obviously when you respond to the person through Odoo CRM, your lead will also see that email is coming from [email protected] instead of some generic email [email protected]."
In my opinion this is complete malarkey. So, a state official sends an email to our Odoo with something like [email protected], and Odoo S.A. thinks it's okay that we will relay it using our own Office account?? There's a very good reason why we have such technologies as SPF, DKIM and DMARC; prevention of spam and fraud, and other unauthorized email. If you go through your own email, you will notice that services such as
- GitLab
- GitHub
- Zendesk
- Google Issue Tracker
and a number of other services _DO NOT CLAIM TO BE THE ORIGINAL SENDER_ in the emails they send. For instance, GitHub conversations will be sent from the address "GitHub Username ".
We stopped using Office365 emails for our clients because a few clients had a high spam rate in outgoing mails sent by Odoo, even though all the settings and DNS configurations were properly set.
Our default configuration contains a module that can be used to set a static Sender address, static From address, static Reply-To address and now even create an alias for every thread. The latter feature was developed because some email clients (read: some versions of Outlook for Windows) don't preserve the headers that Odoo includes in the emails. But luckily even those email clients respect the Reply-To address, so we can add the custom autogenerated email alias to every message. We will most likely contribute this module to some OCA repository.
So, whenever we send email from Odoo with that module installed and properly configured, the headers will be:
From: Original Sender
Reply-To: Original Sender
Oleg Kuryan
Hi Mikko,
As a technical person I absolutely agree with everything you are saying. Many years ago I was studying how emails are working and was VERY surprised after I saw code on how Odoo works. I was very curious - why we are still not in SPAM. I was hating an idea that company mail server will be acting as a relay server sending emails from unknown mails. I was very worried at this moment about this topic and even used to install special modules for Odoo to stop using Odoo as relay server
Here is this module
It is very easy fix that replaces FROM header in all outgoing mails always to be equal to SMTP username of the outgoing mail server.
Here is code that is added to standard Odoo
I guess some similar fixes you have in your internal setup. Moreover, internally obviously I tried many other ways including dedicated mail addresses for various mail threads and etc. (like you mentioned)
I started digging deeper and found out that it is POSSIBLE setup. And even such providers as Office 365 and Google Apps allows this setup. One limitations I know is that Google is not allowing to relay addresses with "@*.ru". Also hotmail has more strict SPF policy and sometimes mails are not passing.
Moreover, other transactional services like MailGun can be used for this to avoid using your own mail server for this purpose. Moreover, I recommend to use them rather than your own Google Apps or Office 365. Just to be 100% on safe side.
Also just to finish this technical discussion, as far as I know from here SPF FAQ , SPF protection was designed only to verify the Return-Path/Sender/Bounce/Envelope-from of an email (at the SMTP transaction level), and not "From" header of an email.
That is why still this setup (as relay server) is working fine even in current modern world.
So from TECHNICAL point of view I agree with you that this article is not 100% reliable solution, cause it more relies on standard Odoo mechanism that is not perfect.
Moreover, as you indicated - some mail clients (again Microsoft =) ) do not appropriately handle mails from Odoo when we reply to them.
An easy fix for Odoo will be that emails will be from single email address (so will be like FROM: "Oleg Kuryan via Odoo". That can be done with module I mentioned above.
But let's now look at this solution from END USER point of view. Such setup really irritates business users. For example, because gmail is saving address "[email protected]" under some name like "Your Company" in your address book, it will display all your mails as from "Your Company" and not from individual users (Gmail Web interface just ignores From header and displays mail like it is in address book). And that really irritates sales people who stop understanding who they get mails from. I got such situation in my company before, so I know what I'm talking about. =)
Even better solution will be github like solution. Means every partner in Odoo will get his own alias (like [email protected]). And such aliases will be generated for every partners in unique way. If Odoo will support such setup - that will be much better. AFAIK, there is no such solution in Odoo world yet. We were not planning to work on such solution, but if you are ok with it - we can collaborate on this to provide to the Odoo world such a solution.
By the way - mailing setup is VERY interesting topic. It is even actively discussed by Odoo themselves. Many mail threads, but here is latest https://github.com/odoo/odoo/pull/20911
Note, that this article was created to provide instructions on setting up email + Odoo in a way Odoo S.A. designed it by standard.
Will be happy to communicate about it further as this is very interesting topic to me.
Dhaval
Mail Delivery Failed
Mail delivery failed via SMTP server 'None'.
SMTPRecipientsRefused: {'[email protected]': (550, b'5.7.64 TenantAttribution; Relay Access Denied [xxxxxxxxxxxx.prod.protection.outlook.com]')}
Oleg Kuryan
Hello Dvahal,
That usually means that you haven't properly configured your Office365
Follow step by step section "Configuring Outgoing mail Server in Office 365 as Relay Server". Most likely you haven't put proper IP address of your server at the last step.
cesar
hey man, did you fixed that problem? im having the same one
Jade Chen
Thanks for the good article.
Today we implemented all the steps to configure the "Relay Server", with some exceptions:
(1) The "[email protected]" account is assigned with an "Office 365 Business Essential" license instead of "Business Premium". It seemed Business Essential license is the minimum subscription level which IMAP access is granted. Not sure nor tested if POP will work in this case.
(2) We have 3 domains configured at the same Office365 tenant, e.g.
-- Tenant-X.onmicrosoft.com
-- Company-X.com (This is the "default domain")
-- Company-Y.com
We configured the "ERP account", the "CatchAll Rule" and "Internal Relay " ...etc., all with the domain name "Company-Y.com".
At the step setting the domain type to be an “Internal Relay”, the "Make this the default domain" checkbox is grey-out (because Company-X.com is the default domain).
We did NOT install the "Odoo module to inform users that they used the wrong email".
The result is -- it does CatchAll, but seems not Relaying -- all the incoming and outgoing emails from both domains Company-X.com and Company-Y.com are caught to "[email protected]", but not further relayed to the email's recipients. The same occurs to the emails from third-party email providers such as "[email protected]".
Oleg Kuryan
Hello Jade,
Most likely here is the question how you configured Exceptions. I mean:
Carlo
Hi,
After following your guide I get “timed out” error when testing smtp server. Odoo 10 is running on vm in the cloud and outband port 25 is allowed in vm and cloud networking rules.
What else can I check?
Thanks,
Carlo
Oleg Kuryan
Hi Carlo,
First thing you need to check if connection to your host:port is allowed via TLS from your VM.
I just found very quickly by googling this article on how to do that https://halon.io/blog/how-to-test-smtp-servers-using-the-command-line/
SO that is first you need to check
sandi
I got this error on my Odoo . Can you advise what need to be fixed.
Mail Delivery Failed
Mail delivery failed via SMTP server 'xxxxxxxxxxxxx.mail.protection.outlook.com'.
SMTPRecipientsRefused: {'[email protected]': (550, '5.7.64 TenantAttribution; Relay Access Denied [xxxxxxxxxxxxxxx.prod.protection.outlook.com]')}
Oleg Kuryan
Hello Sandi,
That usually means that you haven't properly configured your Office365
Follow step by step section "Configuring Outgoing mail Server in Office 365 as Relay Server". Most likely you haven't put proper IP address of your server at the last step.
Yousskill
Hello,
I did exactly what the Tutorial said, but in the end, i got this message from Odoo server error:
--------------------------
The server refused the sender address (******@******.com) with error b'5.5.2 Send hello first [DB5EUR03FT008.eop-EUR03.prod.protection.outlook.com]'
----------------------------
When i debugged in odoo python code, i found that the catched smtp error code is 503
I searched for what it means, they said that the two most common causes of this error are:
-Your email server requires you to check email first before sending email. (Checking email first is one way -your email provider manages the security of your email account.)
-Your email client isn’t set up for SMTP Authentication.
Can you help me please, i couldn't figure it out.
Lukas
Hi there,
I am having the same problem. It seems to be an issue with the way Odoo communicates with the mail server.
By searching with the error, I found out that error iusually occurs when the HELO or EHLO message is not send at the right time or when the other one is needed.
Does somebody know a way to fix this?
Guest
Thanks for one's marvelous posting! I truly enjoyed reading it, you are a great author.I will remember to bookmardk your blog and will eventually come back sometime soon. I
want to encourage you to coninue your greazt writing, have a nice evening!
Marco Antonio
Hi! How do I know which version do I have? Accordin to this:
According to official Odoo documentation, You can use an Office 365 server if you run Odoo on-premise. Office 365 SMTP relays are not compatible with Odoo Online.
I have Odoo 12.0e+ Enterprise
https://able2know.org/user/loganbourne/
Hey there! Do you use Twitter? I'd like to follow yoou if that woulld be ok.
I'm definnitely enjoying your blog and look forward to new
updates.
Vasili Puntus
Yes, follow us on https://twitter.com/ventor_tech
Hélio DBT
Not working for me... Emails not sent, neither being received by Odoo.
Any other solution? Any other URL to look up for?
VECTOR ART GRAPHIC DESIGN
Here you will get to know about how to configure email to work with office 365 and odoo.It is a pleasure worth reading it. Great blog indeed, will visit again in the future to read more about it. I am sure many people will come to read this in the future.
Martin Borg
Hi - thanks for the article. I followed the instructions in your article for the Outbound e-mail, on Odoo Community edition V13.0. However, when I try to test the connection (with SMTP Server set to the MXTOOLBOX outlook.com record) I get this error: "Connection Test Failed! Here is what we got instead: SMTP AUTH extension not supported by server." Sending an invitation e-mail gets pretty much the asme error... "Something went wrong ! SMTP AUTH extension not supported by server." This is only using port 25. Port 587 fails with a timeout.
If I change the server to smtp.office365.com, using either port 25 or port 587, the test Connection actually succeeds with "Everything seems properly set up!" message. However, when I then try to send a message to a new user, an invitation e-mail, I get the following message:
"Mail delivery failed via SMTP server 'None'.
SMTPDataError: 554
5.2.0 STOREDRV.Submission.Exception:SendAsDeniedException.MapiExceptionSendAsDenied; Failed to process message due to a permanent exception with message Cannot submit message. "
Followed by a long string of text which I have truncated, mostly hexadecimal characters.
I have been over the instructions again and again and I can't see how I could have missed anything. So:
a) Does this method still work according to you; and
b) Would you suggest something based on the errors I am receiving please?
Many thanks!
Oleg Kuryan
Hello Martin,
Yes, article is valid. Just last week I did configuration both for Incoming and Outgoing Mails for one of our customers using this article on v13
From what I see from error most likely on Outgoing Mail Server (in Odoo) you have added username and password. But you should leave them empty. Because you allowed your Odoo instance to send emails to Office365 without password in earlier steps (when you added IP of your server to Office 365 configuration)
Martin Borg
Thanks Oleg - you are right, I did enter a username and password (your article said it was not necessary but it was there already when I read the article and I thought no harm could come of it.
I removed them now. When Testing Connection I get a different error now: "Something went wrong ! The server refused the sender address ([email protected]) with error b'5.7.57 SMTP; Client was not authenticated to send anonymous mail during MAIL FROM [xxxxxxxxxxxxx.eurprd03.prod.outlook.com]'.
Were the steps above perhaps not enough to allow the sending of anonymous e-mails?
Many thanks
Martin.
Martin Borg
Also, sending a new user invitation e-mail throws Odoo error:
Odoo Server Error
Traceback (most recent call last):
File "/opt/odoo/odoo-13.0-pro/odoo/addons/base/models/ir_mail_server.py", line 526, in send_email
smtp.sendmail(smtp_from, smtp_to_list, message.as_string())
File "/usr/lib/python3.6/smtplib.py", line 867, in sendmail
raise SMTPSenderRefused(code, resp, from_addr)
smtplib.SMTPSenderRefused: (530, b'5.7.57 SMTP; Client was not authenticated to send anonymous mail during MAIL FROM [FR2P281CA0036.DEUP281.PROD.OUTLOOK.COM]', '[email protected]')
During handling of the above exception, another exception occurred:
Oleg Kuryan
Martin, this message means that you haven't properly setted up IP address of the server that is allowed to send email. As described in article.
Or you are trying to setup Office 365 with odoo.sh or Odoo Online due to how Odoo designed them. Note that it is officially not supported, so you can do nothing about it.
Martin Borg
Never mind my previous replies, Oleg.
I realised that in the course of various tests I had changed the SMTP server back to smtp.office365.com, now I have it back to the MXToolbox obtained xxxxx.outlook.com server, and it works - it works very well indeed, and the e-mails appear to be coming from the e-mail address configured for the company having Odoo.
I realise now that this is "Direct Send", it does not "Send As" anyone in the Office 365 organisation, and therefore the e-mails sent are not going into the "Sent Items' Folder of any mailbox, which may not always be desirable. Now, this may be overlooked if there was anywhere in Odoo from where I could see all e-mails sent from Odoo, but I am not sure this is the case.
Also not sure how user will be notified if e-mail is not sent successfully, but I suppose I will have to install "Fetchmail Notify Error to Sender Test" which now exists for V13, and see how that works out.
Are there not security concerns in having Office 365 open like that, accepting e-mails from literally anyone as long as the message comes from that IP address? Could that not open me up to spoofing, and potentially spamming using my IP address?
Thanks
M
Oleg Kuryan
Hi Martin,
As long as you have admin who takes care of security of your Odoo server, you should not be worried.
Martin Borg
Thank you Oleg, appreciate all your help, very eye-opening. Also thanks to Miku above - very informative post - will certainly help us decide how to go forward on this.
Many thanks!
Peter
Hi, I follow the instructions, I just want my users to send emails (no INBOUND), Do I need the catchall?
Do I need to update my dns records to my public IP?
The error I receive is this one:
Traceback (most recent call last):
File "/usr/lib/python3/dist-packages/odoo/addons/mail/models/mail_mail.py", line 357, in _send
msg, mail_server_id=mail.mail_server_id.id, smtp_session=smtp_session)
File "/usr/lib/python3/dist-packages/odoo/addons/base/ir/ir_mail_server.py", line 484, in send_email
raise MailDeliveryException(_("Mail Delivery Failed"), msg)
odoo.addons.base.ir.ir_mail_server.MailDeliveryException: ('Mail Delivery Failed', "Mail delivery failed via SMTP server 'None'.\nSMTPRecipientsRefused: {'[email protected]': (550, b'5.7.606 Access denied, banned sending IP [MY-PUB-IP]. To request removal from this list please visit https://sender.office.com/ and follow the directions. For more information please go to http://go.microsoft.com/fwlink/?LinkID=526655 AS(1430) [BN8NAM11FT016.eop-nam11.prod.protection.outlook.com]')}")
Any recommendation welcome, Odoo11, regards!!!
Oleg Kuryan
Hi Peter,
I think the only thing you can do is follow instructions from error message:
(550, b’5.7.606 Access denied, banned sending IP [MY-PUB-IP]. To request removal from this list please visit https://sender.office.com/ and follow the directions. For more information please go to http://go.microsoft.com/fwlink/?LinkID=526655 AS(1430)
Louis
Hi Oleg,
Thanks for this well-written article. I followed your instructions and everything seems to be working except sending email from odoo outside my main domain. For instance, my company domain is AAA.com and office350 doesn't have issues delivering emails to AAA.com but it can not send emails to "gmail.com" or any other domain except AAA.com. This is what I'm getting: Unknown error: Mail Delivery Failed Mail delivery failed via SMTP server 'None'. SMTPDataError: ip here Relay Access Denied ATTR36.
Any thoughts?
Thanks in adavance.
Oleg Kuryan
Very strange error. But in general it seems that you may not properly setted up mail server in Odoo. In General Settings have you enabled checkbox "External Mail Server" and have you written domain name for your emails ? By default it is empty.
Louis
Thanks Oleg, I just got enabled "External Mail Server" and now I can send emails to any domain.
Thanks again, you saved my day.
Sean McCarthy
Hi there,
Thanks a lot for the excellent tutorial. I followed the tutorial completely, and was able to get the outgoing emails to work (i.e. sending an email from Odoo to myself), but I wasn’t able to get the inbound emails to work.
After I clicked the “Test & Confirm” button for setting up inbound email, it says "User Error - Server replied with the following exception: LOGIN failed". I followed every single step in your tutorial. I even went back to the beginning and verified everything a second time.
I logged in and checked my email for the [email protected] email address I setup, so the username and password are fine, and multi-factor authentication is disabled for that email address as well. I also sent emails to [email protected] from both internal and external email addresses, and both worked, so it’s not a problem with the Office 365 account.
I then tried your Odoo v13 add-on, and it didn’t show up in the “advanced” tab, so I assume it just doesn’t work yet for Odoo v14.
Thanks a lot,
Sean
Sean McCarthy
Eventually (but not yet) Microsoft will be disabling basic/legacy authentication, which they said on March 7, 2018 that they would do by October 13, 2020, but it hasn't happened yet...
https://www.vansurksum.com/2020/03/01/microsoft-is-going-to-disable-basic-legacy-authentication-for-exchange-online-what-does-that-actually-mean-and-does-that-impact-me/
Either that or our Office 365 account has basic/legacy authentication disabled in our security defaults.
https://docs.microsoft.com/en-us/azure/active-directory/fundamentals/concept-fundamentals-security-defaults
In Thunderbird, to receive emails with [email protected], I have to use OAuth2 and I enter my email password in a popup window. Normal authentication with a regular password won't work for Office 365 accounts.
Ivan
Thank you very much for the information in the article. Is there a way to use it with Odoo.sh? Maybe putting the IP of companydomain.odoo.com as a verify allowed senders by IP address?
Angela Hamilton
Oleg, Thank you for all of the great information. Can you please confirm for me that this will work with Odoo.Sh V12? Thank you very much!
Angela Hamilton
Oleg, Thank you for all of the great information. Are you able to confirm for me that this will work with Odoo.Sh V12? Thank you very much!
Oleg Kuryan
Angela,
Most likely this will not work both for odoo.sh and for Odoo online because of some technical specifics of their setup.
Felipe
Hello,
I was looking at the post and implemented it, it works very well.
but now i have 3 odoo v12 community instances, so now it doesn't work properly.
How can i make it work using the same license office365 [email protected]?
Felipe
I was looking at the post and implemented it, it works very well.
but now i have 3 odoo v12 community instances, so now it doesn't work properly.
How can i make it work using the same license office365 [email protected]?
chals
Hi Oleg, thanks for the tutorial!
Do you know if it will work with the basic / legacy authentication disabled? newer 365 servers come with a default setting that I prefer not to touch ... and in that default setting, basic / legacy authentication is disabled.
Carlos
Would this work with odoo.sh v14?
Alejandra
Hola Oleg hicimos toda la configuración tal como figura en la guía y al querer configurar el correo saliente en Odoo V15 nos da el siguiente error:
Error de usuario
El servidor no es compatible con una opción:
None
Que puede estar pasando?
Kunal Goel
Hi
The above setup was very helpful and worked wonderfully with Odoo Enterprise On-premise. But we have now shifted to Odoo.sh. It would be very helpful if you could also publish a similar post for Odoo.sh users as there is no documentation for .sh users, especially when we want to create a catchall Incoming mail server in Odoo using Microsoft 365.
Could you also
Paul
Hello!
Thank you for your amazing tutorial!
Despite being quite technical, you really broke it down to simple steps and I thank you very much for this!
The only small thing that was complicated and out of tutorial was enabling Exchange Online Organization Customization (https://www.enowsoftware.com/solutions-engine/m365-exchange-online-center/enabling-exchange-online-organization-customization). It was necessary for the IP whitelist (Configuring of a Anti-spam thread policy). Everything else was fairly straightforward (I'm still amazed how much work must go into what I consider a standard scenario).
Anyway, you said to let you know if the "Notify Error To Sender" app (https://www.odoo.com/apps/modules/15.0/fetchmail_notify_error_to_sender/) was needed for another version of Odoo ; I installed v16 on premise and unfortunately I'm not able to install this module (it depends on fetchmail that is not here for Odoo 16).
If you need anyone to test or any help with this don't hesitate to let me know
Best regards,
Edvard Yoch
Paul,
Thanks a lot for your feedback and specially about "Exchange Online Organization Customization".
If you really want "Notify Error To Sender" app for v16 we can provide app migration service for you.
Other variant it is use Odoo v15 if you are just starting to work with Odoo.
xMashhour
if anyone has an HTTP issue when he login to Microsoft please note that, you need to change the system URL to HTTPS and the issue will be solved.
Technical > System Parameters > URL; then change the value field to (https://odoosystemdoman.com), and click save.
BeechCoder
Hello Oleg,
Thanks for the excellent documentation - including the updates for the new M365 API connection.
Everything works for us except sending email. When sending a test message, an error is rendered:
Unknown error Mail Delivery Failed Mail delivery failed via SMTP server 'None'.
SMTPDataErron 554
5.2.252 SendAsDenied; [email protected] not allowed to send as [email protected];
STOREDRV.Submission.ExceptionrSendAsDeniedException.MapiExceptionSendAsDenied: Failed to process message due to a permanent exception with message [BeginDiagnosticData]Cannot submit message.
I have checked the send as permissions against the user, and have also added the Mail.Send and Mail.Send.Shared permissions to the App Registration - still we are unable to send emails.
Do you have any suggestions for how this issue can be resolved please?
Thanks!
Sean Scott
I am using Odoo V15 Community. I do not appear to have the microsoft_outlook app. Is there somewhere that i missed to download it?
Erebus
can this use on o doo 13? Some of my friends try to it's on odoo 13 but seem not working.
Guest
Hello
I was using odoo 13 and i had done exactly like you guide but its not work.
Thank
Jorge
I have a multi company And we want to send email for each company with diferent domanis
This is posible?
sga508
Awesome! Its truly awesome article, I have got much clear idea about from this post.
Brandon
Hey! Thanks for this.
We are unable to get emails to send, We have followed all steps but we cannot send or recieve emails and our custom email does not change on the default. Odoo V17
Andrew
I think your article was stolen
https://softcroft.ie/blog/our-blog-1/office-365-relay-server-1
Tomas Lindqvist
Thanks a lot for this very good tutorial. It took some time to get everything correct but now it is working.
I have only one question, we would like to add a few email addresses that are not exchange users that shall not be catched by the catchall email function. Is this possible?
Galyna
Hello, team, thank you for a great article. Could this guide be adopted to Odoo 15?
Oumaima
We recently migrated Odoo server from AWS to Azure, and your configuration no longer works because Azure blocks port 25. They refused to unblock the port. Do you have a solution for us?
Vasily Puntus
Please read this article regarding your issue with port 25 https://ventor.tech/odoo/how-to-configure-emails/
Also, please clarify where exactly you moved to Amazon: Virtual Machines, Web Application, Container Application, Kubernetes Cluster?