Introduction
We previously wrote an article for Office 365 Business subscribers about configuring Office 365 Exchange to work with Odoo ERP which is deployed using its own infrastructure. But beyond that, Odoo SA also provides their own platforms for deploying ERP such as Odoo.sh and Odoo Online.
Odoo.sh is a PaaS (Platform as a Service) managed by Odoo SA. Odoo.sh allows deployment of its own cloud platform in several clicks which also comes with a pre-configured mail server.
Odoo Online is a SaaS (Software as a service) managed by Odoo SA. In a few seconds and several clicks your cloud instance will be ready to use in any place and time. It also comes with a pre-configured mail server. The biggest advantage of Odoo Online is simplicity: you should never think about technical aspects because Odoo will do it by itself.
Mentioned platforms are very popular, but if you want to use Office 365 Exchange instead provided by default mail server, then you can’t use SMTP Relay as an outgoing email server because it uses port 25 for connection. This port is blocked on Odoo.sh and Odoo Online for security reasons.
Table of contents
- Prerequisites
- Configuring Incoming/Outgoing mailbox in Office 365
- Configuring Incoming Mail Server in Odoo
- Testing Odoo ERP Emailing Setup
- Conclusion
Prerequisites
1. Assumption is that you are already a user of the Office 365 Business subscription that includes Exchange Server. E.g. “Office 365 Business Premium”.
2. You are already using mailing features from Office 365. Meaning you are not a new Office 365 subscriber. If you just purchased a subscription and haven’t configured anything yet, you first need to perform an initial setup by following the official Microsoft guide. It is especially important that you already have properly configured your custom domain. This Microsoft guide can help you with this.
3. People executing the steps below need to have Administrative access (Role: Global Administrator) to https://www.office.com. That is needed in order to create new users and groups on the Portal.
4. You are a user of Odoo.sh or Odoo Online (or want to start using) which according to the official documentation does not allow you to use Office 365 SMTP relays, or you are unable by other reasons to use port 25 or a static IP for your Odoo instance.
If you run Odoo on-premise (25 port is not blocked and the instance has a static IP address) you can configure it by following this article.
If all above preconditions are already fulfilled, then you can go ahead with next steps.
Configuring Incoming/Outgoing mailbox in Office 365
For sending/receiving email messages by Odoo will be used single mailbox with connecting to it by SMTP/IMAP protocols by 587/993 ports respectively, where as access data is enough mailbox name and data for authorization.
Configuring this mailbox fully complies with the instructions given in this section – “Configuring Catchall Email in Office 365”.
Configuring Outgoing Mail Server in Odoo
Outgoing mail server is needed to allow Odoo to send messages and notifications to mailboxes of recipients that are inside and outside Odoo. Below are the steps needed to make this configuration.
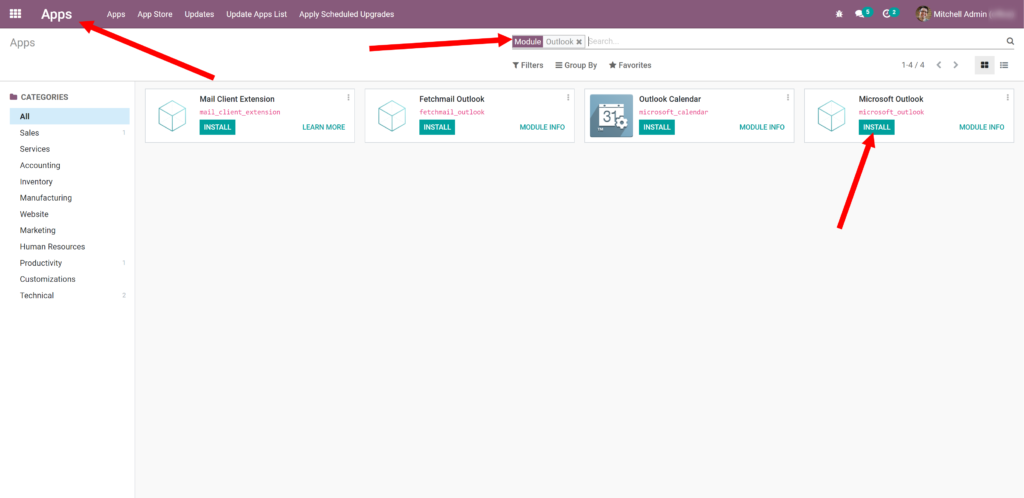
- Login as Administrator in Odoo ERP, go to the “Apps” menu, find the “Microsoft Outlook” app and click “Install”.
- Then go to “Settings -> General Settings -> Discuss”, enter the following values and click “Save”:
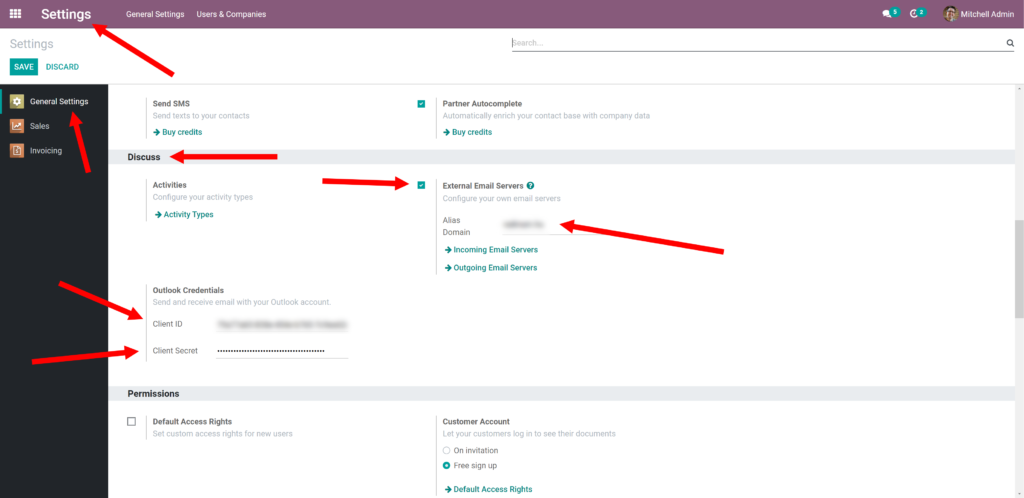
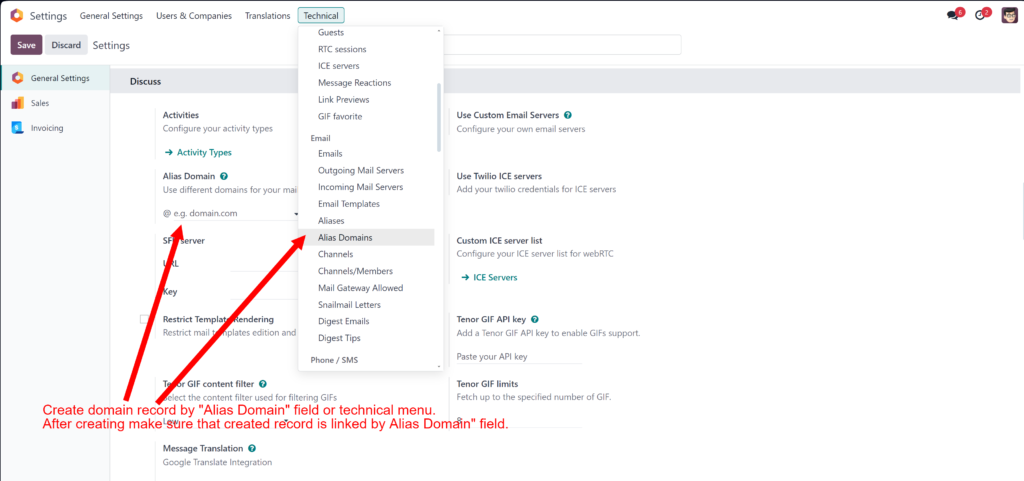
If your Odoo version is v17 you should add Alias Domain in the next way
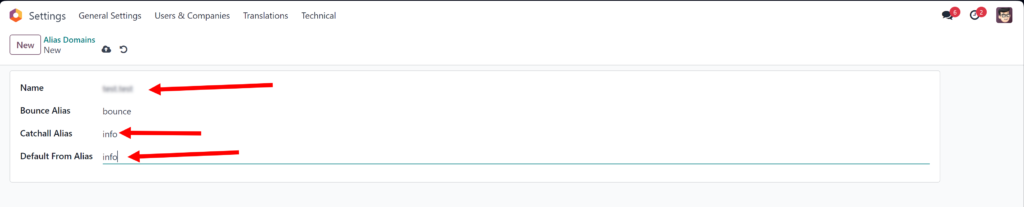
- Name – this parameter should have your-domain.com
- Catchall .Alias – enter here part of the email previously configured. For example “info” in case you have previously configured the email [email protected]
- Default From Alias – this parameter should have “info” (as previously configured in the email [email protected]). It means that all outgoing messages in case an unknown sender will use the default “From” address.
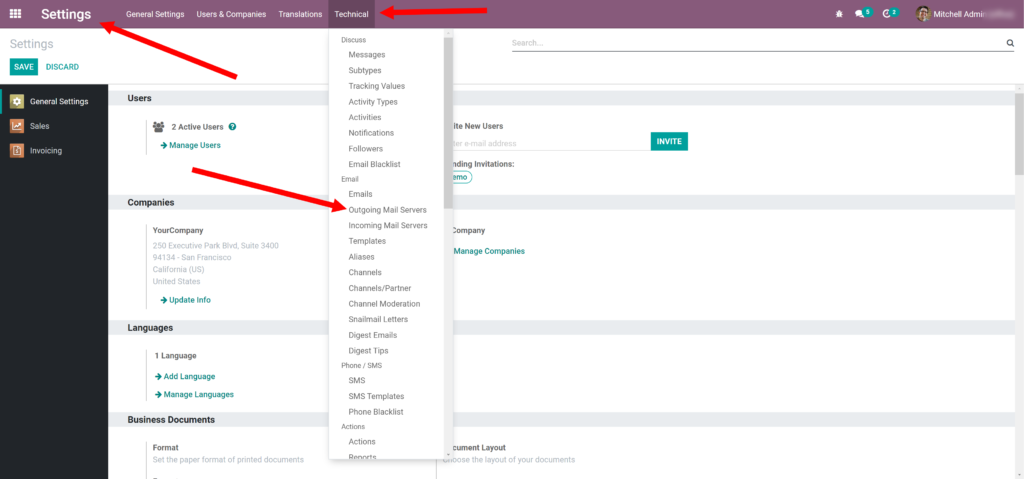
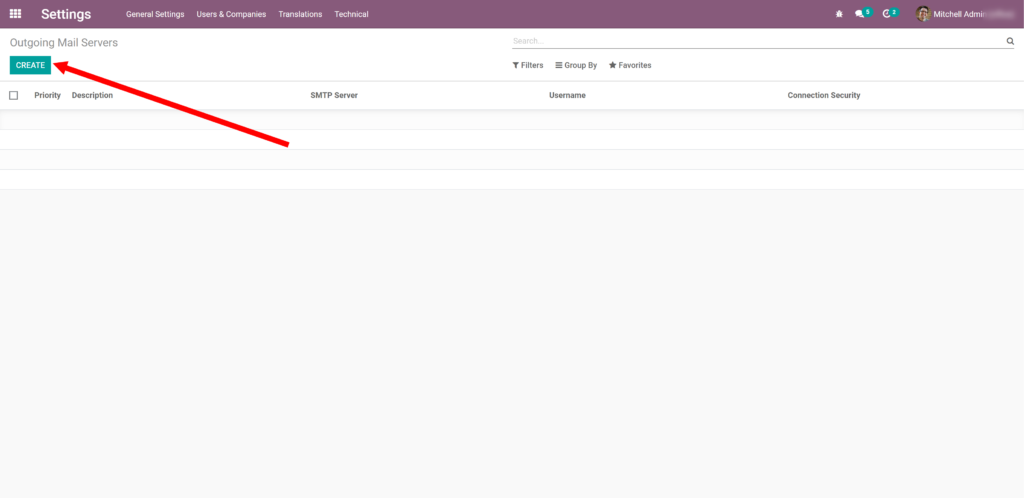
- After that go to “Settings -> Technical -> Outgoing Mail Servers”. Either select an existing one (to modify it) or click “Create” to create a new one.
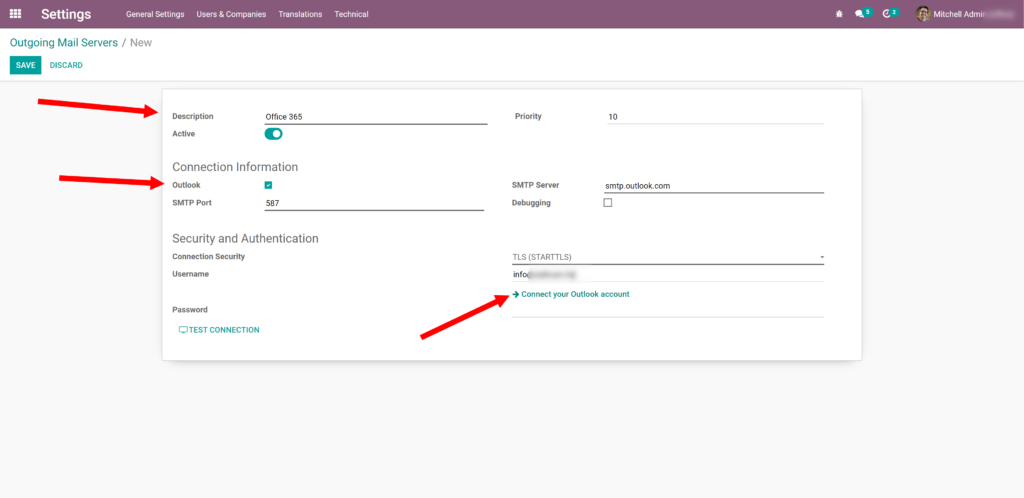
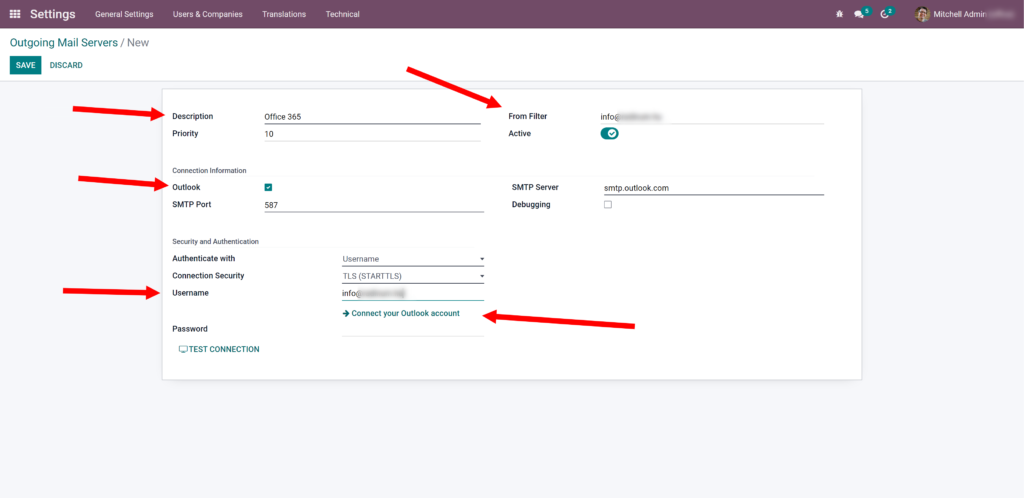
- Now enter the following values and click “Connect your Outlook account”:
- Description = “Office 365”
- Outlook = Selected
- Username = [email protected] (Catchall mailbox)
For Odoo version 15 and higher we also have to add:
- From Filter = “[email protected]” – it is needed to send messages only with sender which is [email protected]
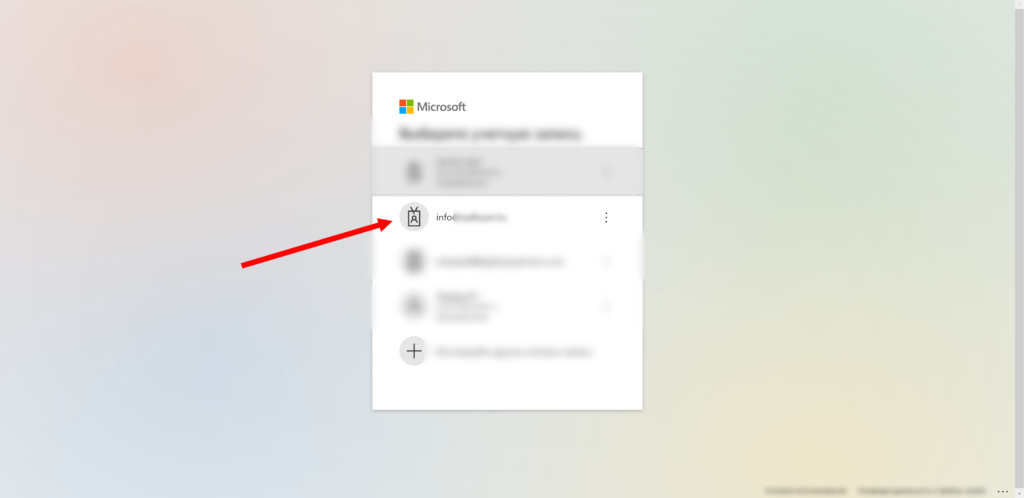
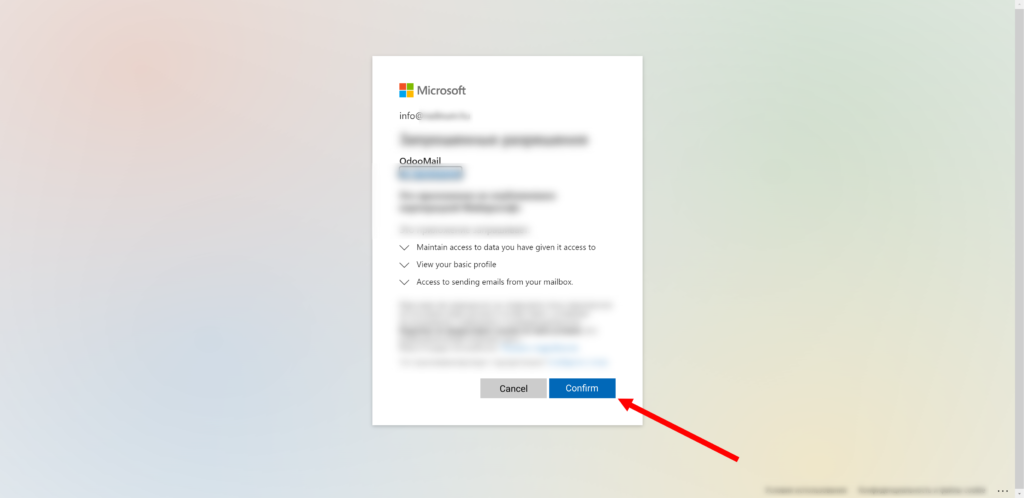
- Then “Login” by your Catchall mailbox user.
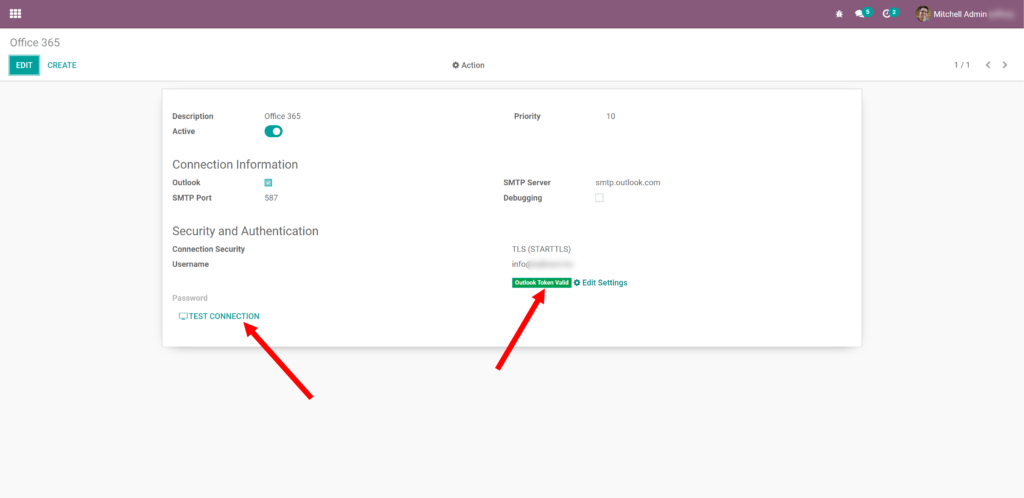
- As a result you will see that Odoo ERP got a Valid Outlook Token. So next click “Test Connection”.
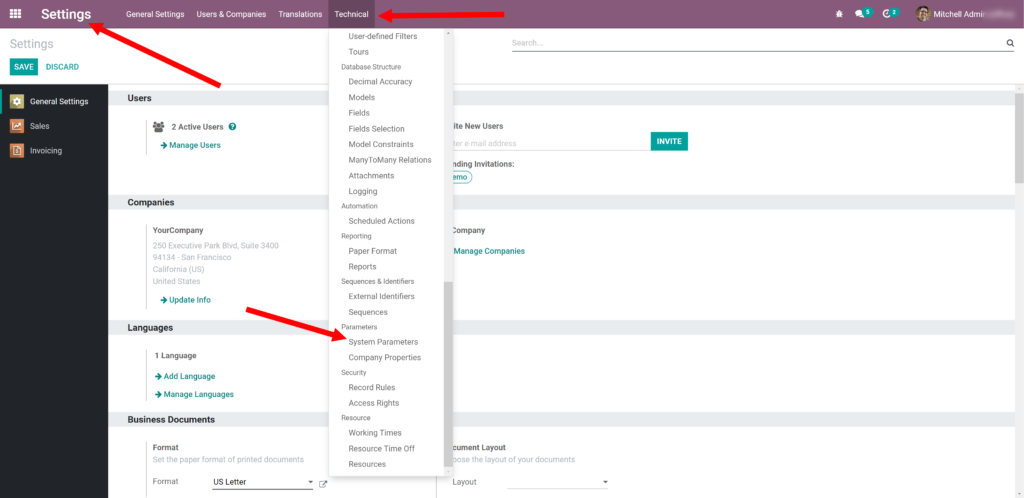
- Then go to the menu “Settings -> Technical -> System Parameters”. And make sure that the properties below are set up correctly:
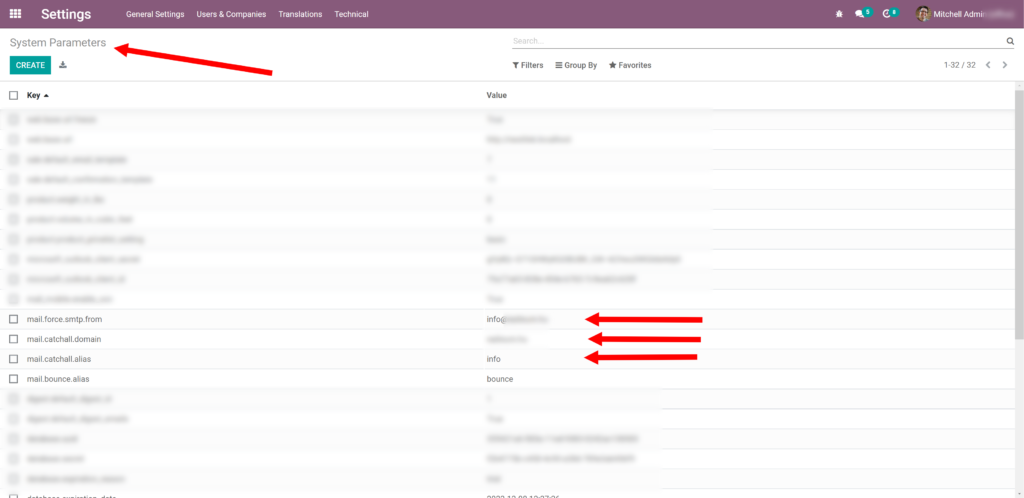
For Odoo version 16 and lower we should have the following properties:
- mail.catchall.domain – this parameter should have your-domain.com
- mail.catchall.alias – enter here part of the email previously configured. For example “info” in case you have previously configured the email [email protected]
For Odoo version 14 and lower we should have following properties:
- mail.force.smtp.from – this parameter should have [email protected]. It means that all outgoing messages will use the same “From” address.
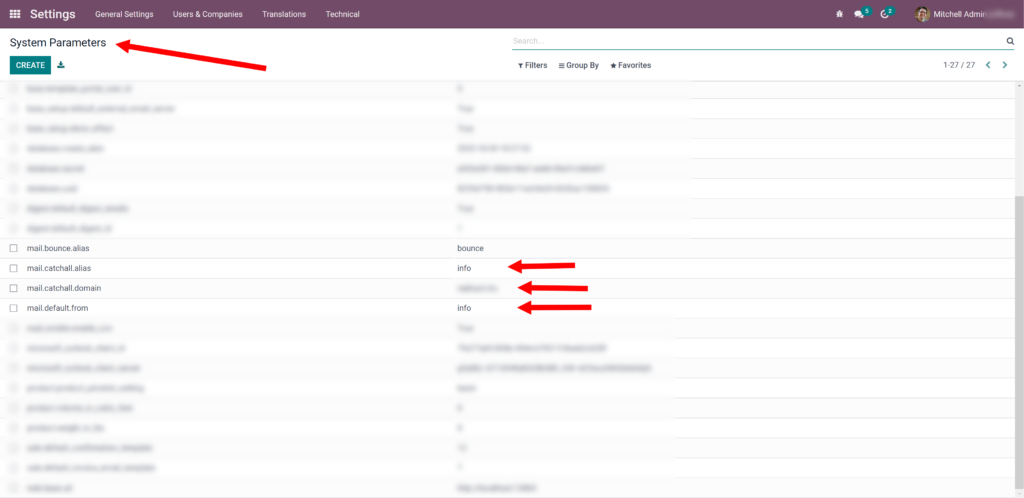
For Odoo version 15 and 16 we should have the following properties:
- mail.default.from – this parameter should have “info” (as previously configured in the email [email protected]). It means that all outgoing messages in case an unknown sender will use the default “From” address.
IMPORTANT! How does it work?
In current configuration sending of emails is done by the same mailbox like for receiving. Since it is mailbox but not SMTP relay, then we cannot specify anyone other than the owner of the mailbox as the sender (in current case [email protected]), so we made a configuration where the sender is always the same. As a result all email recipients will see “Odoo User or Notification or etc.”<[email protected]> instead “Odoo User or Notification or etc.”<user or service or etc. email>. If it is really important to you that the sender looks indistinguishable from an ordinary person and has own email, then because of the aforementioned circumstances to do this you need change place of Odoo deploying or use other mail provider instead Office 365 Exchange.
It’s a limitation of Office 365 configuration with odoo.sh or Odoo Online. You can’t use different addresses as an email sender, so you should take into account this aspect when using this manual.
Configuring Incoming Mail Server in Odoo
Configuring Incoming Mail Server fully complies with the instructions given in section “Configuring Catchall Email in Office 365”.
Testing Odoo ERP Emailing Setup
- As Administrator or any powerful user go to menu “CRM -> Sales -> Teams” and open any team’s configuration. On the sales team details, enter the following data:
- Email Alias = “sales” (you can enter any)
- Accept Emails From = “Everyone”
- Team Members – add some real users with real email addresses
- Followers (in the chatter, optional) – add users that should automatically receive mail notifications when a new lead is coming.

- Now send something from your personal email address to the mail address specified in Sales Team. Wait for at least 5 minutes. That is the period that Odoo is configured by standard to download incoming mails.
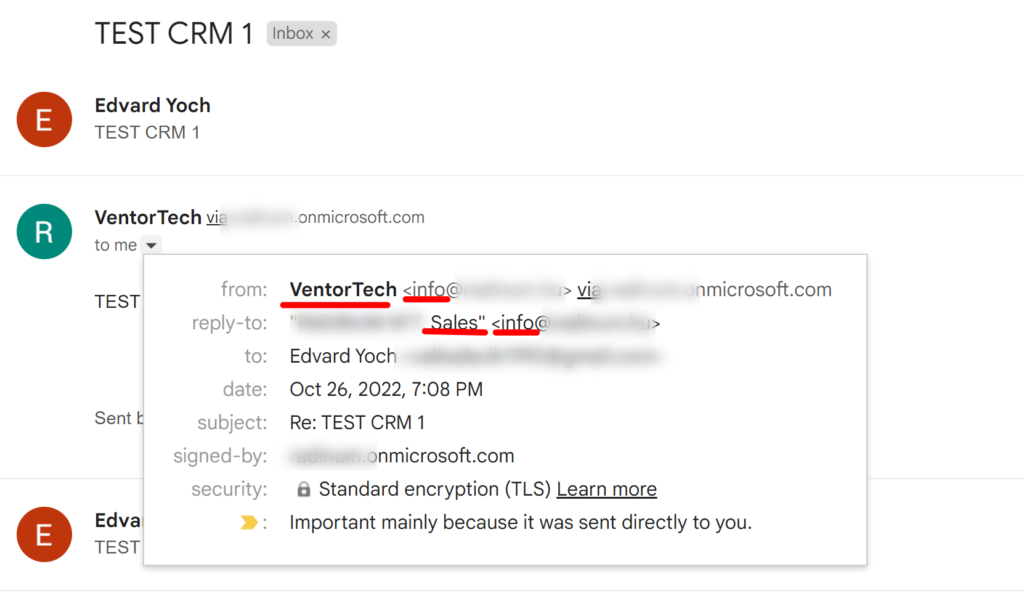
- Now go to menu “CRM -> Pipeline” and You will see that a new Opportunity was automatically created from the incoming email with the name which is the same with email subject. To test Outgoing Mail Server you can start conversation by chatter from this Opportunity. As we see in the example below we can receive and send messages by Odoo.

Bingo! You are done with your configuration of Office 365 and Odoo ERP.
Conclusion
In the result we configured Office 365 and Odoo integration for sending and receiving emails in your ERP which is deployed by Odoo.sh or Odoo Online platforms or at an instance where it is not possible to use port 25. Current configuration allows you to continue using Office 365 Exchange as mail provider.
If you think that this article is helpful, please, share it on social networks. Sharing Icons are
available below the article. Subscribe to our newsletter and follow Ventor.tech twitter to be kept up to date.
If you need help in configuring your Office 365 properly with Odoo ERP or found some issues / mistakes in the article, please leave your comments down below. We will be happy to assist.
Calculate the price for your Odoo project
How to Configure Emails to work with Office 365 and Odoo – https://ventor.tech/guides/how-to-configure-emails-to-work-with-office-365-and-odoo/
Follow our Linkedin account and subscribe to our newsletter to make sure you don’t miss updates.

1+ year of Odoo development experience
3+ years of ensuring electromagnetic compatibility for electric networks
Main skill: Python, JS, SQL, Odoo, Email Flow, S3, Redis, RabbitMQ


3 Comments
Devendra Jagtap
Hello, your article is probably better than the documentstion provided by odoo itself.
Is the email server provided by odoo.sh complete?
Does it make sense to abandon outlook and move to odoo.sh completely? Will there be any gaps in functionality?
Devendra Jagtap
Hello, great article. Does it make sense to move from o365 premium to odoo.sh? What are the disadvantages of that?
Nick
Thank you for this. Super helpful! Much better direction than Odoo documentation. I do have a question/comment.
I see that your guide said it's not possible to have emails come from individual/unique persons at the company. However, a support rep at Odoo told me that: "If they absolutely need messages from Bryan to arrive from [email protected] and messages from Alex to arrive from [email protected], they need to add a custom server for each user. They still need to configure a generic server for automated emails."
Does this mean we can follow same process regarding outgoing/incoming mail for each individual address and it would work? However, would it pose a problem by changing Exchange settings to the internal relay (or any other steps in the process)?