
Sometimes Odoo users face performance issues: long loading, freezing, slow response time, errors, etc. They usually occur in large Odoo projects.
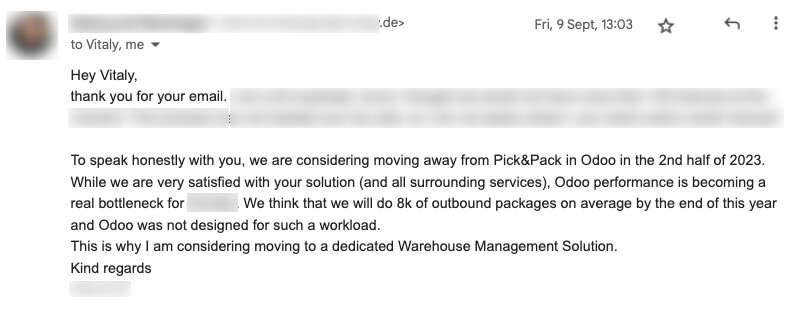
“Performance matters for our business. This is why we always keep the latest Odoo version”. Cube48
Having Odoo performance issues you can
- Define bottlenecks and fix them
- Understand that you can’t move forward with your current system and you have to upgrade to a newer Odoo version or even go with another system
For this you need to perform Odoo performance testing.
Performance attributes
Performance testing is not done to identify bugs in the application. Its main intention is to eliminate performance issues and bottlenecks by measuring the performance quality attributes of the system.

- Speed – determines how fast an application responds to any request;
- Scalability – determines what is the maximum user load an application can handle;
- Stability – determines if an application is stable under differing loads;
- Reliability – determines if an application is consistent under different environmental conditions at a specific period.
Now let’s review how to test Odoo performance.
Table of contents
- Tool for Odoo performance testing
- How to run Odoo load testing
- Odoo load testing
- Test scenarios
- Summary
Tool for Odoo performance testing
At the moment, there are a lot of tools for Odoo load testing. Both paid and free. We will not pretend that our choice is the only right one. We chose Locust for Odoo performance testing for the following main reasons:
- Locust is entirely based on Python, which means you do not need any additional knowledge of programming languages in order to start using it in the Odoo environment;
- Locust is an Open Source Software tool, this makes it stand out among others as it offers a wide range of accessibility to developers;
- The ability to run tests with the same configuration on different computers or servers in a distributed manner (master-workers mode);
- Excellent documentation ( https://docs.locust.io/ )
It is believed that the main disadvantage of Locust is that there is no automatic recording of user behaviour from the browser (as it is for JMeter, for example), but this is actually not the case.
There is an excellent Open Source tool that, in conjunction with mitmproxy (it’s also an Open Source tool https://mitmproxy.org/), allows you to record all requests sent to the application during the test case and download the Locust script immediately ready for use. You can get acquainted with this tool and how to use it at this link: https://github.com/zlorb/locust.replay
This tool is also written in Python, which means you are free to change it and adjust it to your needs so that the Locust scripts are loaded exactly in the form in which you need.
How to run Odoo load testing
1. Install Locust in your system
Don’t forget to use a virtual environment https://docs.python.org/3/library/venv.html: https://docs.locust.io/en/stable/installation.html
Run next commands in the terminal:
python3 -m venv /path/to/new/virtual/environment  # creating new virtual environment

source /path_to_venv/bin/activate  # activating virtual environment

pip install locust  # installing Locust on your system
Do not be surprised when Flask is installed in the system along with Locust. Locust uses Flask to display its UI part.
Check whether the installation was performed correctly by the command that outputs the Locust version:
locust -V
2. Install and configure mitmproxy
In our example, we install and configure on MacOS. Please check out the official documentation if you need to install mitmproxy for other operating systems.
For installation on MacOS we’re using Homebrew. How to use it and how to install it on your system you can find here: https://brew.sh/
Run the command:
brew install mitmproxy
Check whether the installation was performed correctly by the command that outputs the mitmproxy version:
mitmproxy --version
Since mitmproxy has been installed on your system, you need to configure your system to use it.
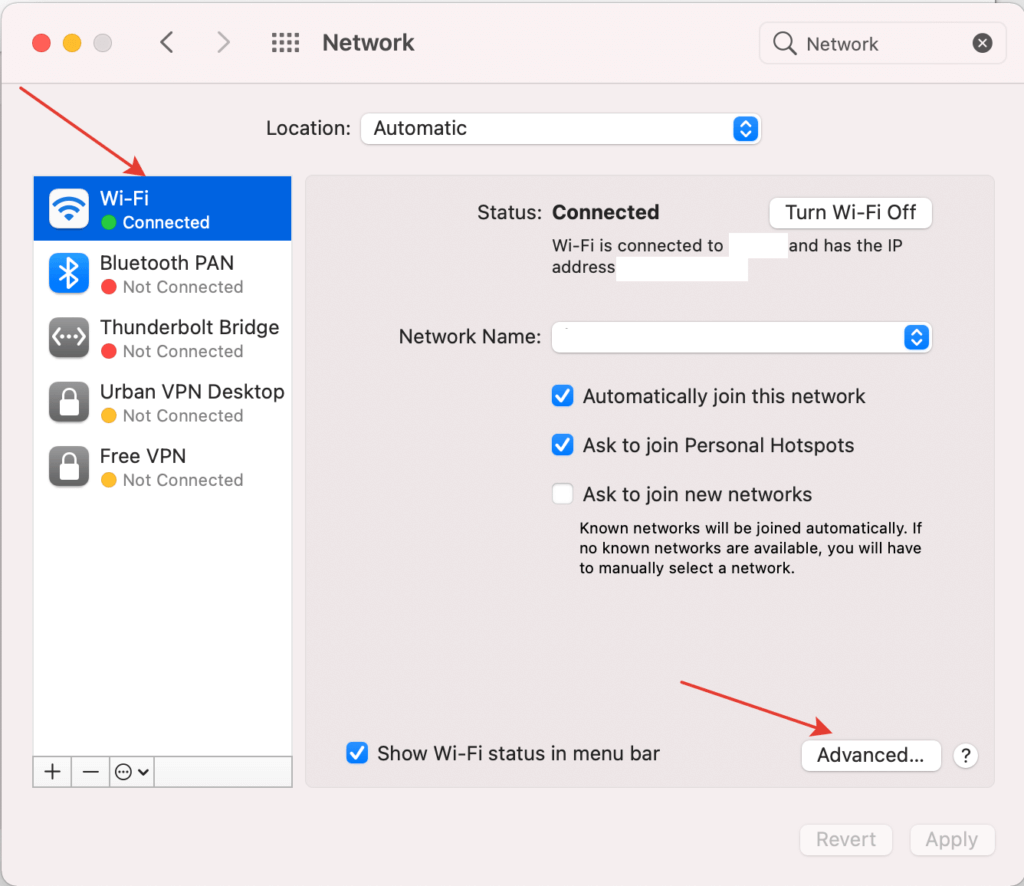
Go to System Preferences –>
![]() Network –>
Network –>
![]()
Choose your active connection to the Internet and click Advanced –>
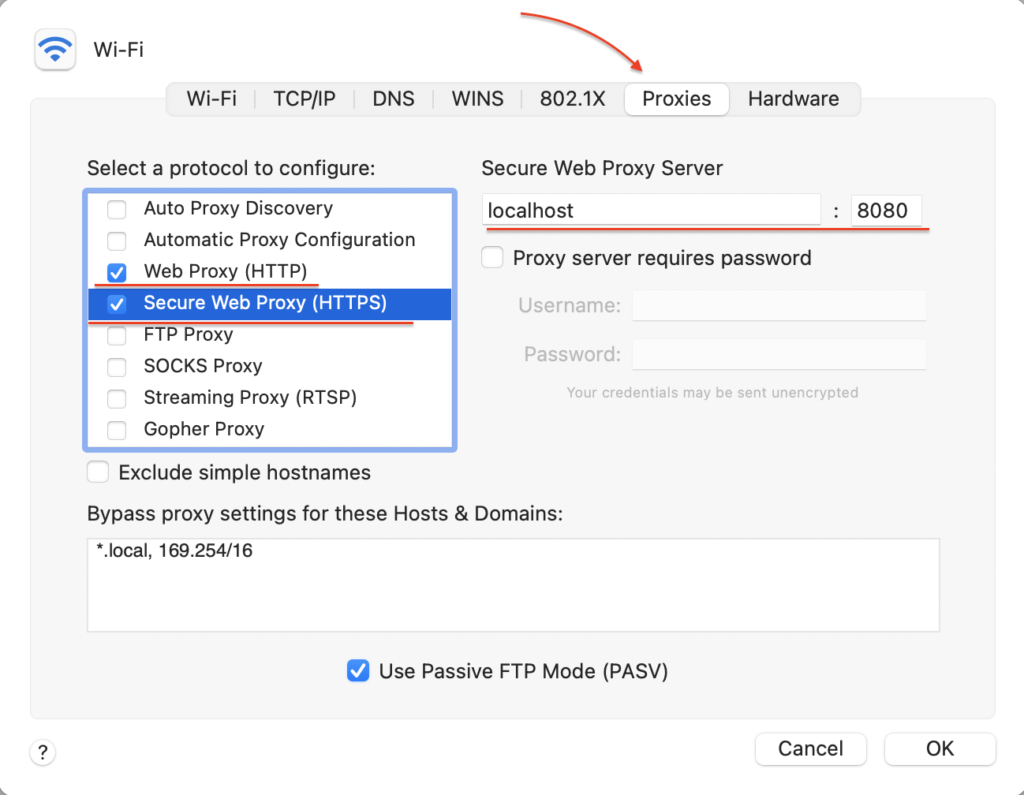
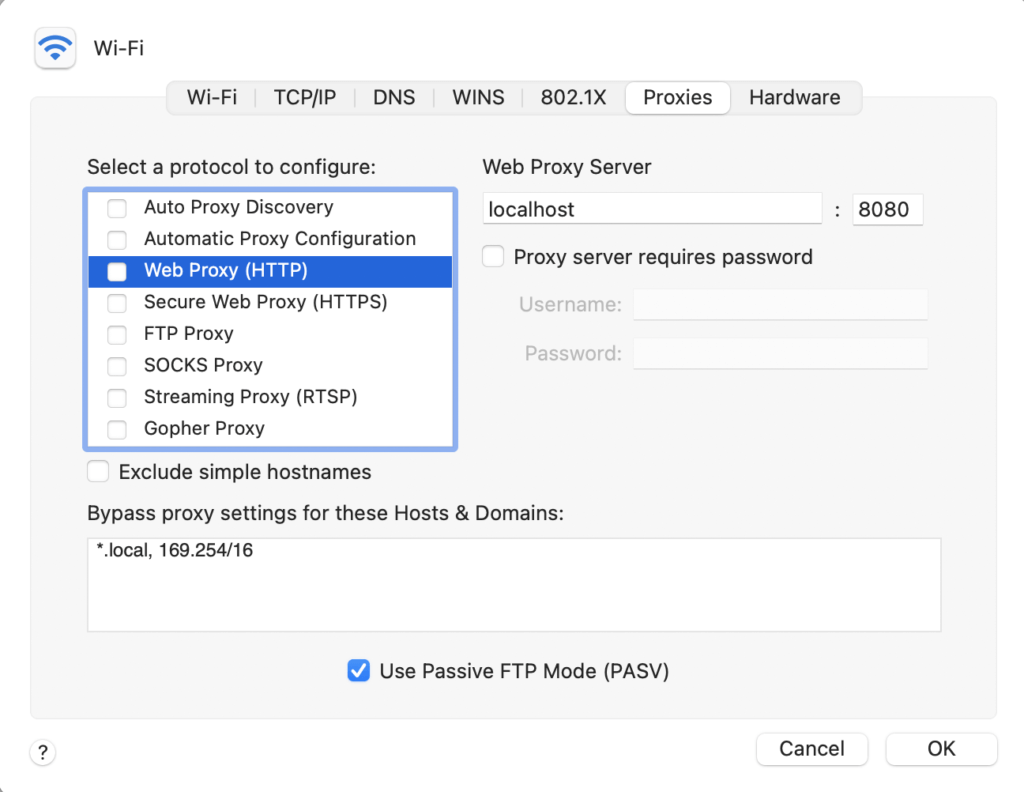
Choose Proxies tab and enable checkboxes Web Proxy (HTTP) to use proxy for http queries and Secure Web Proxy (HTTPS) to use proxy for https queries and configure Proxy Server to use localhost and 8080 port (mitmproxy default port).
Run Terminal and run command to launch mitmproxy.
mitmproxy
You can check that your web traffic is going through mitmproxy by browsing to http://mitm.it/ – it should present you with a simple page to install the mitmproxy Certificate Authority – which is also the next step. Follow the instructions for your OS / system and install the CA.
This certificate is needed for https requests. If you use only http for tests, then you do not need to activate the Web Proxy (HTTPS) checkbox and install the certificate.
We select the macOS section, click Show Instructions and follow the instructions 😉
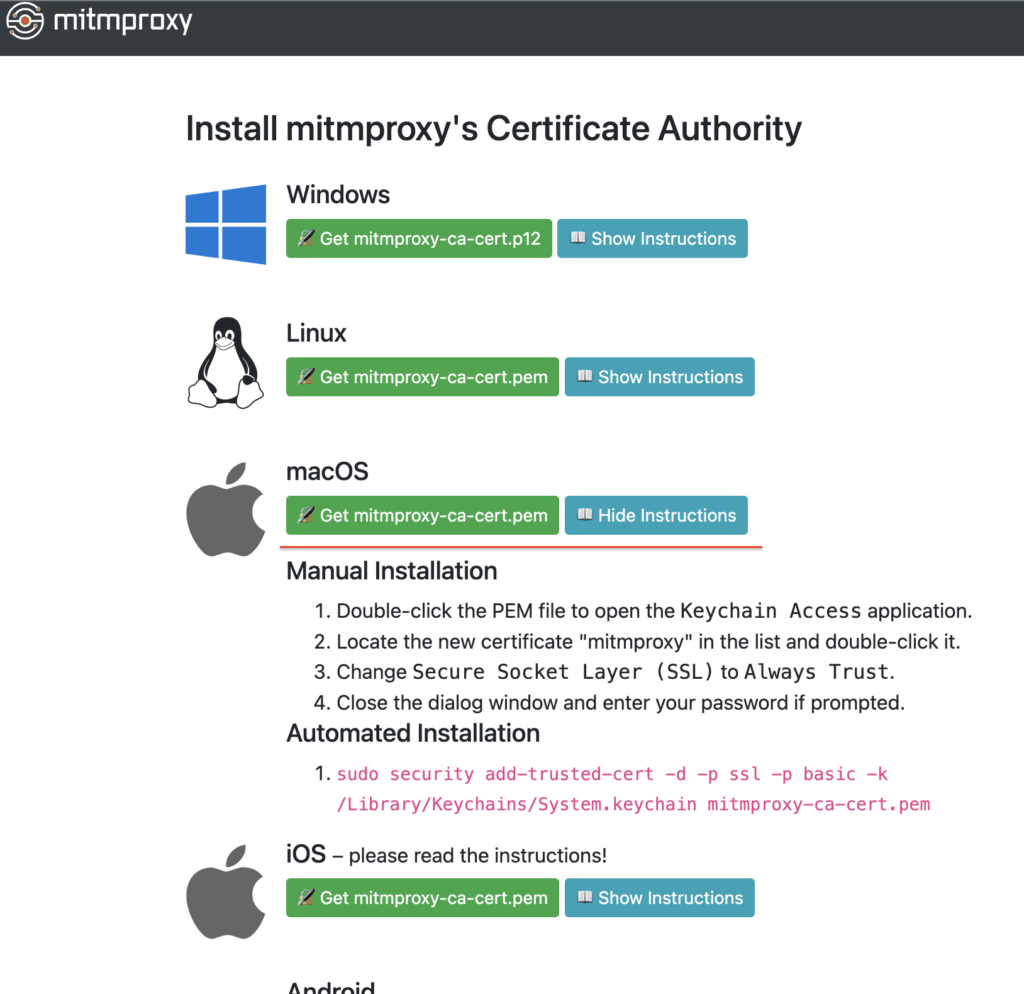
Download the certificate by clicking on the “Get mitmproxy-ca-cert.pem” button.
Double-click the downloaded PEM file to open the Keychain Access application.
Locate the new certificate “mitmproxy” in the list and double-click it.
Change Secure Socket Layer (SSL) to Always Trust.
Close the dialog window and enter your password if prompted.

Or you can use the command that is specified in the Automated Installation section of the instruction.
3. Clone Locust Replay in your project directory:
git clone - https://github.com/zlorb/locust.replay.git
Install mitmproxy python package (it’s needed for Locust Replay)
pip install mitmproxy
Recording user behaviour
Now you are ready to record and reproduce user behaviour in the browser.
Do not forget to disable the proxy when you are just going to surf the Internet. Simply stop mitmproxy by pressing the control + C keys in the terminal and disable checkboxes Web Proxy (HTTP) and Secure Web Proxy (HTTPS) in the System Preferences –> Network app.
Now stop (if you had it running) and start mitmproxy in the mode of working with Locust Replay. Various launch options and parameters can be found in the official documentation, we will offer one example of a launch command:
mitmproxy --anticache -s locust_extractor.py --set filename_prefix=TC_1_demo --allow-hosts demo3.odoo.com
Where parameters are:
–anticache – strip out request headers that might cause the server to return 304-not-modified
-s locust_extractor.py – path to the python file from locust.replay repository
–set filename_prefix=TC_1 – prefix for the name of the uploaded scripts (TC_1 – Test Case 1 for example)
–allow-hosts demo3.odoo.com – the address of the application to which requests will be processed by the proxy, in our case it’s demo3.odoo.com
After you have launched the proxy, go to the browser and do your black magic (well, or white, depending on what kind of magician you are.
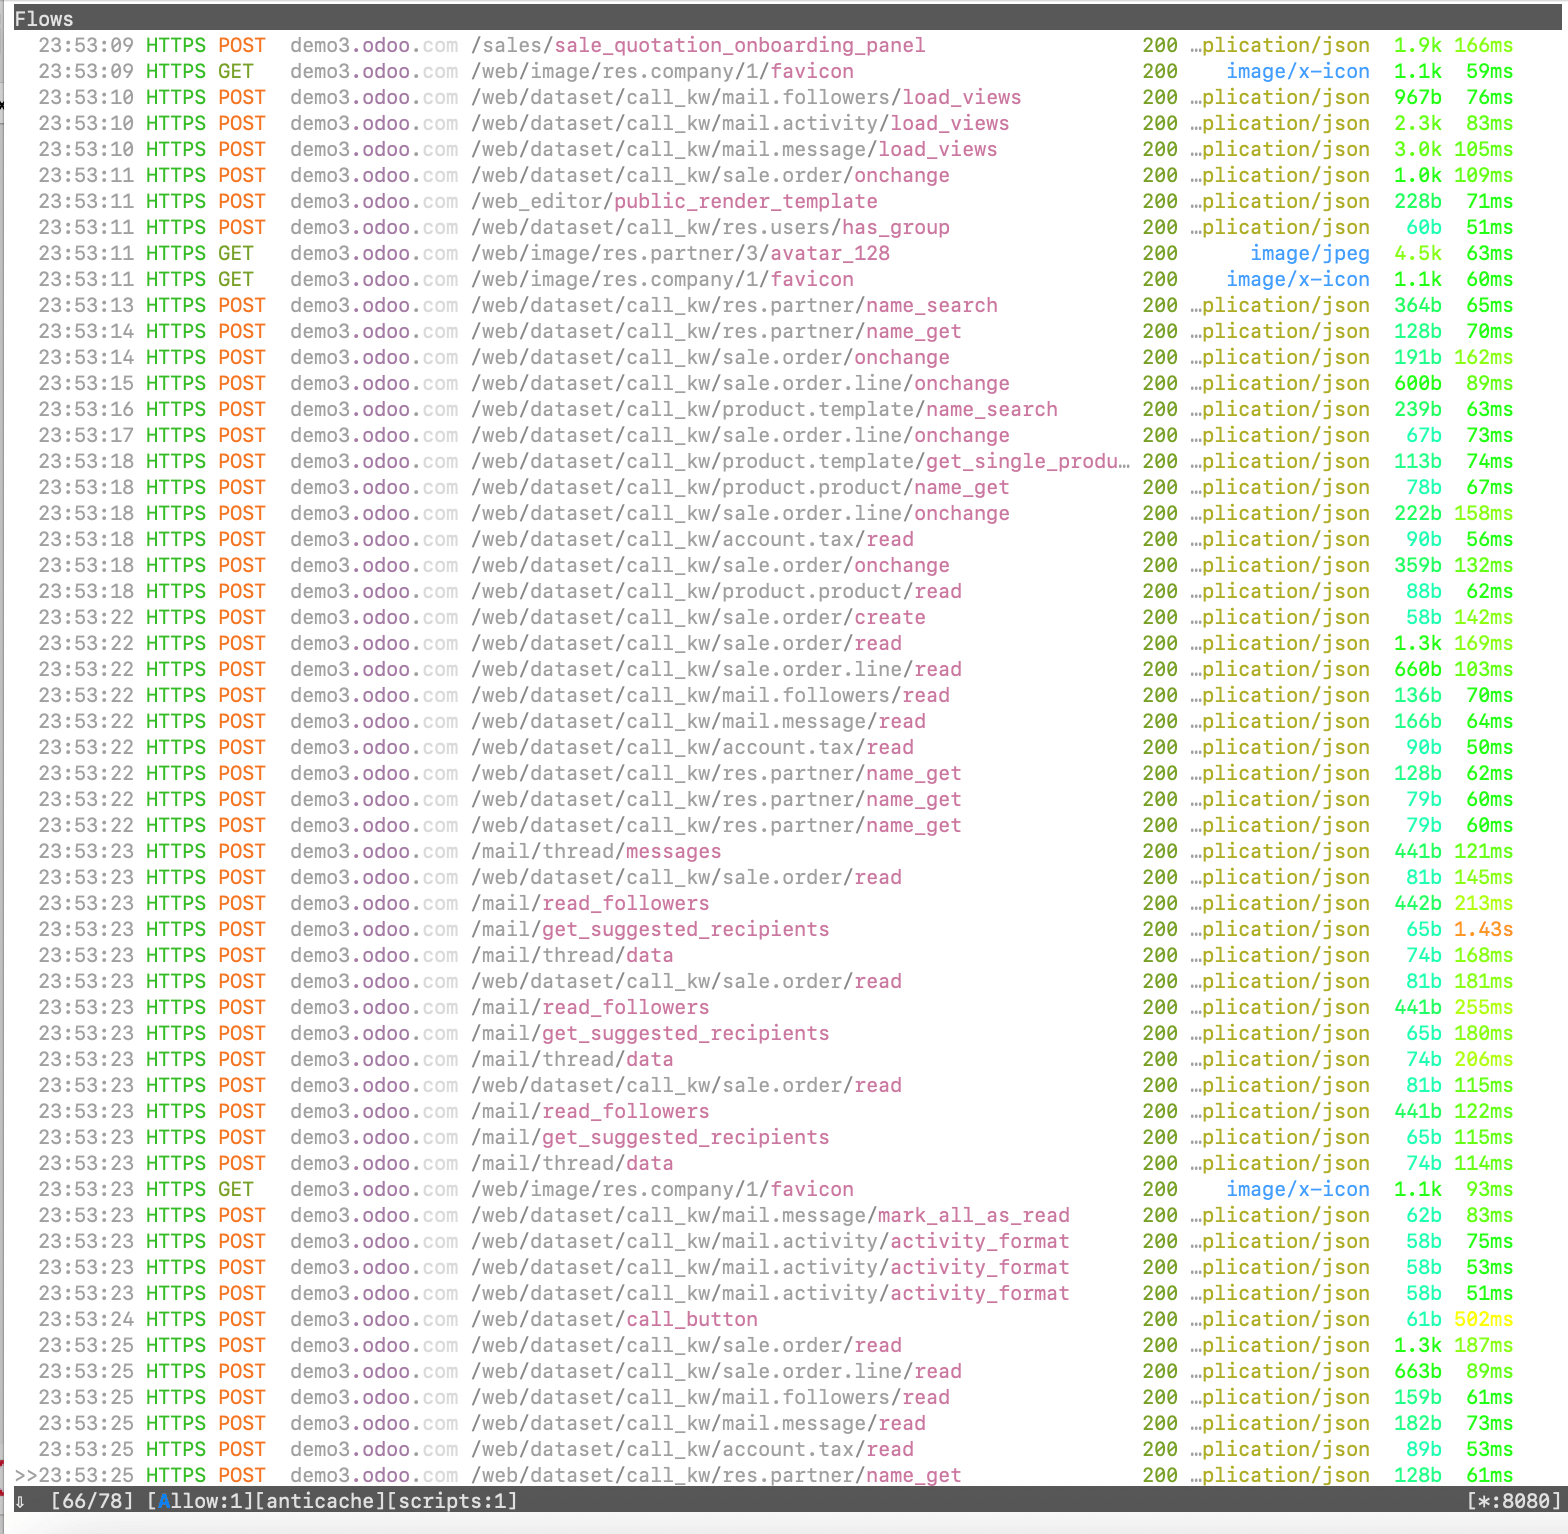
 In the screenshot below you can see an example of recorded requests by mitmproxy to the demo Odoo when creating a sale order (as well as the execution time, the size of the request and its type):
After you are done with the test case, just press the control + C keys in the terminal to shut down the proxy.
With Locust Replay, we can be sure that we will not miss a single request, and the behaviour of our script will be as similar as possible to the behaviour of a real user (the main thing is not to forget to add pauses between requests so as not to get a user too fast.
In our example, the newly created file with the Locust script will appear exactly in the directory from where you launched the proxy in the terminal.
Do not forget to check the proxy events for errors if something went wrong and the file was not uploaded. You can enter the event viewer by pressing Shift + E in the terminal when the proxy is running. If you did everything correctly and did not change the source code, then everything will work as it should 😉
Odoo load testing
Since now, you are free to do whatever you want: change requests or add new ones, add randomness to the requested or created data, create your own scenarios for the behaviour of various users, and so on. Feel all the flexibility and power of Locust.
But do not forget, in order to perform any operations in Odoo, you must first be authorized.
Specifically for this example, I decided to do it as shown in the picture below.
class UserBehavior(SequentialTaskSet):
    def on_start(self):

        login_headers = {

            "Upgrade-Insecure-Requests": "1",

            "Content-Type": "application/x-www-form-urlencoded",

            "User-Agent": "Mozilla/5.0 (Macintosh; Intel Mac OS X 10_15_7) AppleWebKit/537.36 (KHTML, like Gecko) Chrome/103.0.0.0 Safari/537.36",

            "Accept": "text/html,application/xhtml+xml,application/xml;q=0.9,image/avif,image/webp,image/apng,*/*;q=0.8,application/signed-exchange;v=b3;q=0.9"

        }


        response = self.client.get(f'/web?db={DB}', headers=login_headers, catch_response=True)

        soup = BeautifulSoup(response.text, features='html.parser')

        csrf_token = soup.find('input', dict(name='csrf_token'))['value']


        with self.client.request(

                method='POST',

                catch_response=True,

                url='/web/login',

                headers=login_headers,

                data={

                    'login': LOGIN,

                    'password': PASSWORD,

                    'csrf_token': csrf_token,

                    'db': DB,

                },

        ) as response:

            if response.status_code != 200:

                response.failure('Request failed with status code ' + str(response.status_code))

                self.interrupt(reschedule=True)
The on_start method will be executed only once when the test is run and will log in the user. All subsequent requests will be executed under this user.
Here I used BeautifulSoup to get a csrf token to show that we are not limited in the choice and use of tools. Use any tools that are convenient for you or that you are used to.
After you finished changing your Locust script (or maybe you didn’t need to change it at all?) you can run Locust with the following command:
locust -f TC-1_demo14e_ventor_tech.py --host=https://demo14e.ventor.tech
Where parameters are:
-f TC-1_demo14e_ventor_tech.py – the path to the file that we received after the Locust Replay, in our case it’s TC-1_demo14e_ventor_tech.py
–host=https://demo14e.ventor.tech – the address of the application to which requests will be sent.
In the future, it will be convenient to configure the locust.conf file to run Locust scripts. How to do this and what parameters such a file takes and what they mean can be found in the official documentation ( https://docs.locust.io/en/stable/configuration.html ), as we already know – it’s just wonderful.
After you have entered the command above, you should have the following messages in your terminal window:

After that, you can click on the specified link ( http://0.0.0.0:8089 ) to get to the Locust startup user interface.
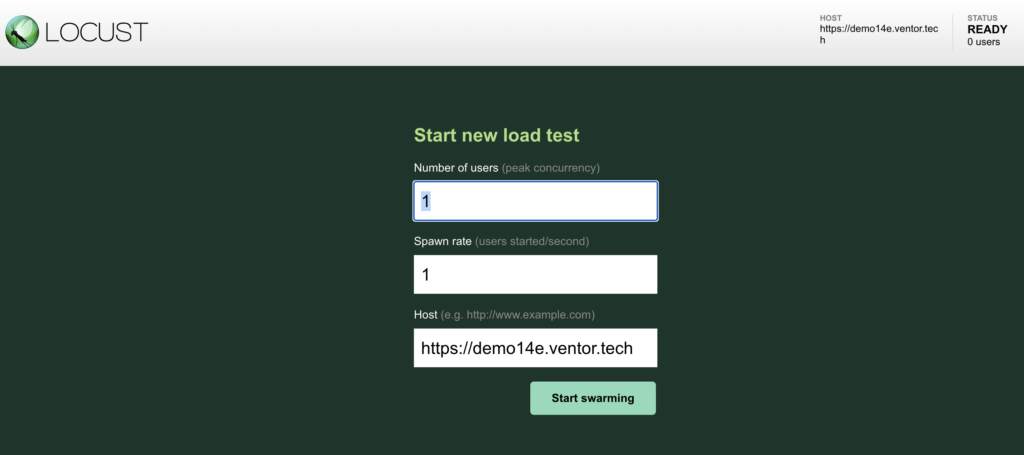
Since we have already specified the host when running the command in the terminal, this field is already filled in automatically. We just need to specify the number of users and the rate to spawn users at (users per second). In fact, all these parameters, and not only them, could be specified when running the command or in the configuration file.
By the way, did you notice that we changed the host address for tests? No? Well, that’s fine…
In fact, this was done just for the convenience of testing.
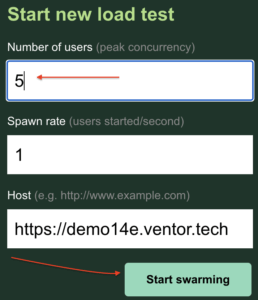
Specify the desired number of users, in our case it is 5, and click on the button Start swarming.
Make yourself comfortable and enjoy the process, as well as how quickly the products from the warehouse are sold out.
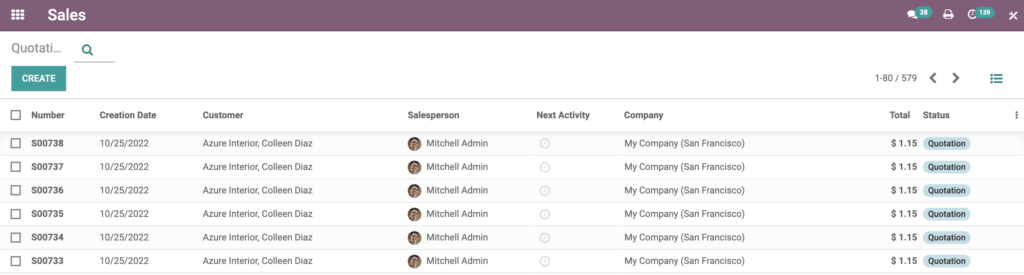
Do not forget that in this test we used only one user and did not change the product in the sale order and the customer remains the same. In order to add variability in our working tests, we pre-create demo data (users, products, customers and so on) or we use a database dump from the production server (with the necessary changes so that real customers don’t suddenly wonder what kind of shopaholics they really are) and then use them in random order in tests.
Below are some interesting screenshots that we can see during and after Locust work:
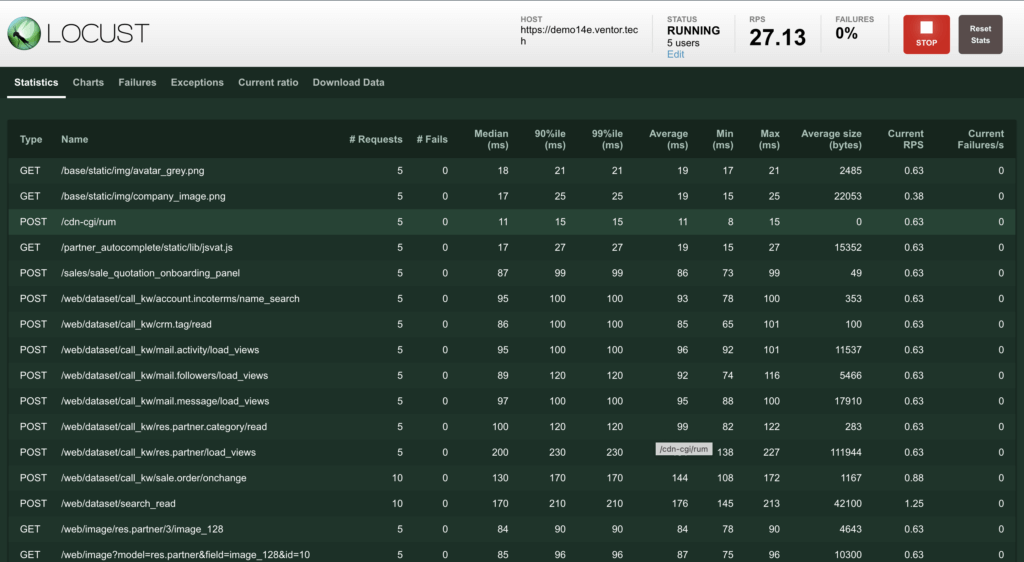
Here we can see in real time what requests are being executed now, how many requests per second are being sent (in the upper right corner), the number of failed requests, the size of requests, the time of their execution and other parameters, which can be found in more detail in the official documentation.
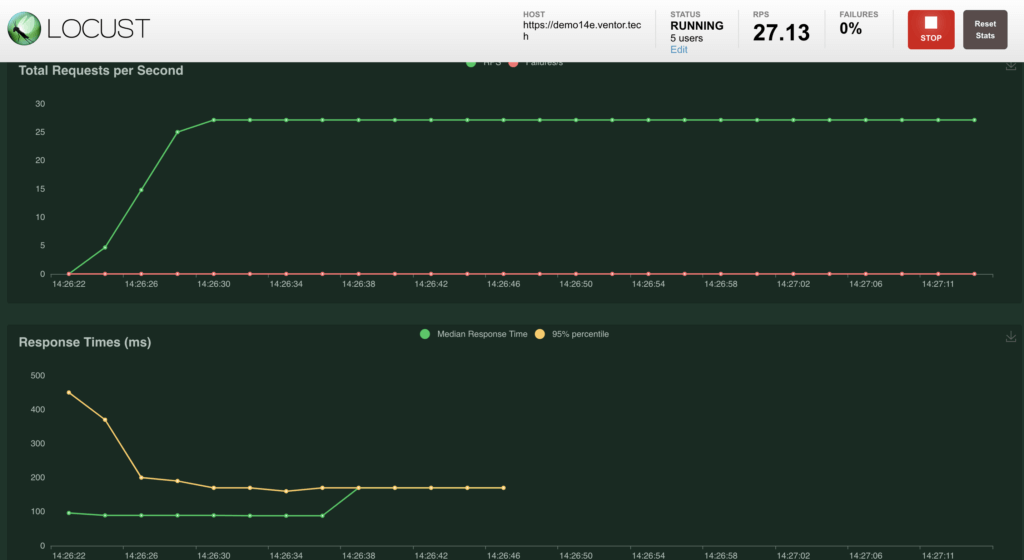
According to the information on the graphs, you can see an increasing number of requests per second (load on the application) with an increase in the number of users and changes in the time of processing requests by the application (response time).
For the convenience of working with the script and debugging it, Locust can be run in single user mode. You can read about how to use it and how to configure your IDE here:
https://docs.locust.io/en/stable/running-in-debugger.html
Test scenarios
You’d better to consult with your Odoo integrator what test scenarios need to be covered for your system, for example Odoo online store might have the following performance test scenarios:
- 400 users browsing the online store
- 150 users adding items to cart and checking out
- 150 users viewing their account and past orders
Summary
Performance issues is a big pain point of any business. Odoo load testing allows you to define bottlenecks of your current set up and fix them. This way you can stay with Odoo for a long time even if your business grows quickly.
If you have any questions related to this guide, feel free to ask them in the comments.
Having Odoo performance issues?
Follow our Linkedin account and subscribe to our newsletter to make sure you don’t miss updates.
Python / Odoo Developer
1+ year of Odoo and Python development experience
10+ years of design, implementation, optimization and support of complex IT infrastructures
Main skills: Python, Odoo, PostgreSQL, JavaScript, System Administration


0 Comments