This article is written for Office 365 Business subscribers who use the software as their internal and external mailing system. When your business is growing, you can start facing a mess in your mailbox. This indicates that you need to integrate your mailing system with ERP or CRM, so you can continue to use your favorite mail client. Then, all communications will be synced in a structured way into ERP/CRM for managing sales, tasks, support tickets, and more.
In this guide, learn how to configure emails to work seamlessly with Office 365 and Odoo. Utilize the Odoo Outlook for bidirectional communication, access Office 365 emails in Odoo, and vice versa. Optimize the Odoo SMTP server for reliable email delivery. Configure incoming emails in Odoo to handle customer queries efficiently. Customize Odoo’s email settings for a professional brand image and streamlined communication. Boost productivity and collaboration with this integration.
As an A–Z guide, we have provided you with a full set of instructions on how to configure your Office 365 Exchange to work with the Odoo ERP system. This guide was written with the goal to be an A-Z guide. If you find that this article is not complete enough or something is unclear, please leave your comments down below and we will correct these instructions and add clarifications to it.
Prerequisites
1. Assumption is that you are already a user of the Office 365 Business subscription that includes Exchange Server. E.g. “Office 365 Business Premium”.
2. You are already using mailing features from Office 365. Meaning you are not a new Office 365 subscriber. If you just purchased a subscription and haven’t configured anything yet, you first need to perform an initial setup by following the official Microsoft guide. It is especially important that you already have properly configured your custom domain. This Microsoft guide can help you with this.
3. People executing the steps below need to have Administrative access (Role: Global Administrator) to https://www.office.com. That is needed in order to create new users and groups on the Portal.
4. According to official Odoo documentation, You can use an Office 365 server if you run Odoo on-premise. Office 365 SMTP relays are not compatible with Odoo Online or Odoo.sh.
For Odoo Online or Odoo.sh or at instances where it is not possible to use 25 port or without a static IP address you can configure it by following article.
If all above preconditions are already fulfilled, then you can go ahead with next steps.
Table of contents
- Configure Outgoing mail Server in Office 365 as Relay Server
- Configure Catchall Email in Office 365
- Install Odoo module to inform users that they used the wrong email
- Configure Outgoing Mail Server in Odoo
- Configure Incoming Mail Server in Odoo
Configuring Outgoing mail Server in Office 365 as Relay Server
Principle of Operation
In this section, you will learn how to configure Office 365 to act like a relay server.
Why is it needed?
Odoo ERP is trying to operate as a relay server. Meaning that it is used as an intermediate layer to send emails from ANY mail address to ANY mail address. For example, after this mail configuration Odoo will be able to send emails from any email (for example somename@anydomain.com)
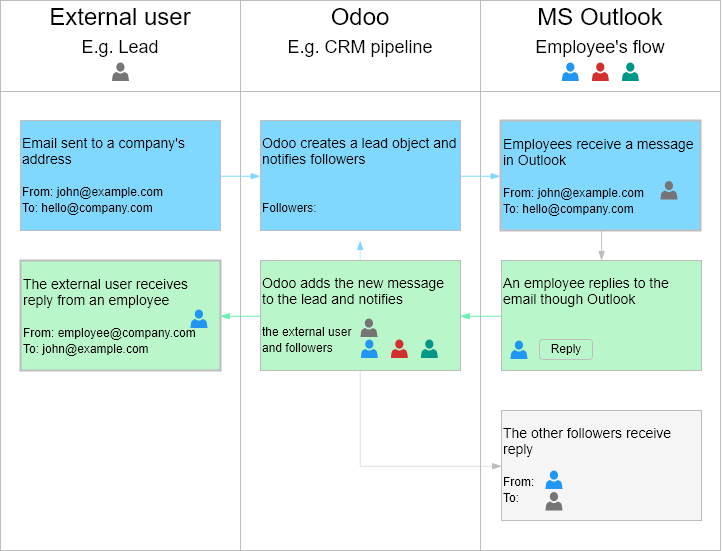
A little bit of clarification on why Odoo acts like this
Let’s imagine that you are getting an email from a potential lead to the address hello@company.com. Imagine that potential lead’s email address is john@example.com. Odoo ERP catches this email and creates a new Opportunity in the CRM Pipeline. And after Odoo creates it – it needs to send automatic emails to all followers, to inform everybody about the new Opportunity. As it is now implemented in Odoo ERP, the email will attempt to send FROM the email of the lead (e.g. john@example.com) and not from some generic email like erp@company.com. The reason why Odoo is doing it is to make sure that this email will be beautifully displayed as belonging to a real person and not to look like an automatic notification from ERP. And obviously when you respond to the person through Odoo CRM, your lead will also see that email is coming from realperson@company.com instead of some generic email erp@company.com. So the intention of Odoo is clear – they want to ensure all messages from ERP are personal and do not look like an automatic notification. But that gives additional headache relating to the mailing system configuration.
Configuring of a SMTP relay connector
The configuration of the outgoing mail server is based on the following documentation.
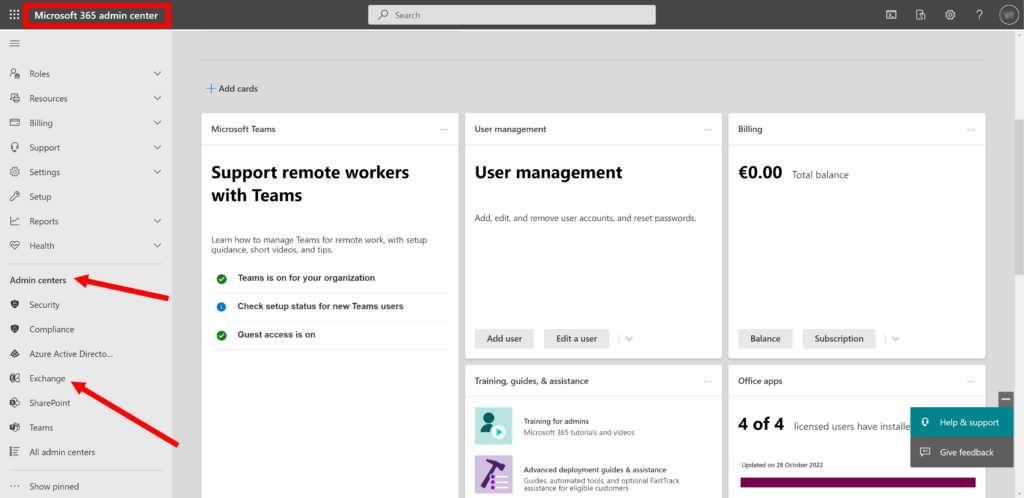
- Login with your Global Admin user account to https://admin.microsoft.com and click on the “Admin centers -> Exchange” menu in the left panel
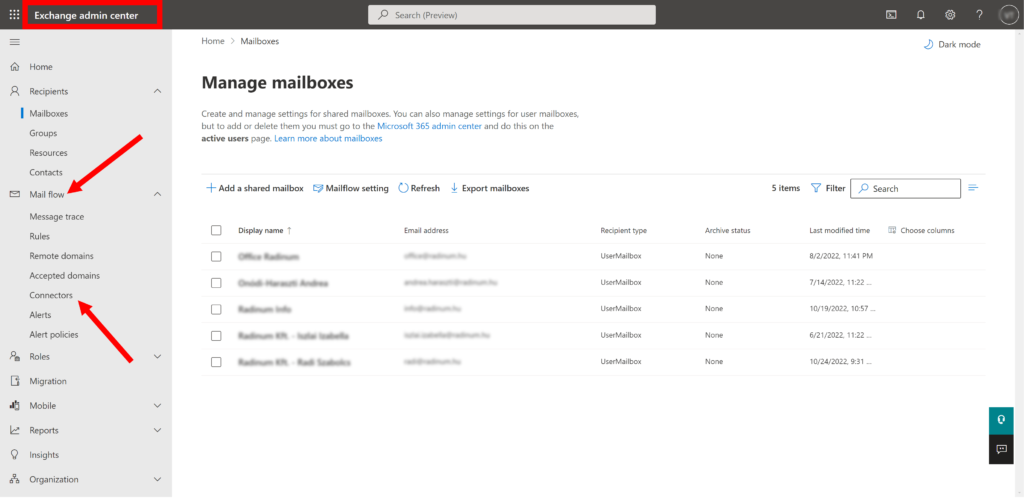
- In the Opened Window click on the section “Mail flow -> Connectors”
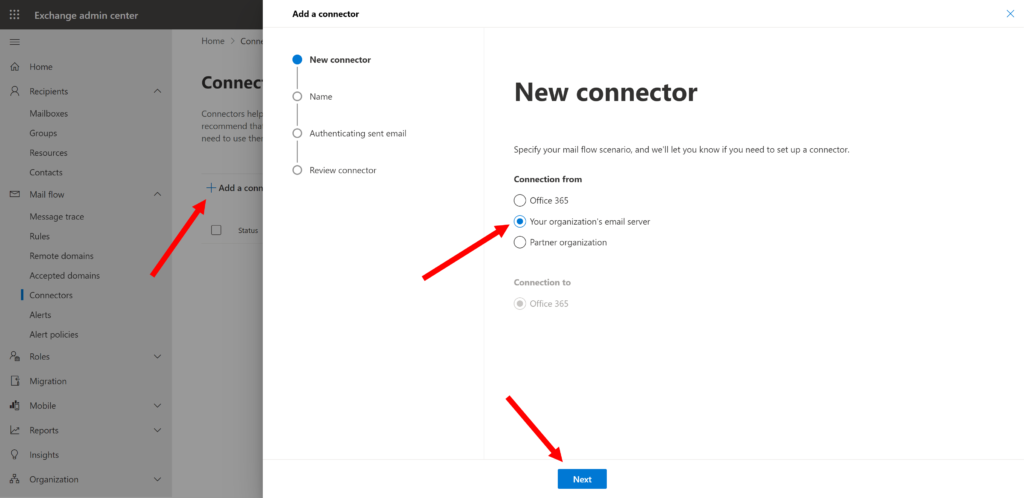
- Click the “Add a connector” on the opened page to add a new connector.
- On the first screen with mail flow scenario, select the following values and click “Next”
From = “Your organization’s email server”
To = “Office 365”
- Give a name to the connector. E.g. “OdooMail”. All checkboxes should be checked (default behavior). And click Next
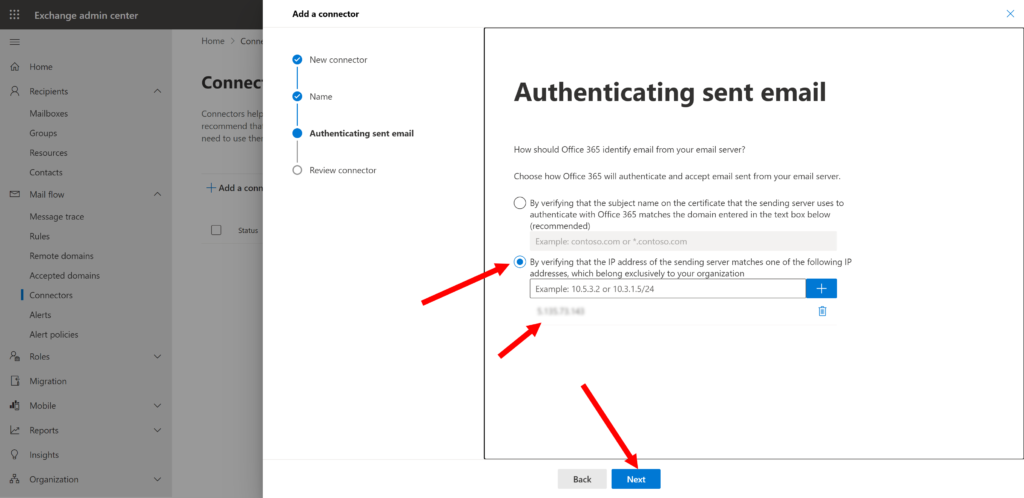
- Select checkbox to verify allowed senders by IP address and add IP addresses of all your Odoo ERP instances. That is a type of whitelist. Office 365 will trust messages sent from those IP addresses as safe.
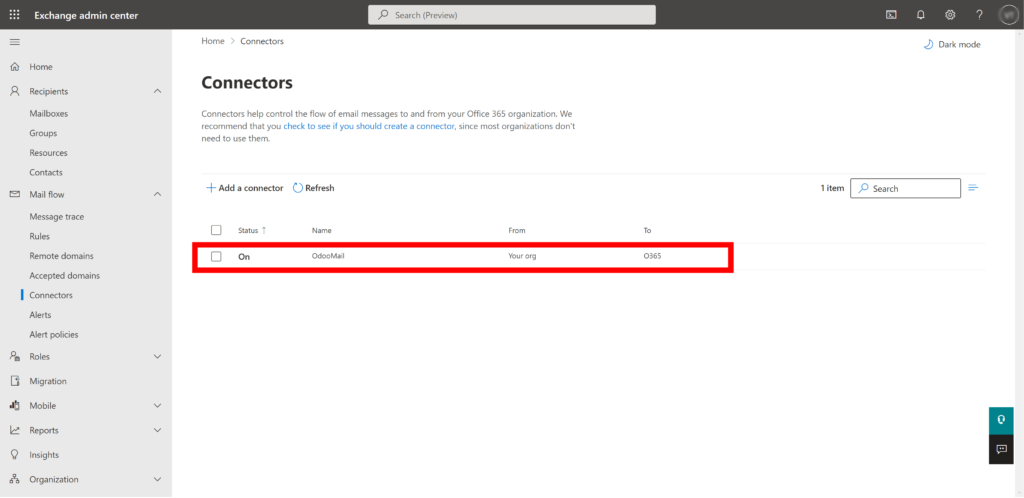
- After clicking “Create Connector” you should get the following screen with an already created connector
Configuring of a Anti-spam thread policy
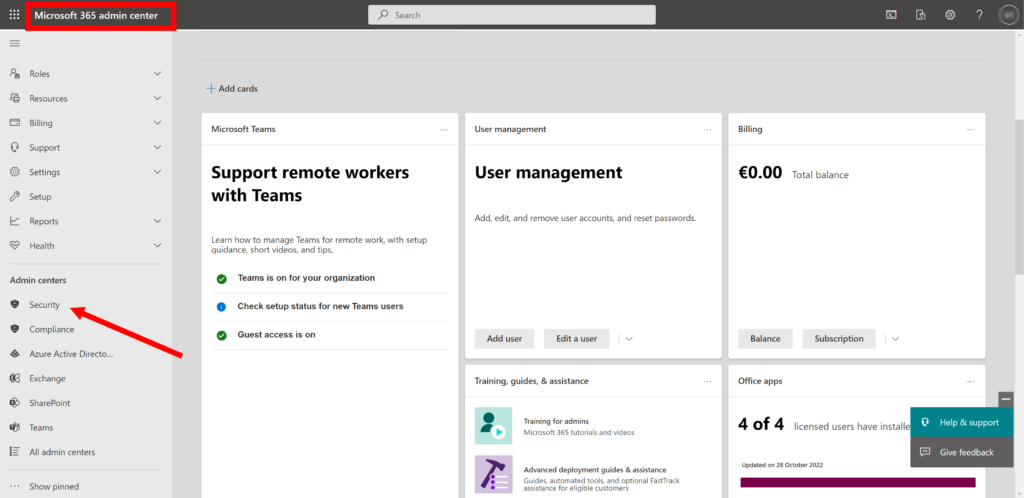
- Go back to Admin center click on the “Admin centers -> Security” menu in the left panel.
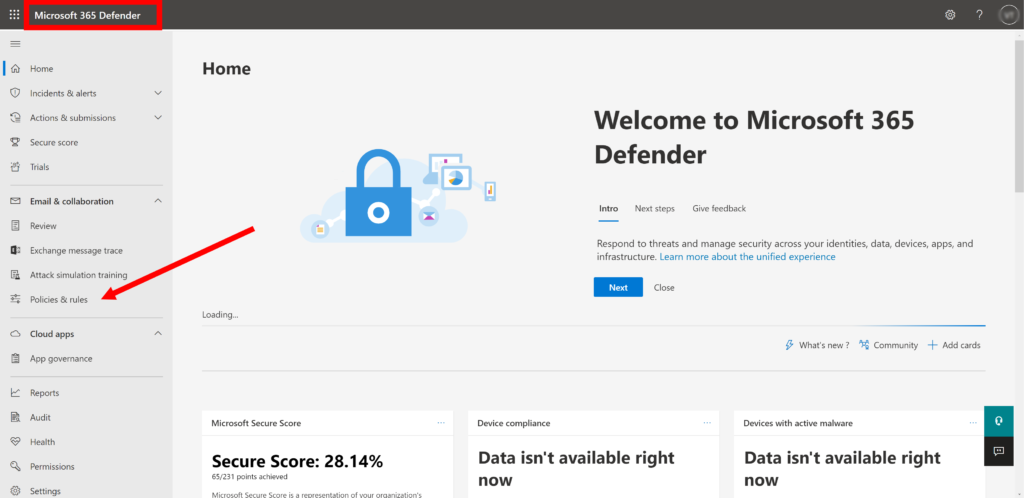
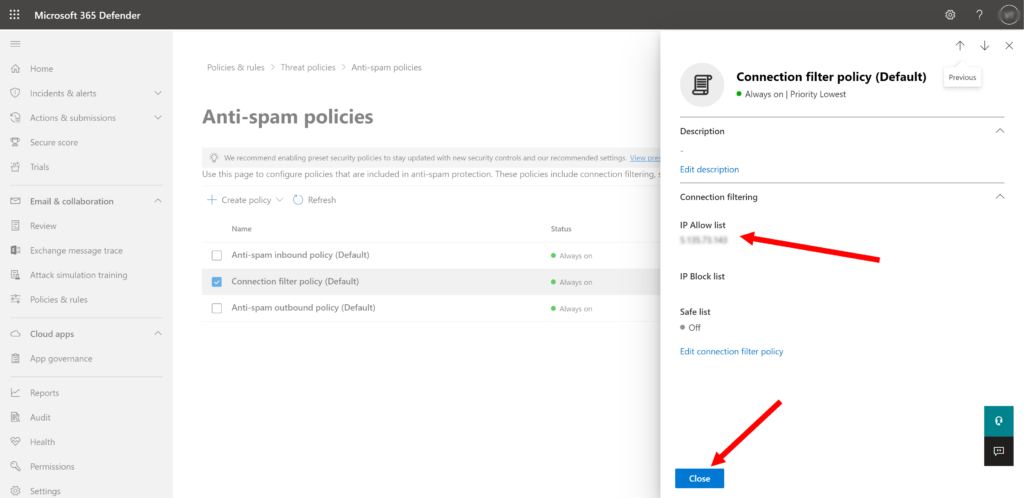
- In the Opened Window move by following path “Policies & rules -> Threat policies -> Anti-spam -> Connection filter policy (Default)” and click on “Edit connection filter policy”
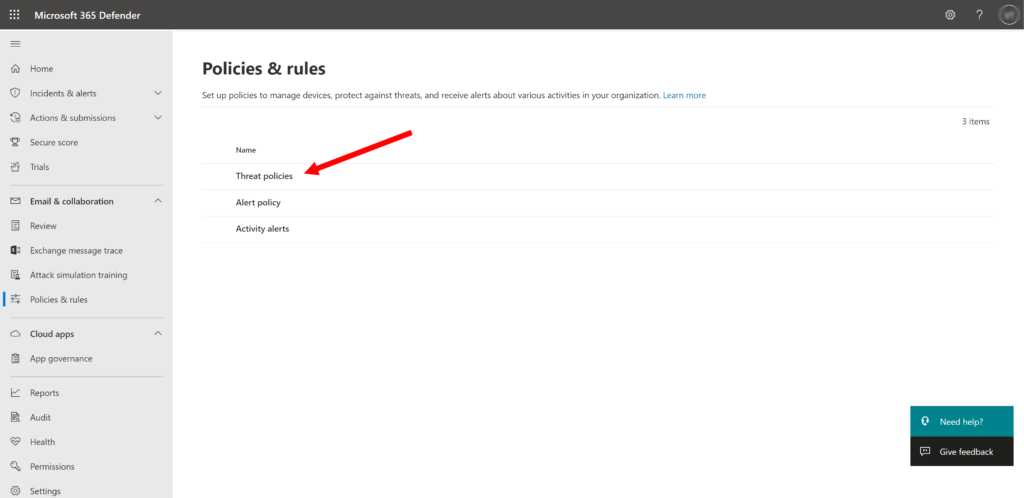
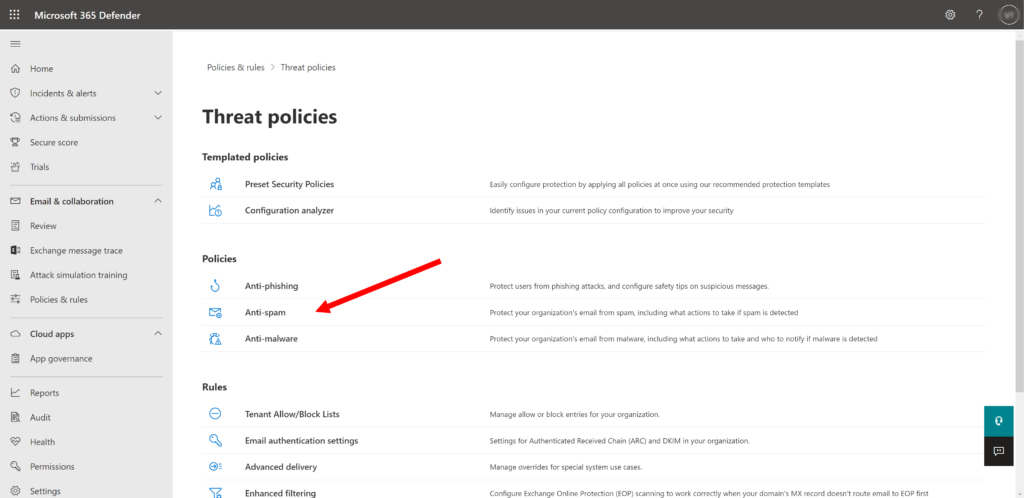
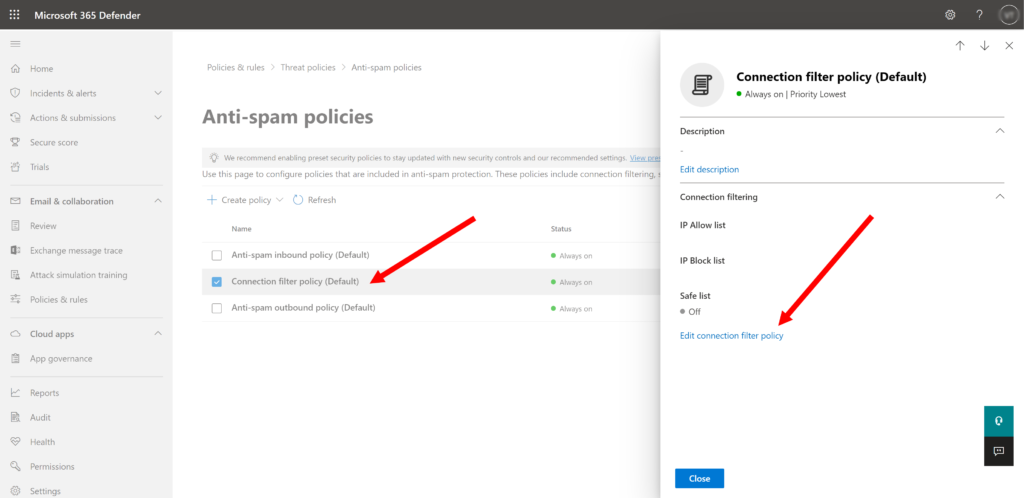
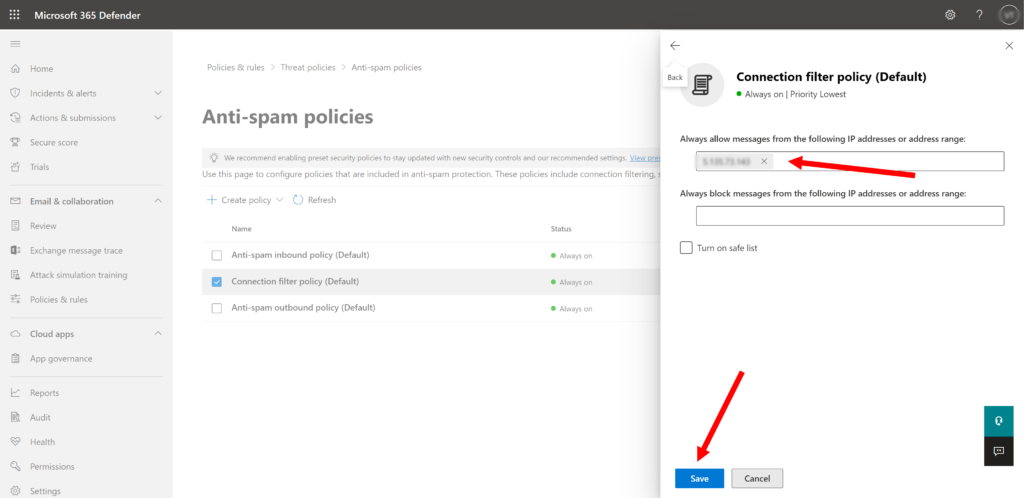
- Add to “Always allow messages from the following IP addresses or addresses range” field IP addresses of all your Odoo ERP instances and click on “Save”.
Configuring of a Domain DNS records
- You need to make sure that your domain has required DNS records. For this go back to Admin center and move by following path: “Settings -> Domains -> Your Domain -> DNS records”
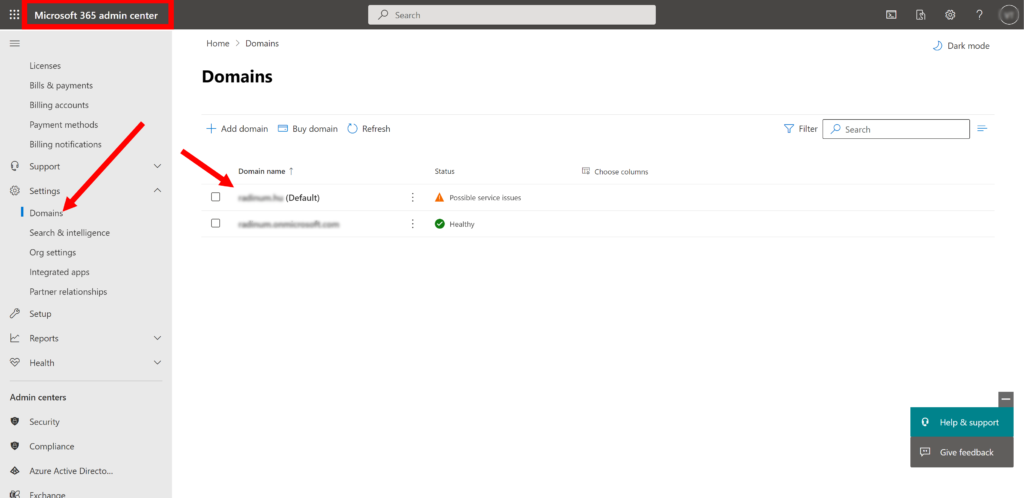
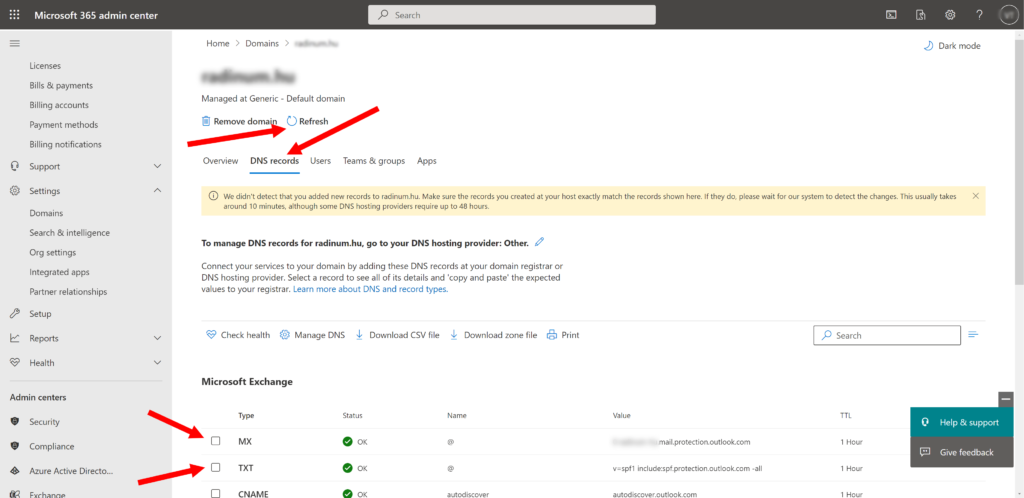
- We are interested in MX and SPF records. Check that the MX record looks like following structure:
<subdomain(optional)>-<second level domain(SLD)>-<top level domain (TDL)>.mail.protection.outlook.com
Example: contoso-com.mail.protection.outlook.com (domain with replaced dots to dash before .mail.protection.outlook.com).
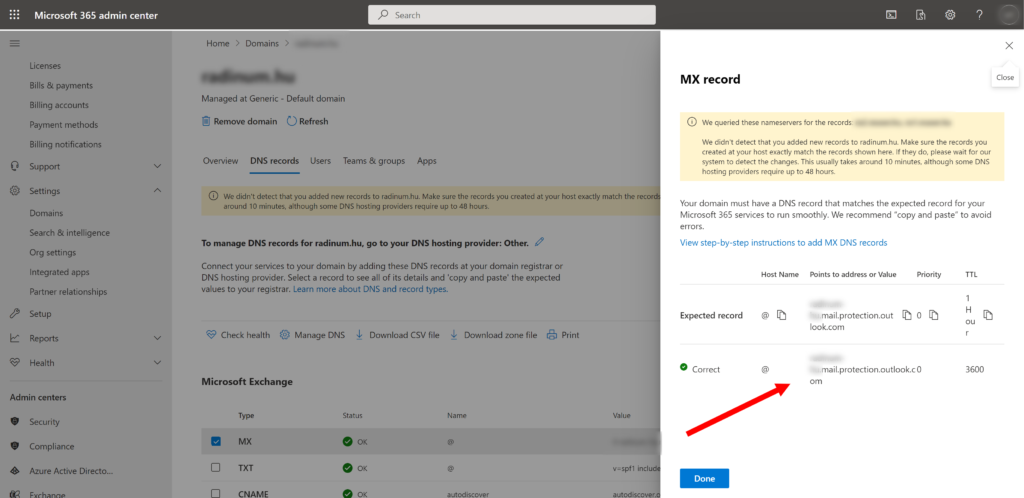
If the MX DNS record does not match with mentioned structures, you should add them by the Admin panel of your domain provider.
- Check that SPF record contain IP addresses of all your Odoo ERP instances and looks like following structure:
v=spf1 ip4:<your_ip> ip4:<your_other_ip(optional)> include:spf.protection.outlook.com ~all
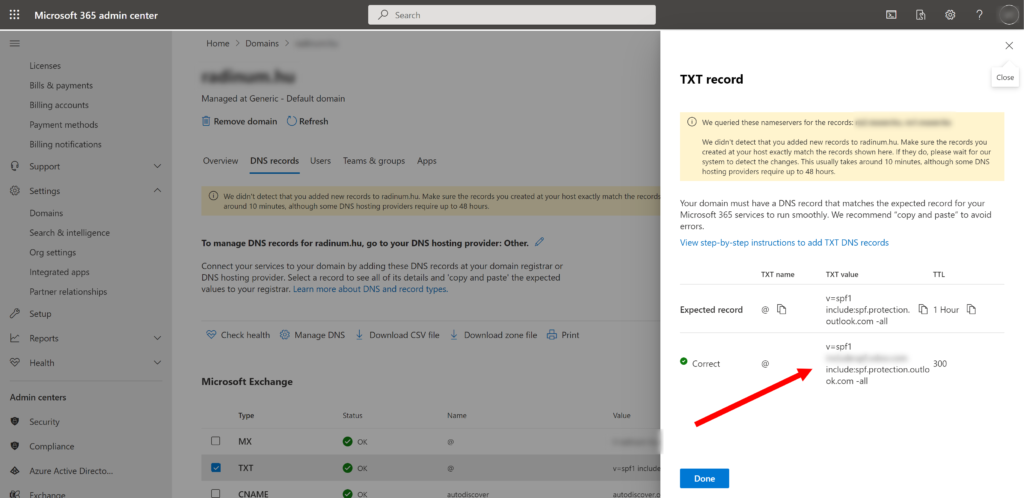
If the SPF DNS record does not match with mentioned structures, you should add them by the Admin panel of your domain provider.
IMPORTANT!
If you are trying to integrate Office 365 emails with Amazon EC2, you will need to follow this article additionally. The reason why you need this – Amazon has additional protection to prevent spammers to send emails from their servers. So you have to explicitly request from them allowance to do that.
Configuring Catchall Email in Office 365
Principle of Operation
In this section, you will learn how to create a special mail address in Office 365 that will collect emails sent to unknown receivers (meaning no User exists in Office 365).
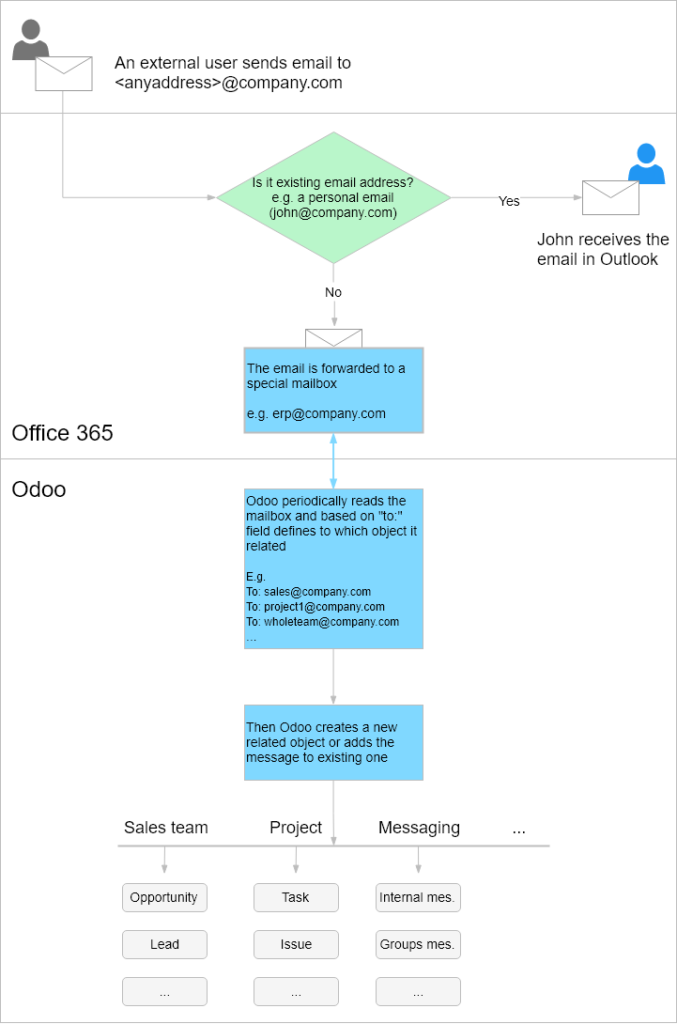
Why is it needed?
In Odoo ERP it is possible to configure multiple Sales Teams, Projects and etc. Any objects you want. For example, you may want to have a Sales Team with the name “Initial Processing Team”. That sales team should process leads that are received to the email address “hello@company.com”. Also, you may want to have separate Sales Teams which will be responsible for processing emails sent to addresses “asia-sales@company.com” and “europe-sales@company.com” or more.
You may configure as many email addresses as you want and obviously those email addresses will not be real emails in your Office 365 Portal.
So to avoid lots of manipulations in the Office 365 Portal when you are adding something new in Odoo ERP (new project, new sales team and etc.), it is better to configure single email addresses that will be the only endpoint for all emails sent to nonexistent mailboxes. That way Odoo ERP can easily process them, and no emails will be lost.
Configuring of a Catchall mailbox user
- Sign into https://admin.microsoft.com, go to menu “Users -> Active users” to see list of already created users
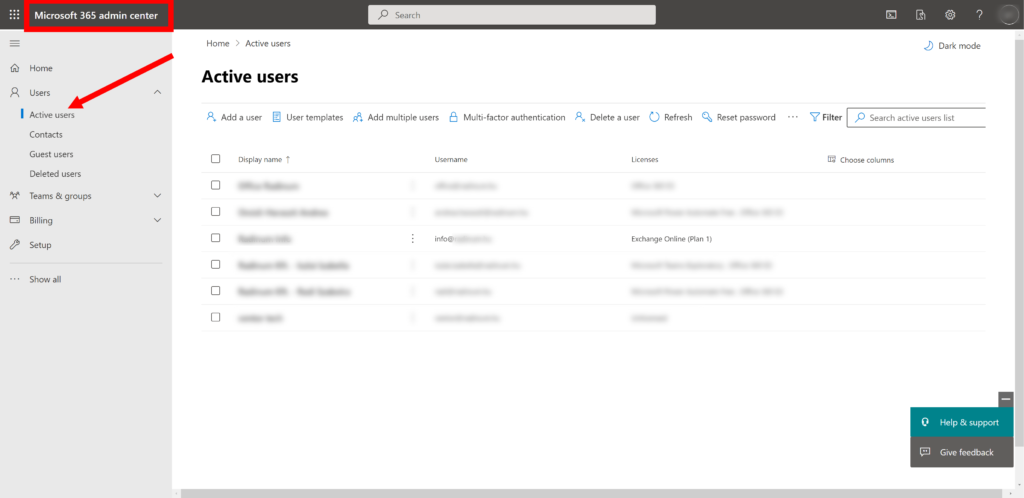
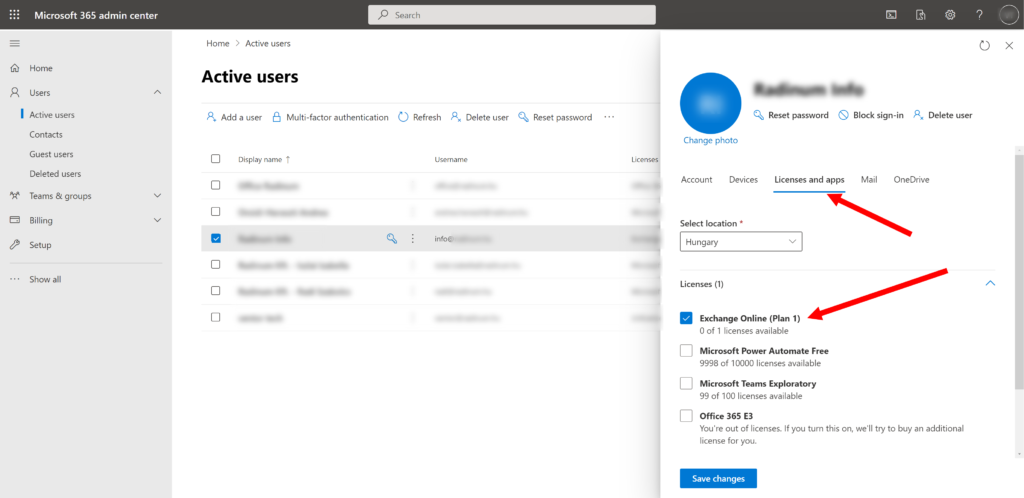
If you don’t have the user which will be used like Catchall mailbox, create it by clicking on the button “Add a user”.The name of the user you can write like “ERP Notification” with email info@your-domain.com (recommended alias is ‘catchall’’ but you cat use any one except ‘bounce’, as example we use ‘info’). Note that Role of this user should be “User (no administrator access)” and Product License should have the status Exchange Online or higher.
If you have the user which will be used like Catch All mailbox, you need to make sure that it has required configuration.
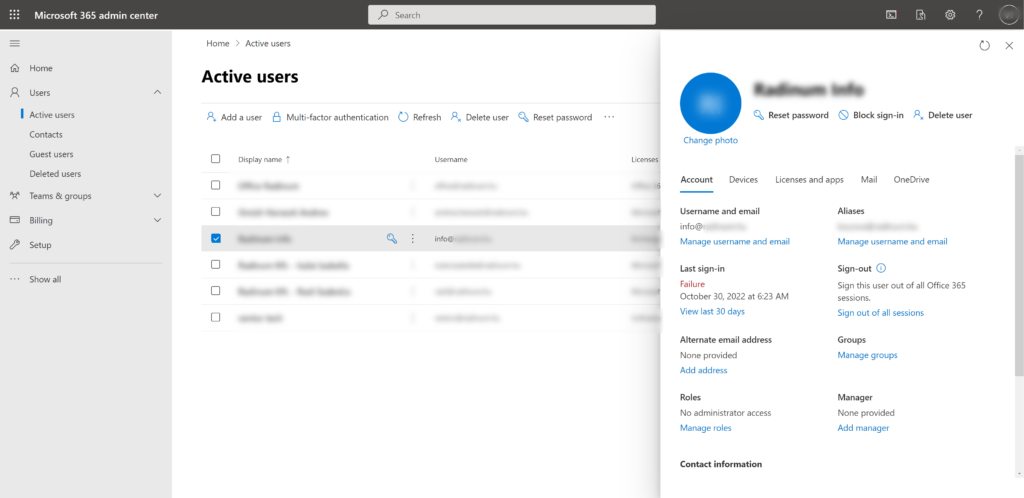
- First of all you should go to the “Licenses and apps” tab and make sure that the user’s Product License has the status Exchange Online or higher.
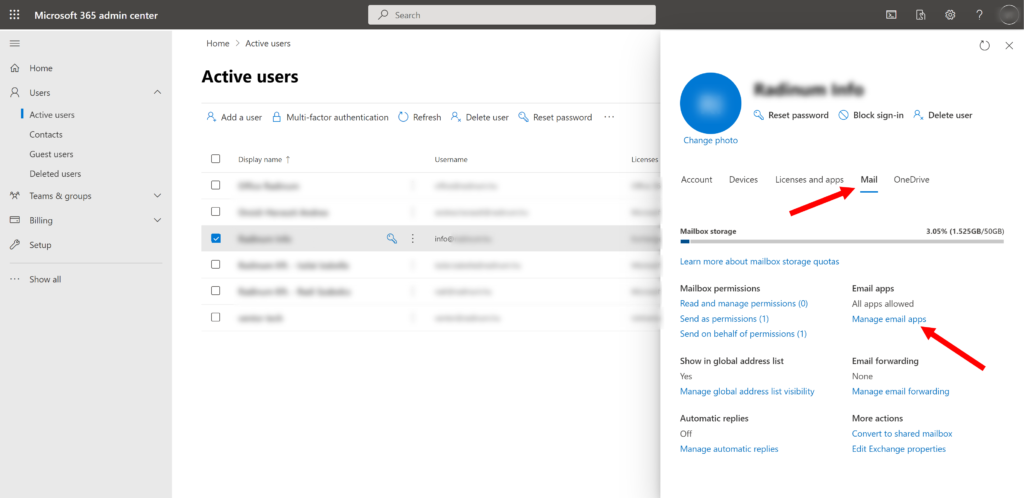
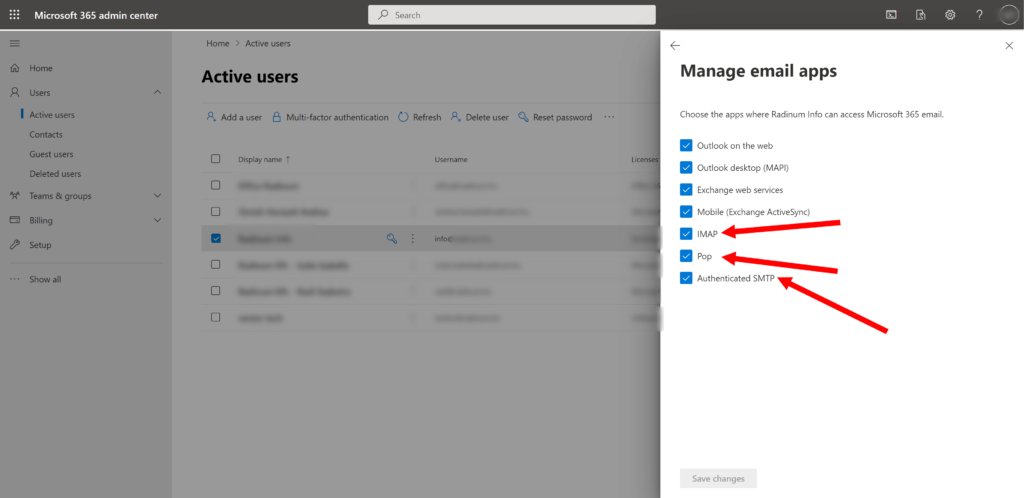
- After that you should go to the “Mail” tab and make sure that the user has permissions for connections by SMTP, IMAP and POP protocols.
Configuring of a Dynamic Distribution Group
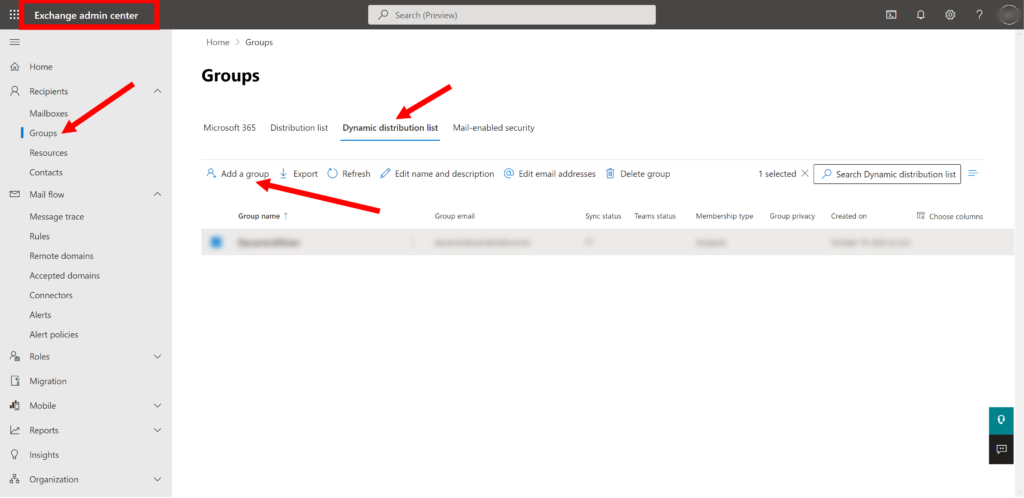
- Go to the menu “Admin Center -> Exchange -> Recipients -> Groups”, choose the “Dynamic Distribution list” tab and click “Add a group”.
- Choose the “Dynamic distribution” point and click “Next”.
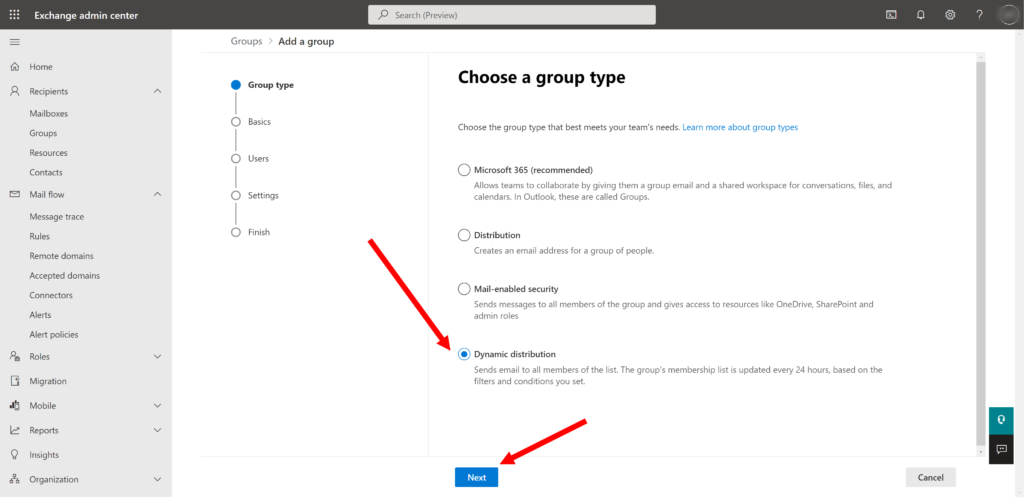
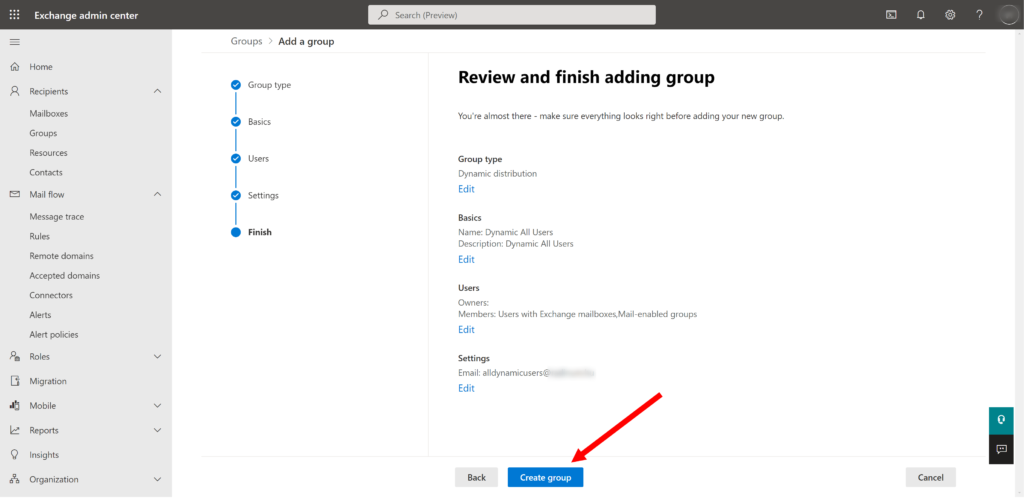
- Now enter the following values in the fields and click “Next”:
- Name = “Dynamic All Users” (you can use any you want)
- Description = “Dynamic All Users” (you can use any you want)
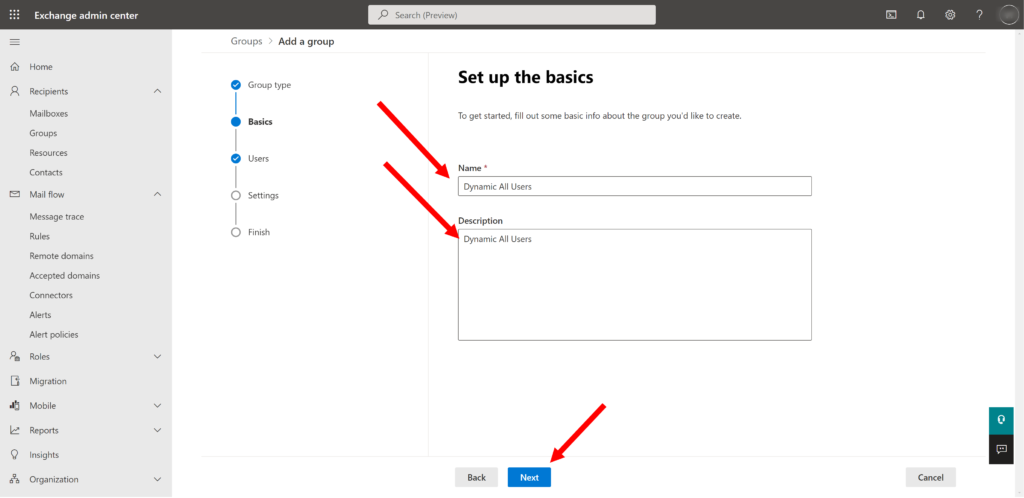
- Choose the following values in the fields and click “Next”:
- Members = “Users with Exchange mailboxes” and “Mail-enabled groups”
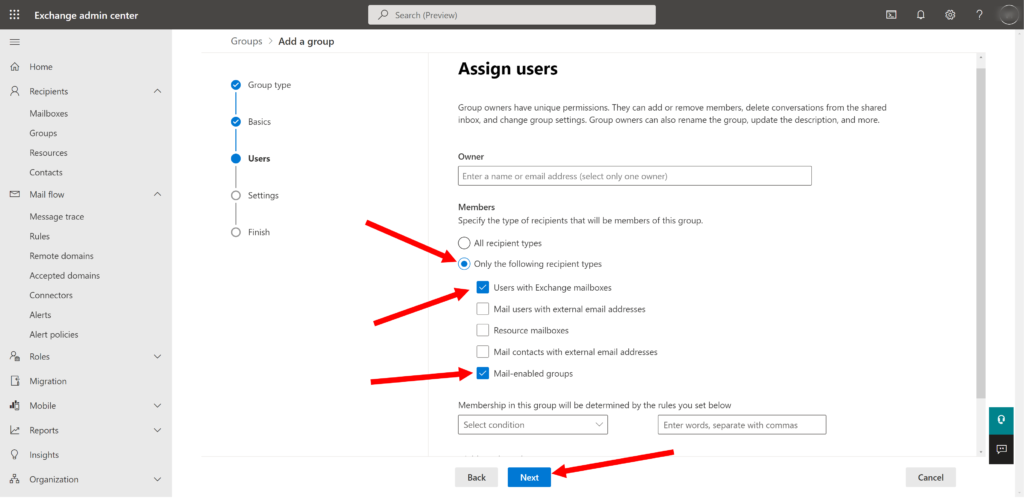
- Enter the following values in the fields and click “Next”:
- Alias = “alldynamicusers” (you can use any you want)
- Domain = the same domain like for Catchall mailbox
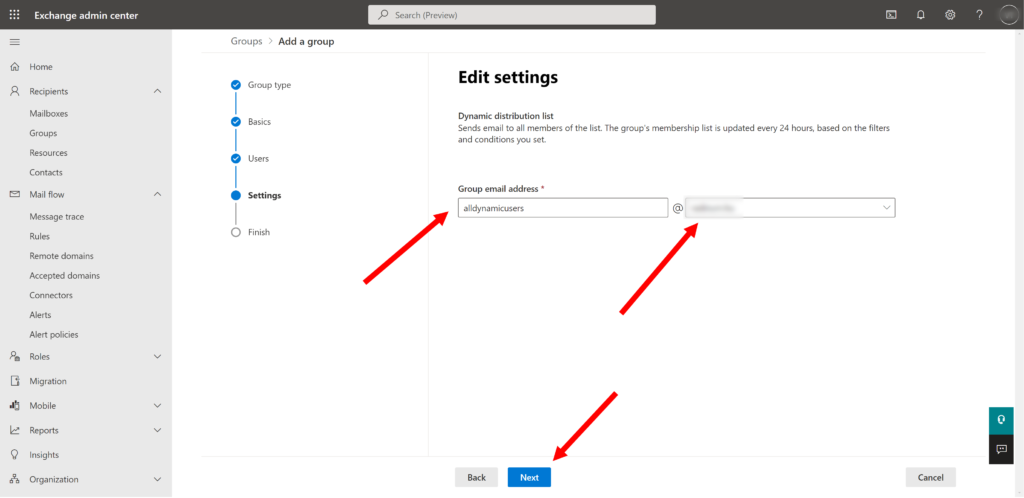
- Confirm the group creation by clicking “Create group”
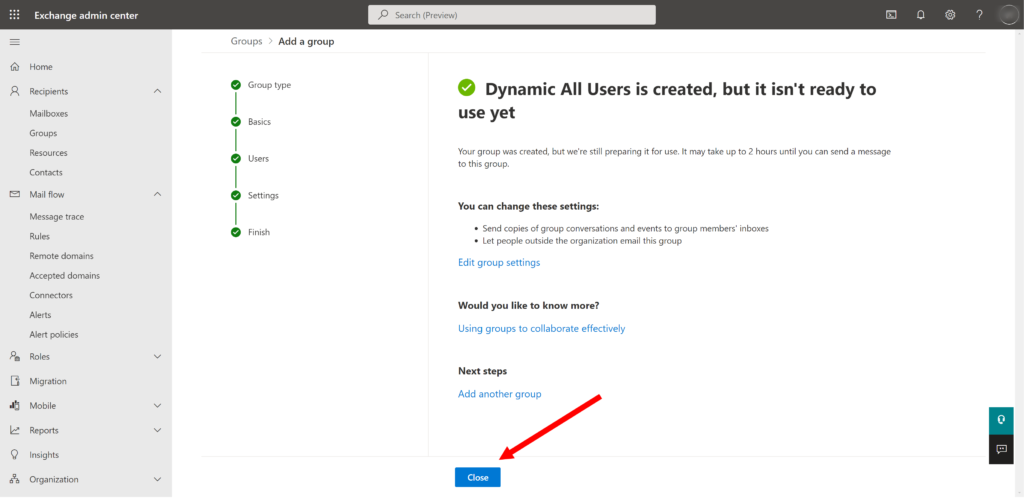
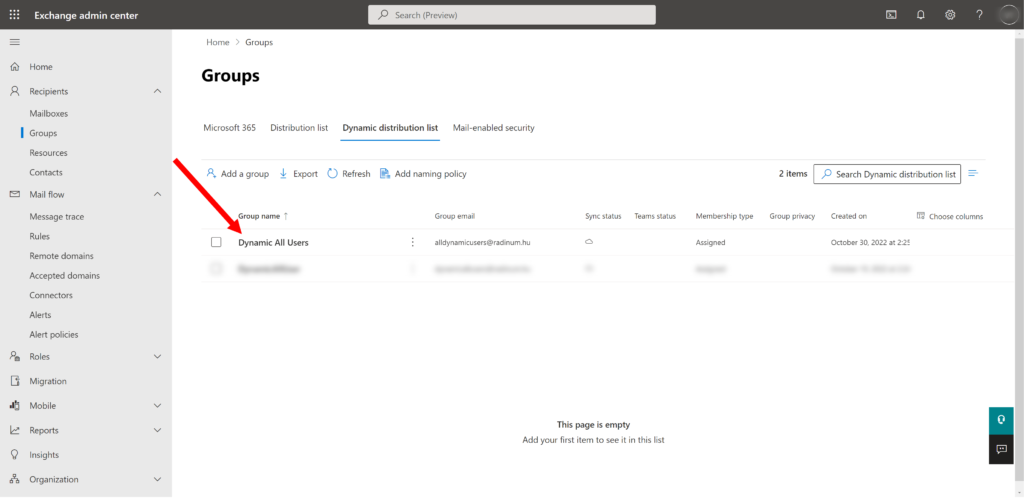
As result you can see the same as at examples below:
Configuring of a Mail Flow Rule
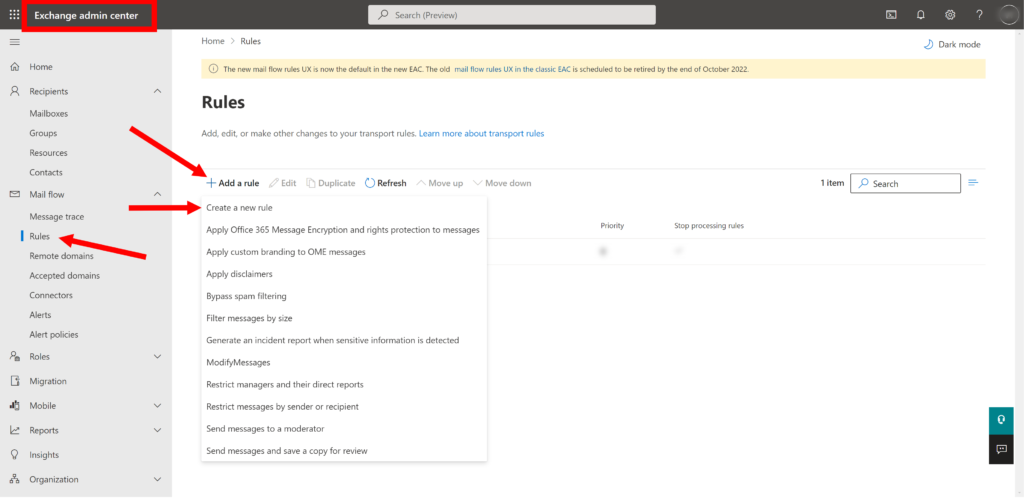
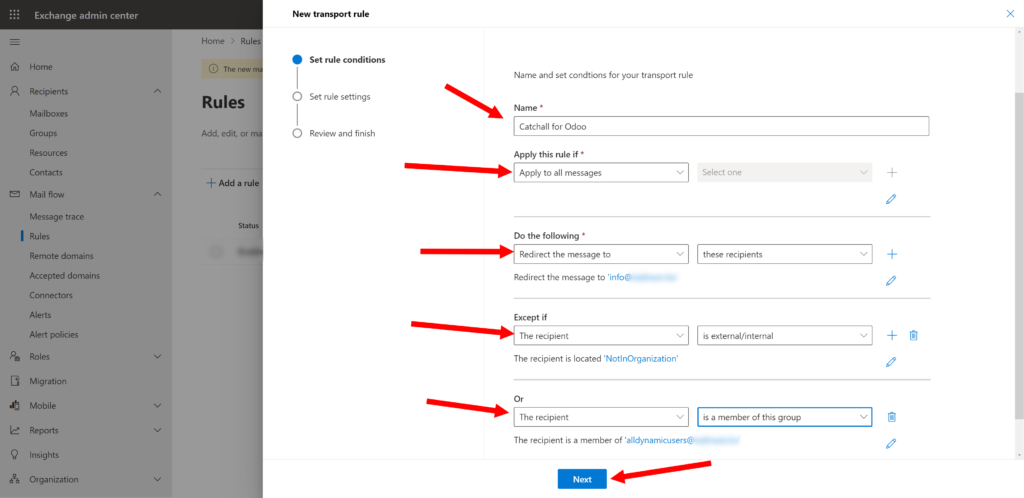
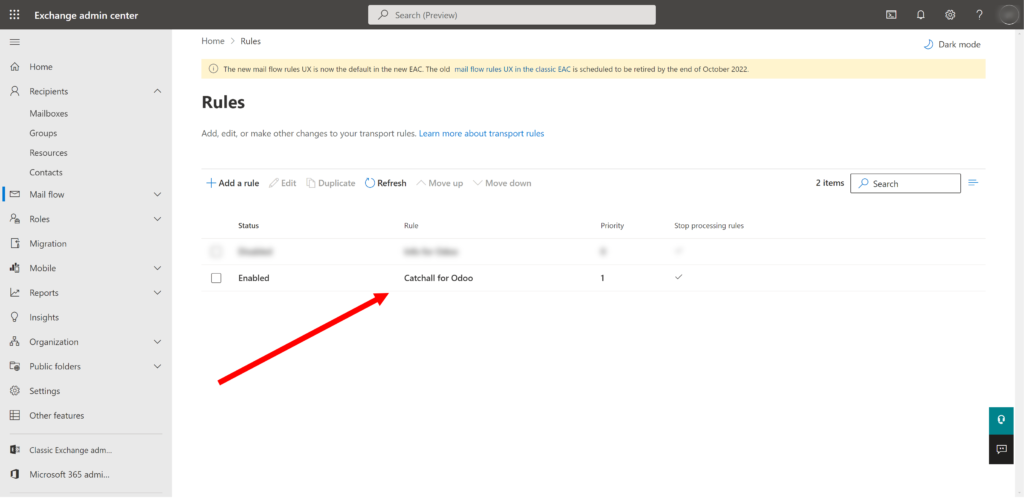
- Go to the menu “Admin Center -> Exchange -> Mail flow -> Rules”. In this section we are going to create a special mail flow rule that will allow you to catch all emails to unknown email addresses and will forward them to info@your-domain.com, so Odoo ERP can process and analyze them. Click the “Add a rule” and choose the “Create a new rule”.
- In opened form enter the following values in the fields and click “Next”:
- Name = “Catchall for Odoo”
- Apply this rule if = “Apply to all messages”
- Do the following = Redirect the message to your Catchall user (here you can select email address created in earlier stages)
- Except if = The recipient is located “NotInOrganization” OR The recipient is a Member of All Dynamic Users group (those rules are needed not to do anything with messages that are sent to external email addresses or that are sent to real users in your organization)
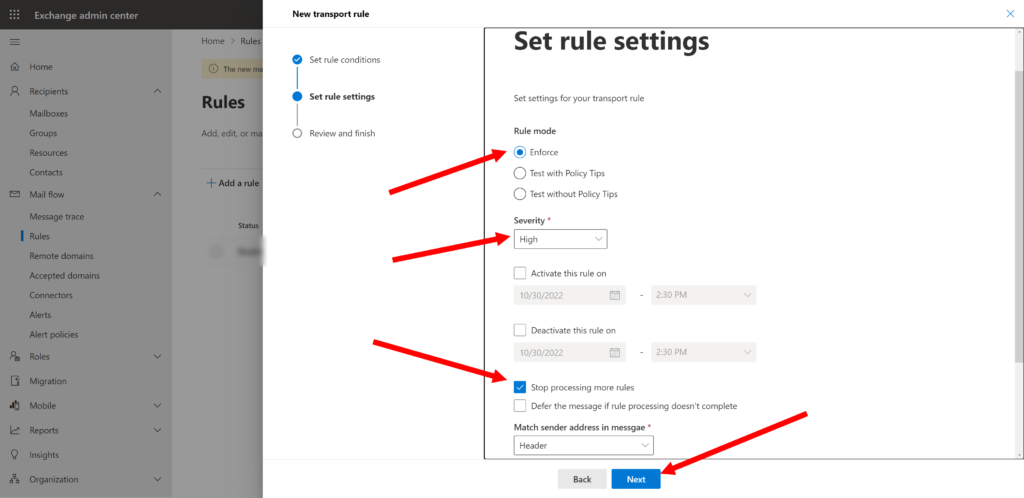
- Then enter the following values in the fields and click “Next”:
- Rule mode = “Enforce”
- Severity = “High” (if any issues we want to debug this)
- Stop Processing more rules = Selected
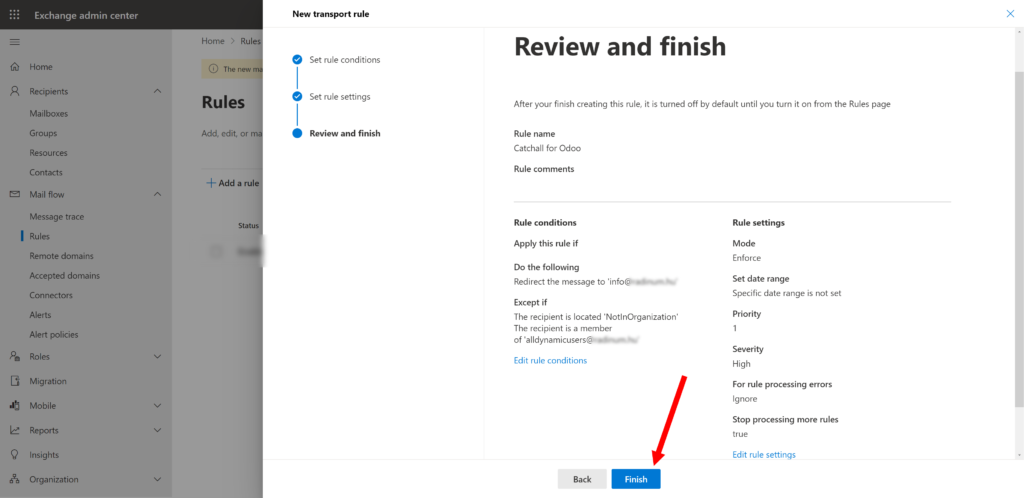
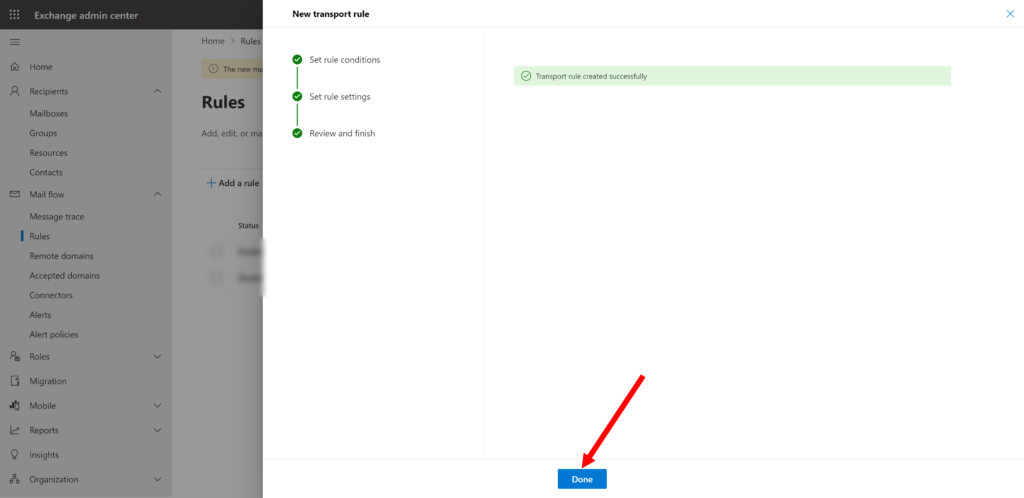
- As a result, after saving your rule it will look like the screens below.
Configuring of a Internal Relay for Accepted Domain
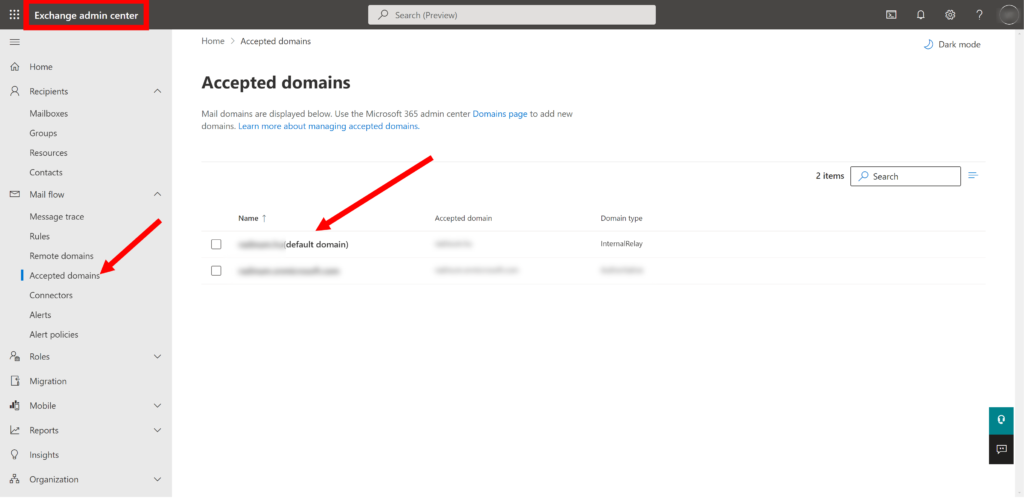
- Note that after executing the above, the process is not finished yet. Now if you try to send email to non-existent email addresses, Microsoft will bounce back this email to the user saying that “Such email address does not exist”. We need to switch off this feature of Microsoft on our domain (but later we will need to replicate it on Odoo side, but that is next steps). For now, we should go to the menu “Admin Center -> Exchange -> Mail flow -> Accepted domains” and find our domain
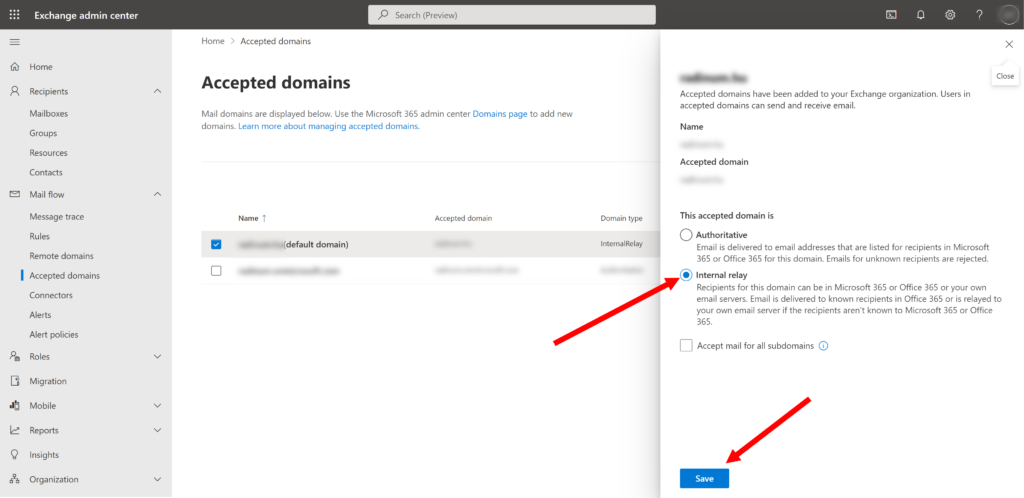
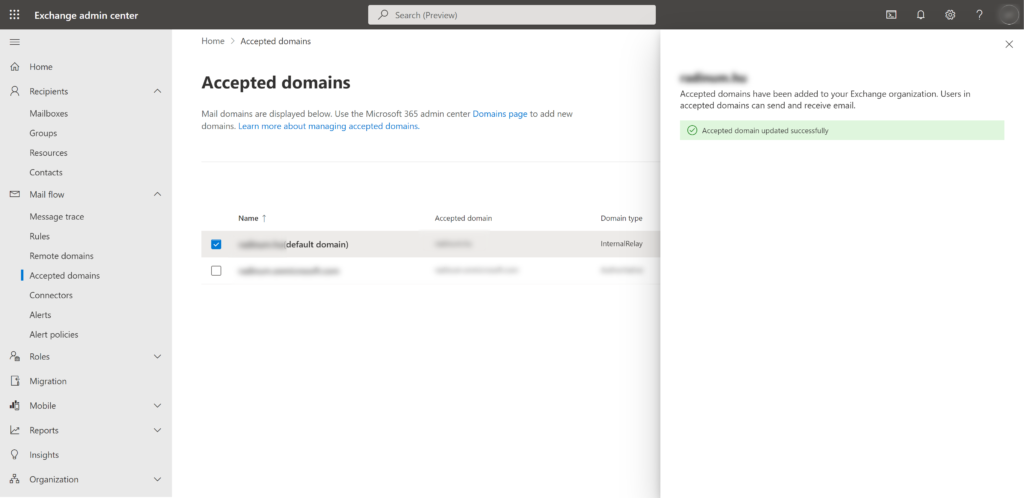
- Now edit your domain and set its type to be an “Internal Relay” as shown on the image below
Configuring of a Azure App for connection to Catchall mailbox
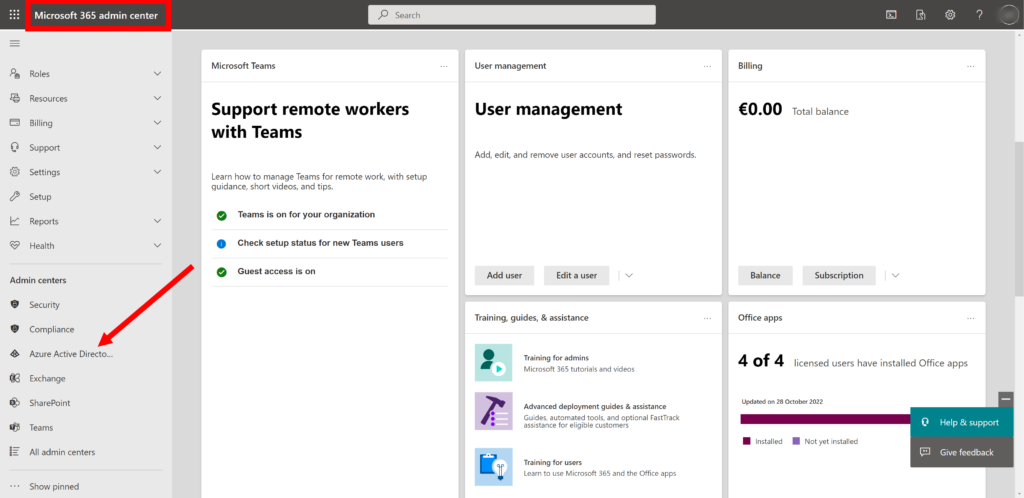
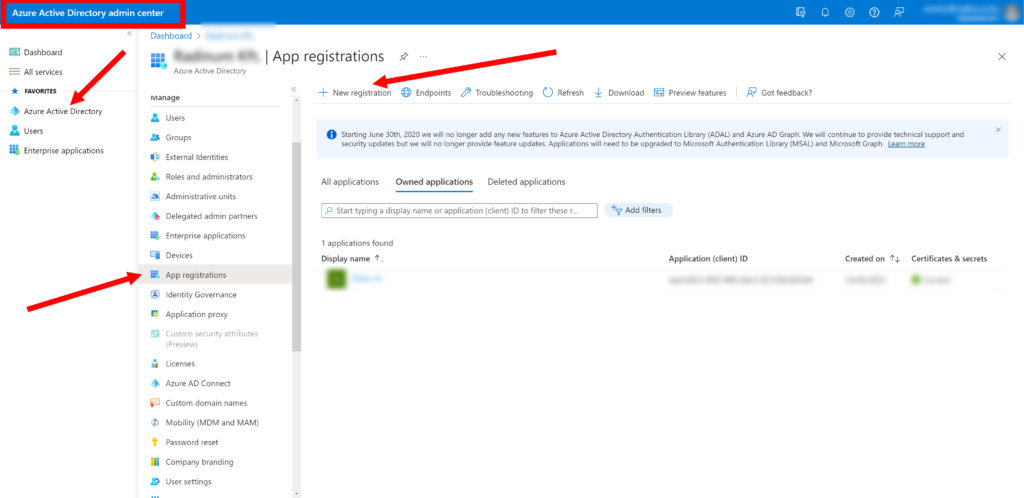
- To have the possibility to connect to the Catchall mailbox from Odoo it is needed to create an entrypoint with special permissions. To do this we should go to the menu “Admin Center -> Azure Active Directory admin center -> Azure Active Directory -> App registration” and click “New registration”.
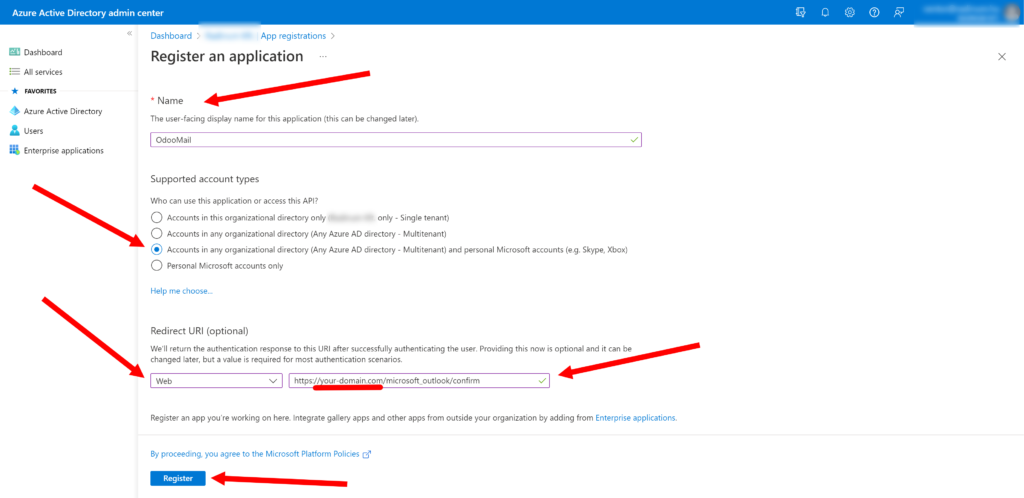
- Enter the following values in the fields and click “Register”:
- Name = “OdooMail” (you can use any you want)
- Supported account types = “Accounts in any organization directory and personal Microsoft accounts”
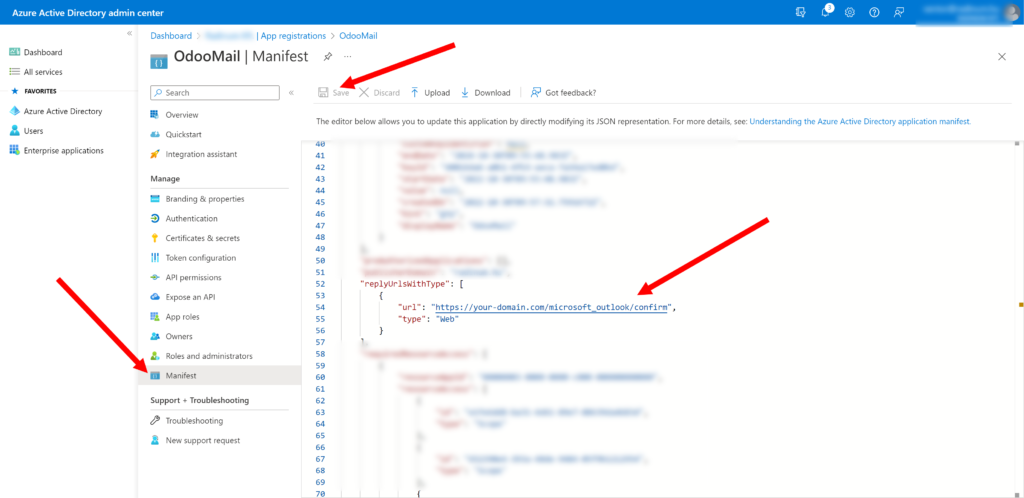
- Redirect URI = “Web” and “https://your-domain.com/microsoft_outlook/confirm” (domain of your odoo instance, it can be not same as mail domain)
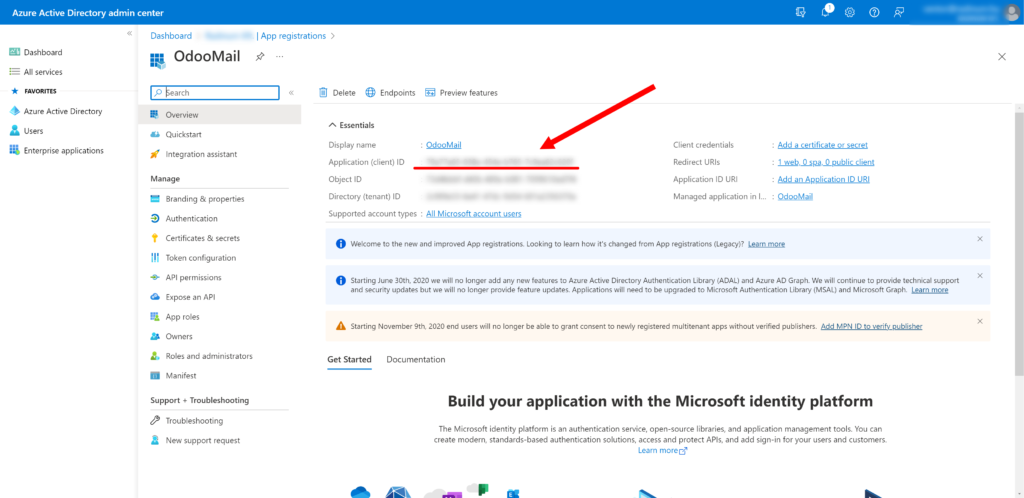
In the result we see a new app. Be sure to copy and save the “Application (client) ID”, it will be required in configuring of a connection to Catchall mailbox from Odoo.
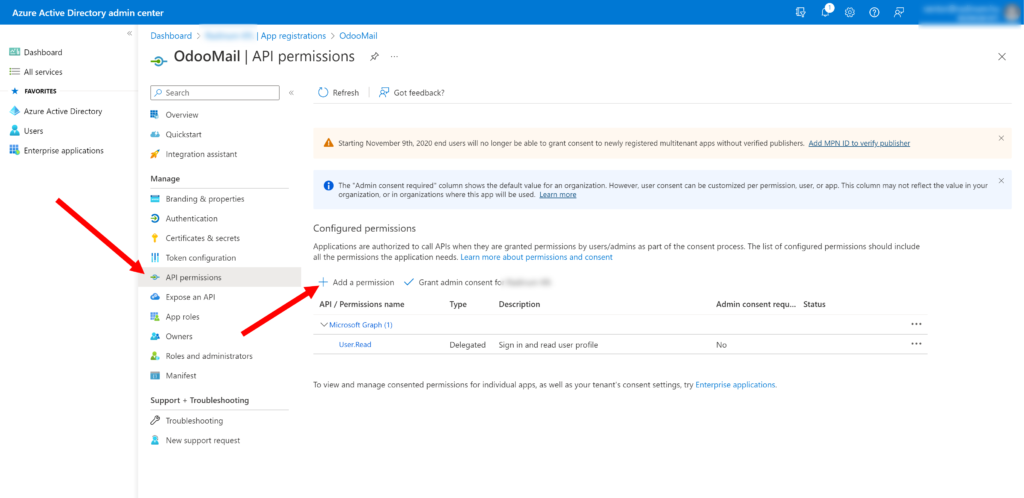
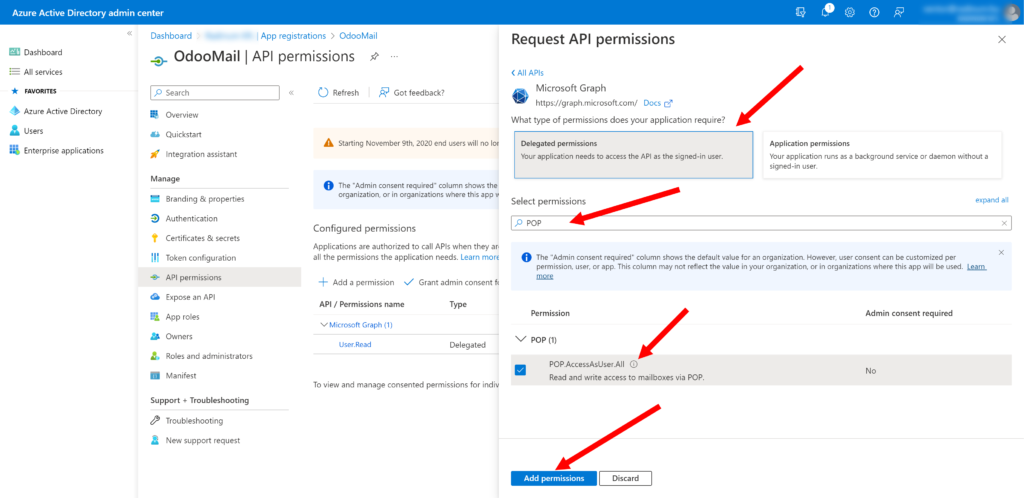
- Then we should give the app special permissions. For this go to the “App permissions” and click “Add a permission”.
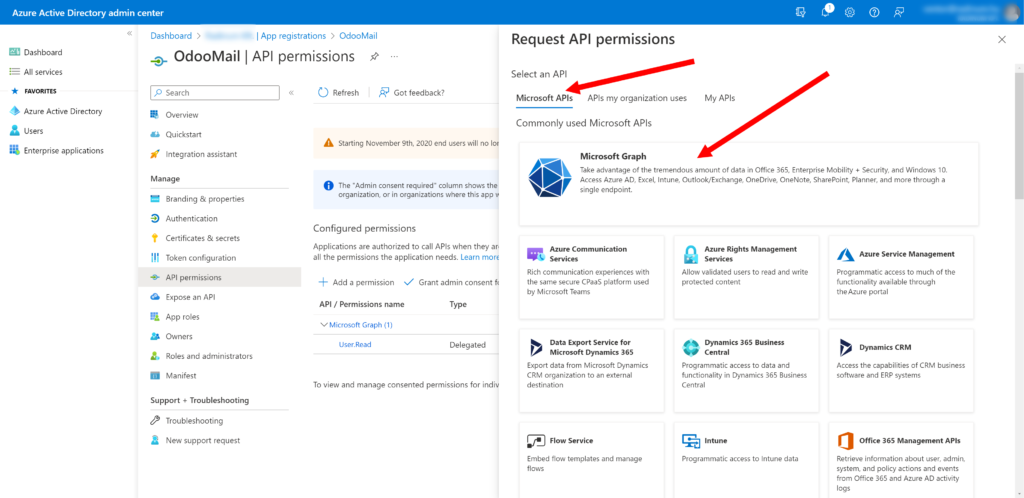
- In the form go to the “Microsoft APIs” tab and click “Microsoft Graph”.
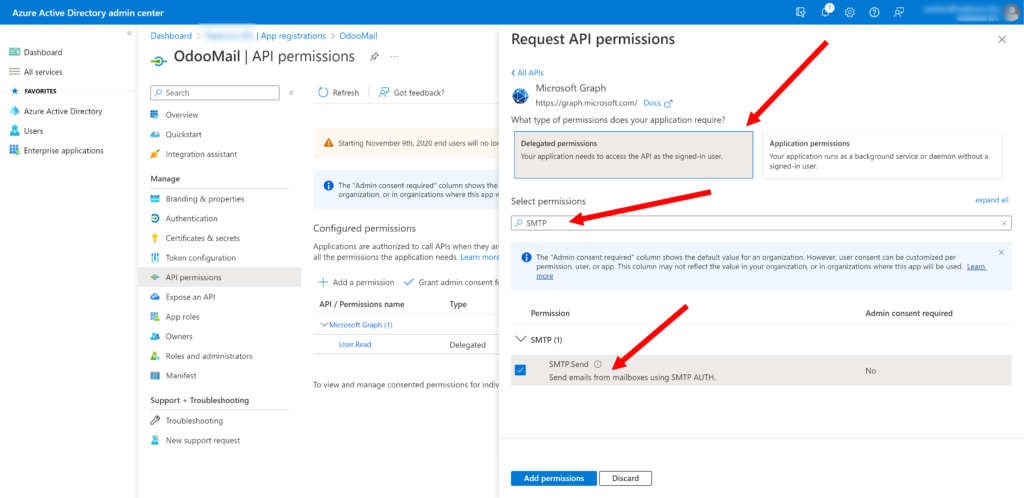
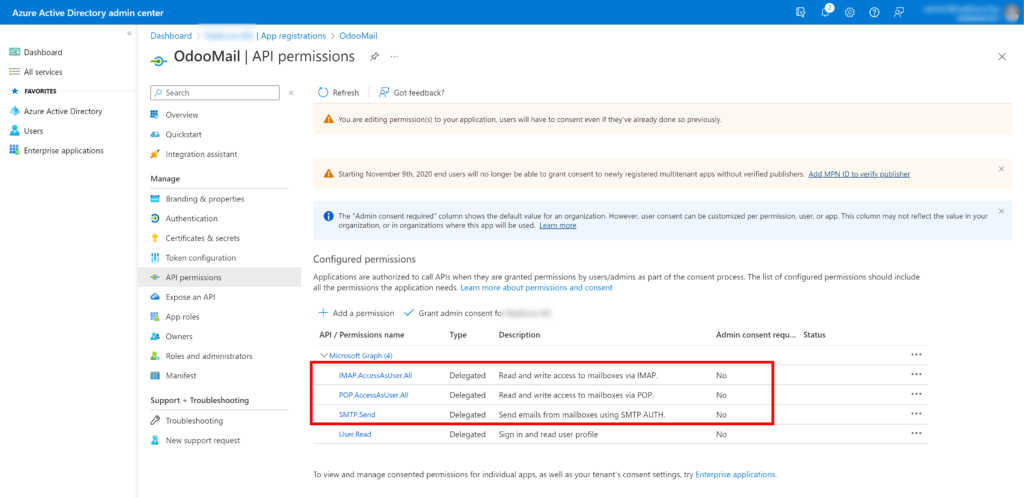
- After that choose “Delegated permissions”, find and check “SMTP.Send”, “IMAP.AccessAsUser.All”, “IMAP.AccessAsUser.All” and then click “Add permissions”.
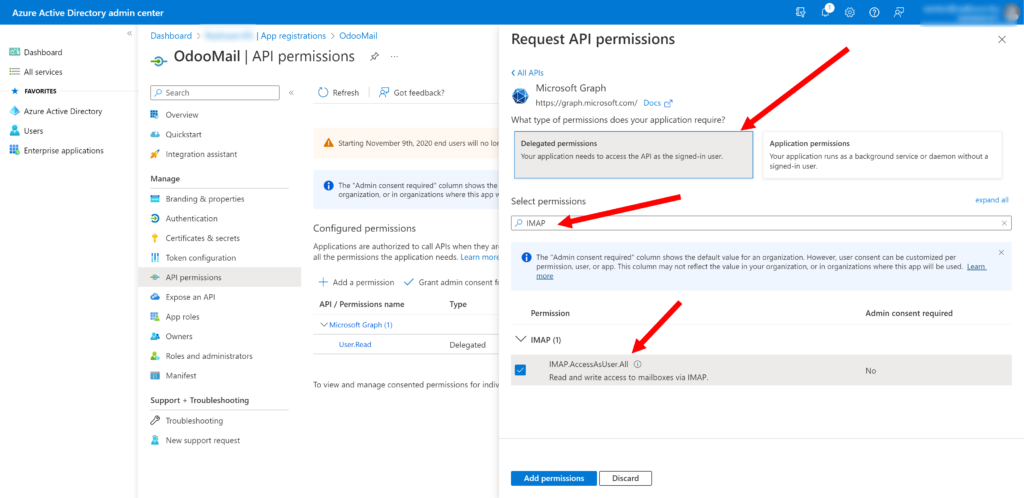
As a result we will see the same as in the example below.
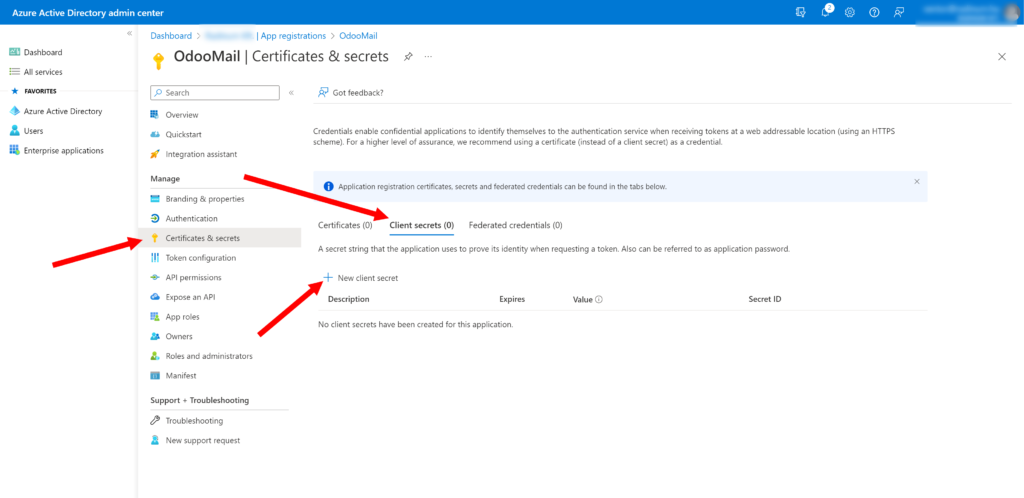
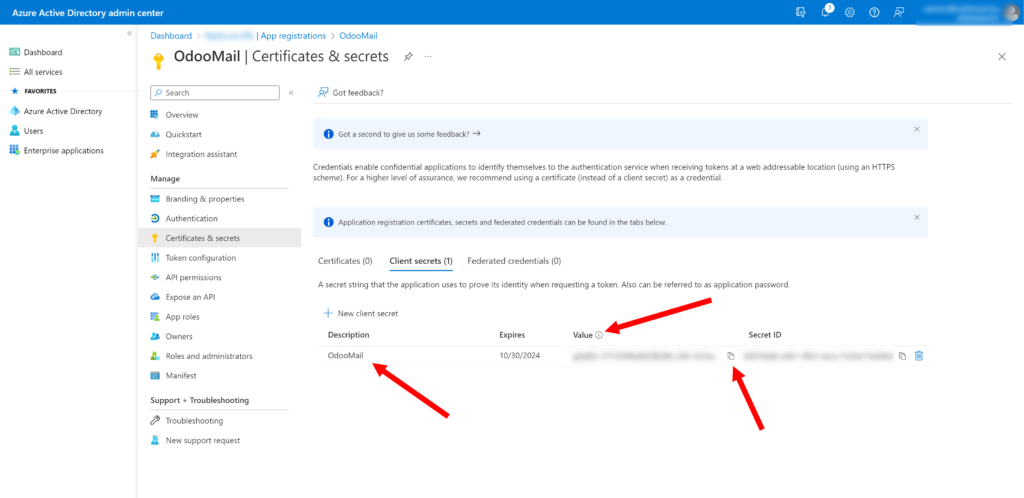
- Now we should create the app secret key. For this go to “Certificates & secrets”, choose the “Client secrets” tab and click “New client secrets”.
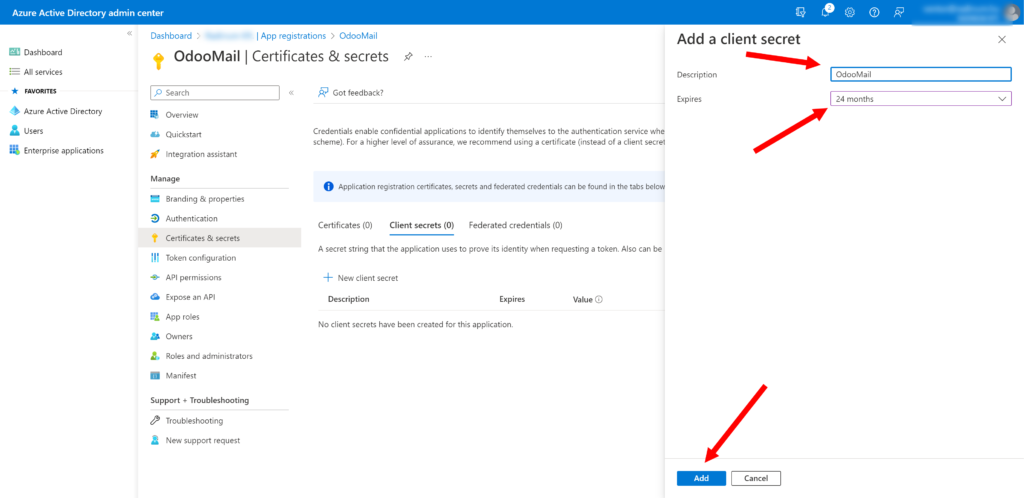
- Enter the following values in the fields and click “Add”:
- Description = “OdooMail” (you can use any you want)
- Expiries = Choose any secret expires you want
As a result we will see the same as in the example below. Be sure to copy and save the “Value” of the created “Client secret”, it will be required in configuring of a connection to Catchall mailbox from Odoo.
Note. If the domain of your odoo instance was changed you should update “Redirect URL” as shown below.
Installing Odoo module to inform users that they used the wrong email
In the previous steps, we have configured Office 365 so it will accept all emails sent to a specific domain, even if those email addresses don’t exist. This means users will not even know that they made a mistake and used the wrong email address. For that purpose you need to perform the following steps:
- You need to install this module https://www.odoo.com/apps/modules/15.0/fetchmail_notify_error_to_sender/ At the moment of writing this module is available only for Odoo 9-15. If you need this module with other versions, please let us know.
- After installing this module, when some user is sending an email to some mail address that does not exist in Office 365 and does not exist in Odoo ERP (no objects are associated with it), then he will receive the message below automatically.

Configuring Outgoing Mail Server in Odoo
Outgoing mail server is needed to allow Odoo to send messages and notifications to mailboxes of recipients that are inside and outside Odoo. Below are the steps needed to make this configuration and health check.
Configuring of Odoo Outgoing connection
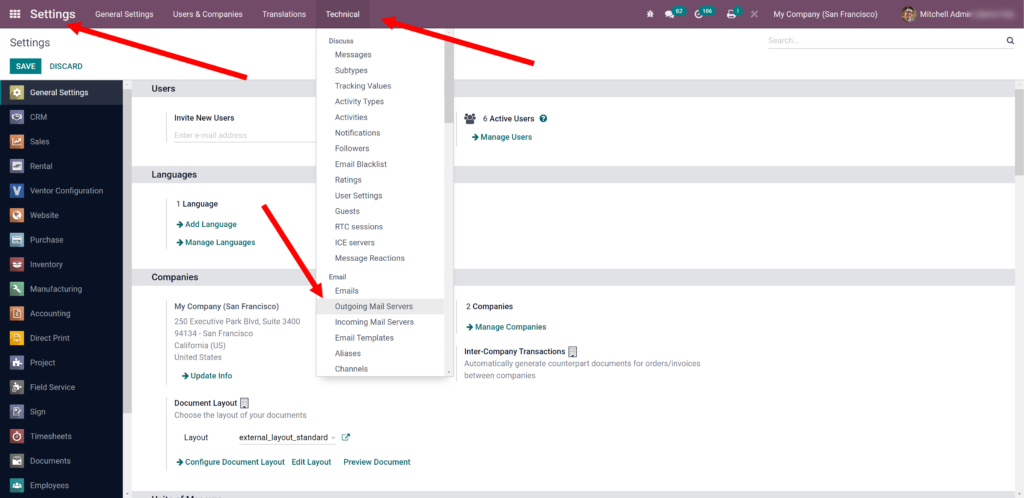
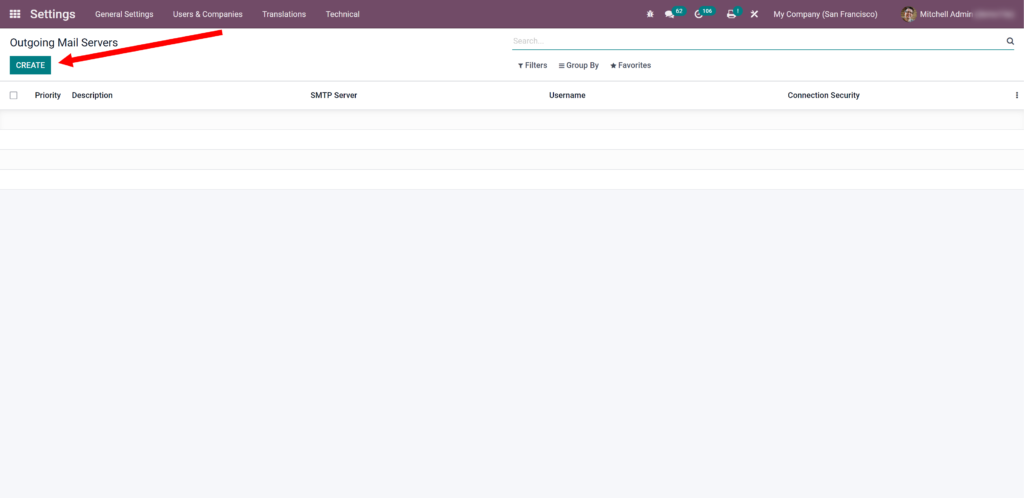
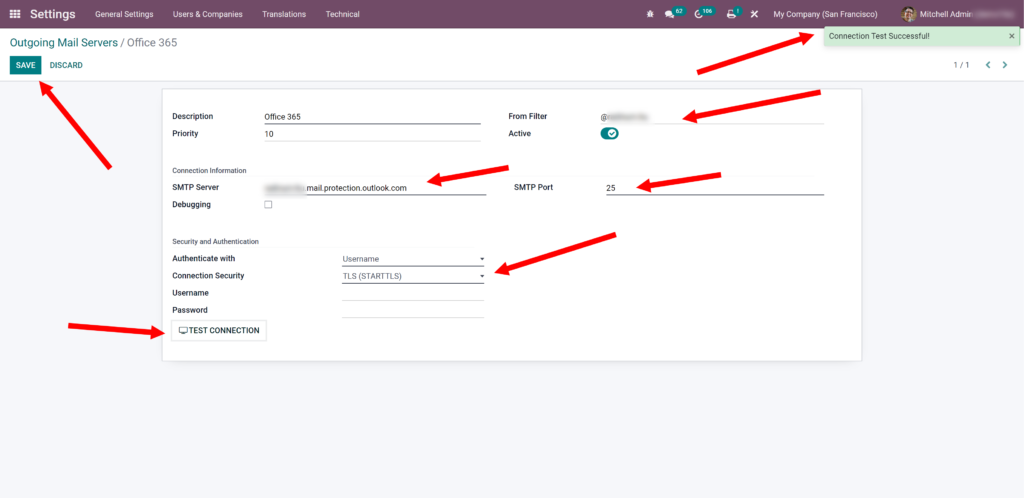
- Login as Administrator in Odoo ERP, enter the Debug mode and go to “Settings -> Technical -> Outgoing Mail Servers”. Either select an existing one (to modify it) or click “Create” to create a new one.
- Then you need to enter the following values, click at “Test Connection” and save settings:
- Description = “Office 365”
- SMTP Server = MX value from DNS records of your mail domain (see here)
- Port = “25”
- Connection Security = “TLS (STARTSSL)”
- From Filter = “@your-domain.com” – it is needed to send messages with sender which has any alias and your mail domain but in case other domain will be used default sender alias (work since Odoo v15)
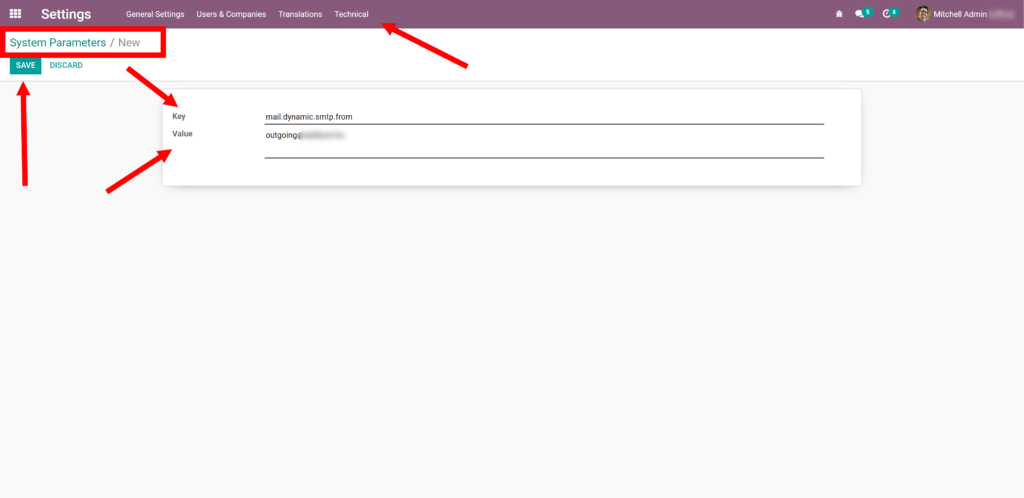
To use analog “From Filter” field in Odoo below v15 you should use the key mail.dynamic.smtp.from and set the value as the email address that should be used in those cases as shown below, for example such as outgoing@your-domain.com (documentation).
Testing of Outgoing Mail Server in Odoo
- Go to your user settings and set “Email” which will contain your mail domain. You can see example below:

- After that, go to any unnecessary contact, set “Email” on which you can receive a message. Then click “Send message”, fill in any text message and click “Send” (before sending make sure that contact is a follower of the current chat).

- Then go to the recipient mailbox and check inbox messages. One of them has to be received from Odoo ERR like at example below.

Configuring Incoming Mail Server in Odoo
Incoming mail server is needed to allow Odoo to scan some particular mailboxes for new emails. And depending on the “To” address, it can create new objects like Leads, Tasks and more (or add messages to existing objects). Below are the steps needed to make this configuration and health check.
Configuring of Odoo Incoming connection
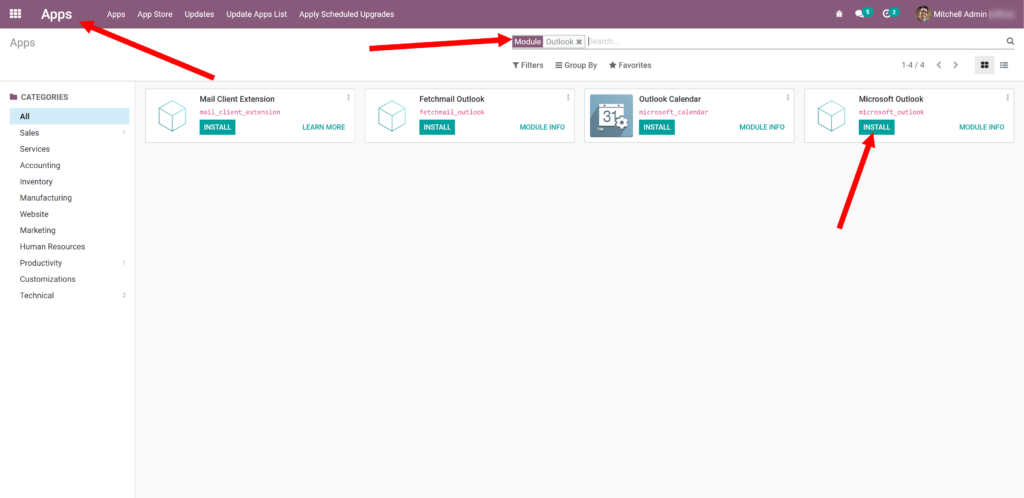
- Login as Administrator in Odoo ERP, go to the “Apps” menu, find the “Microsoft Outlook” app and click “Install”.
- Then go to “Settings -> General Settings -> Discuss”, enter the following values and click “Save”:
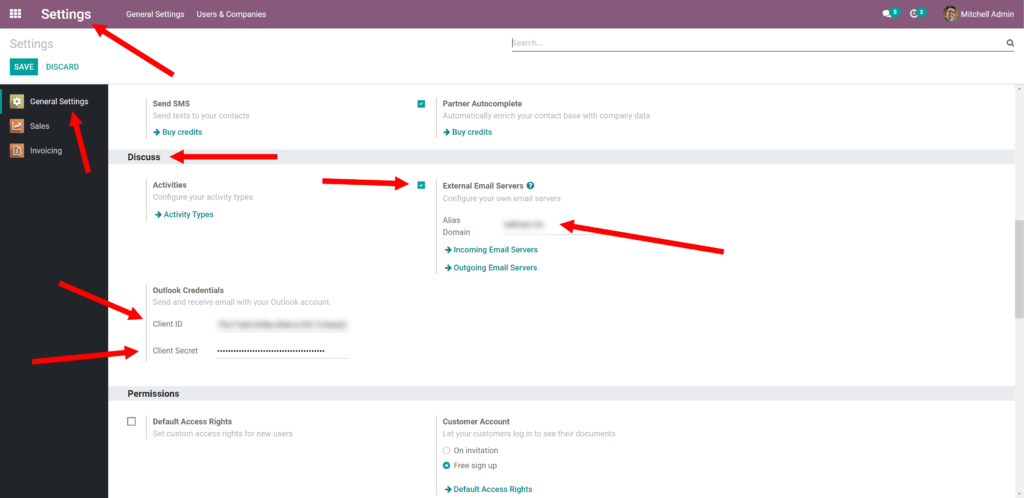
If your Odoo version is v17 you should add Alias Domain in the next way:
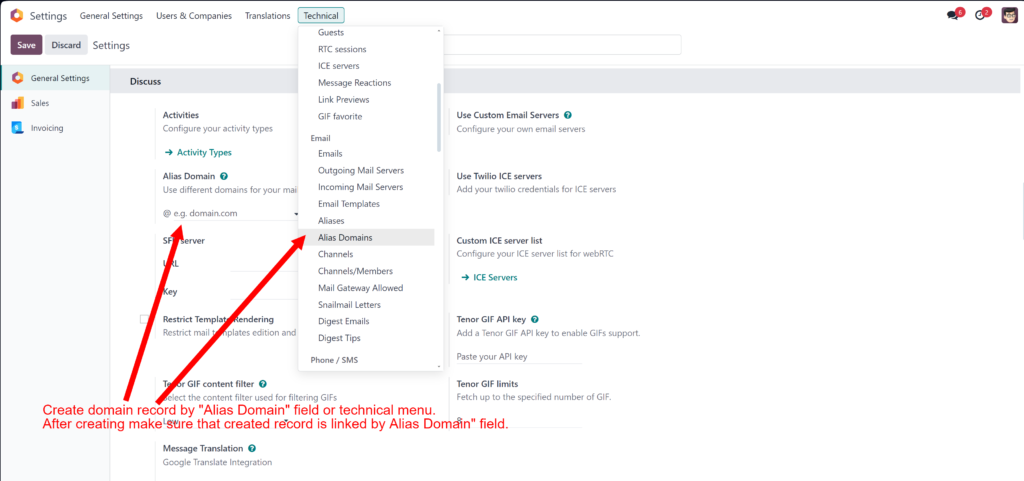

- Name – this parameter should have your-domain.com
- Catchall Alias – enter here part of the email previously configured. For example “info” in case you have previously configured the email info@your-domain.com
- After that go to “Settings -> Technical -> Incoming Mail Servers”. Either select an existing one (to modify it) or click “Create” to create a new one.
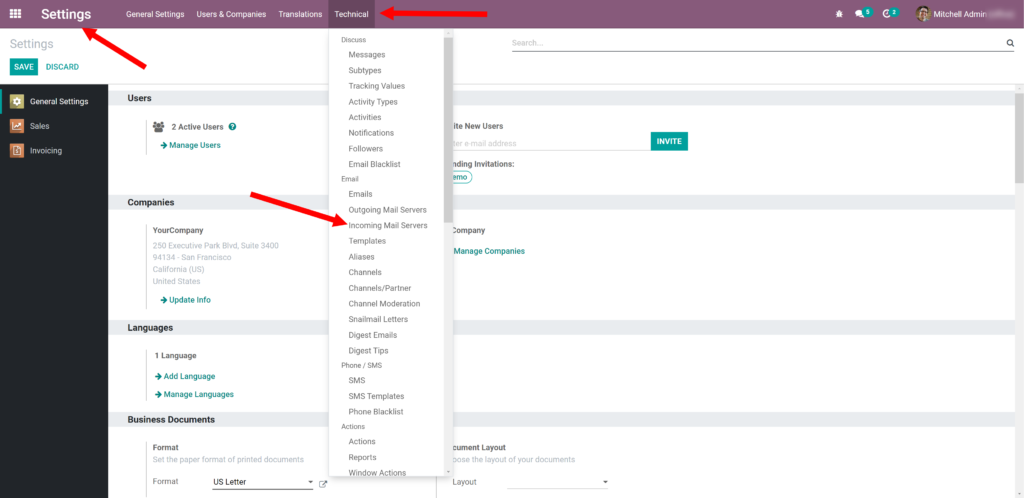
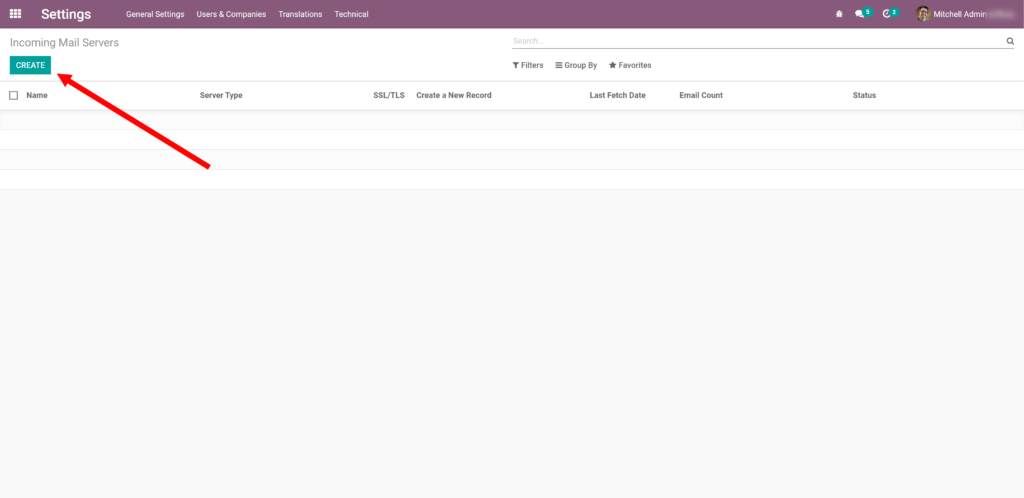
- Now enter the following values and click “Connect your Outlook account”:
- Name = “Office 365”
- Server Type = “IMAP”
- Outlook = Selected
- Username = info@your-domain.com (Catchall mailbox)
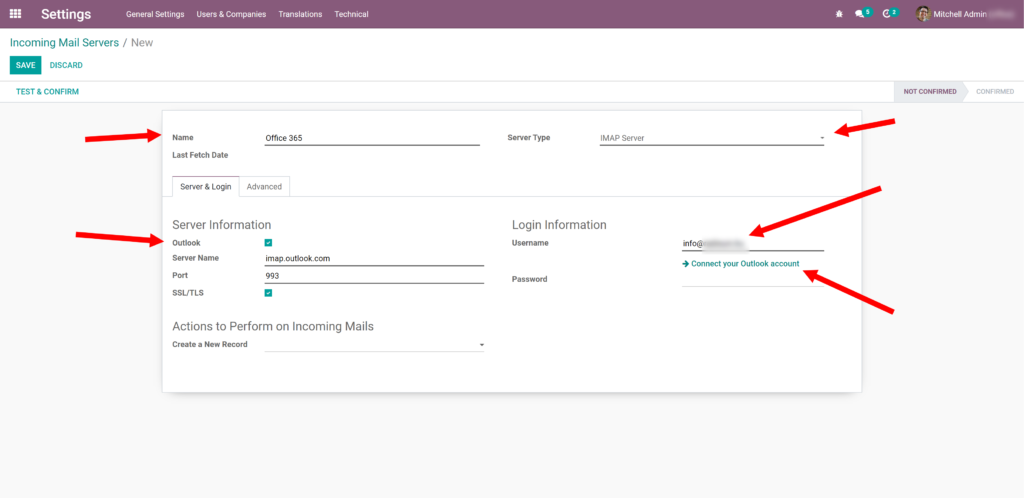
- Then “Login” by your Catchall mailbox user.
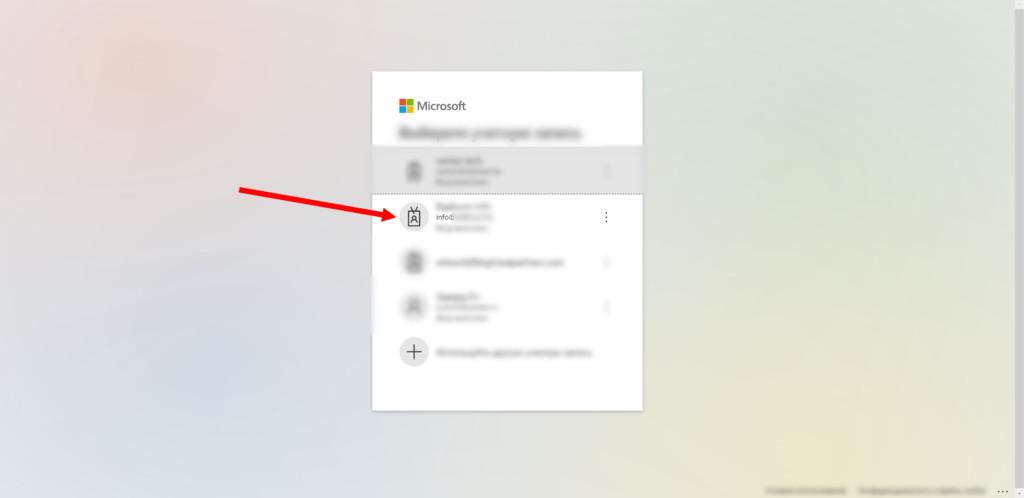
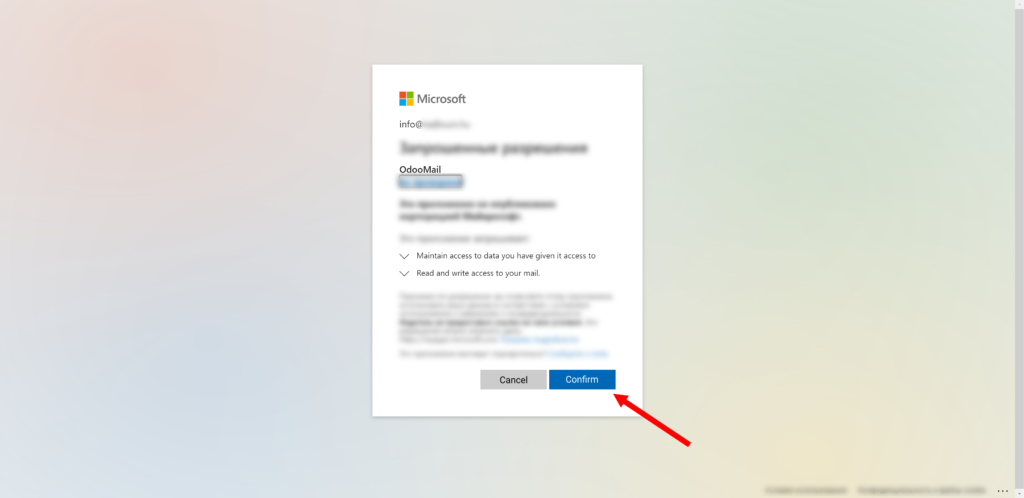
- As a result you will see that Odoo ERP got a Valid Outlook Token. So next click “Test & Confirm”.
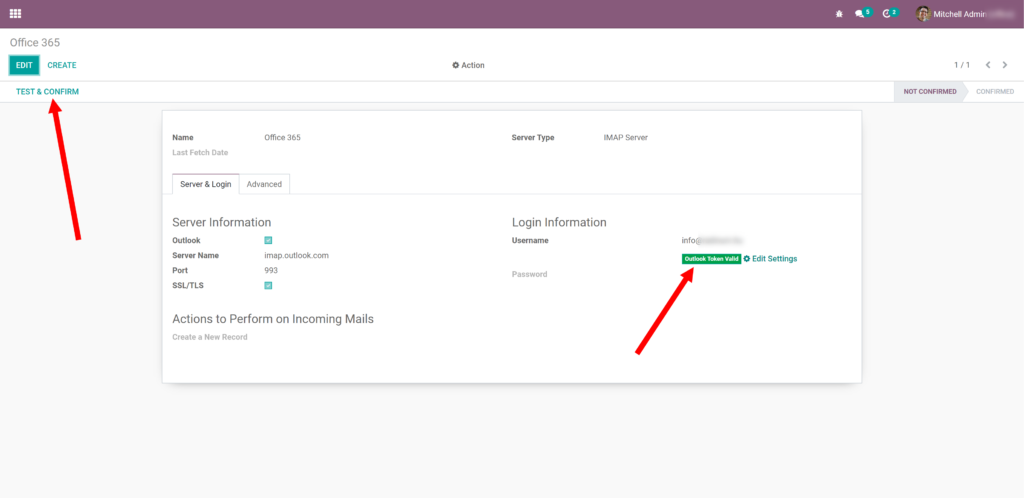
As you can see, the connection to the Catchall mailbox was successful.
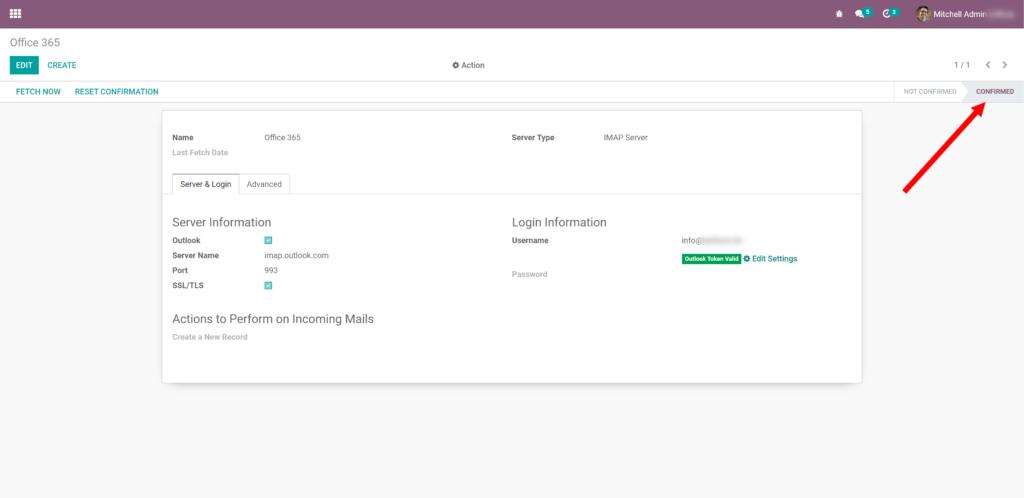
- Check that on “Advanced” Tab you have set field “Error notice template” to the value “Fetchmail – error notice”. Or in other case, when user will send email to nonexistent mailbox that cannot be processed by Odoo – he will not get error message about it.
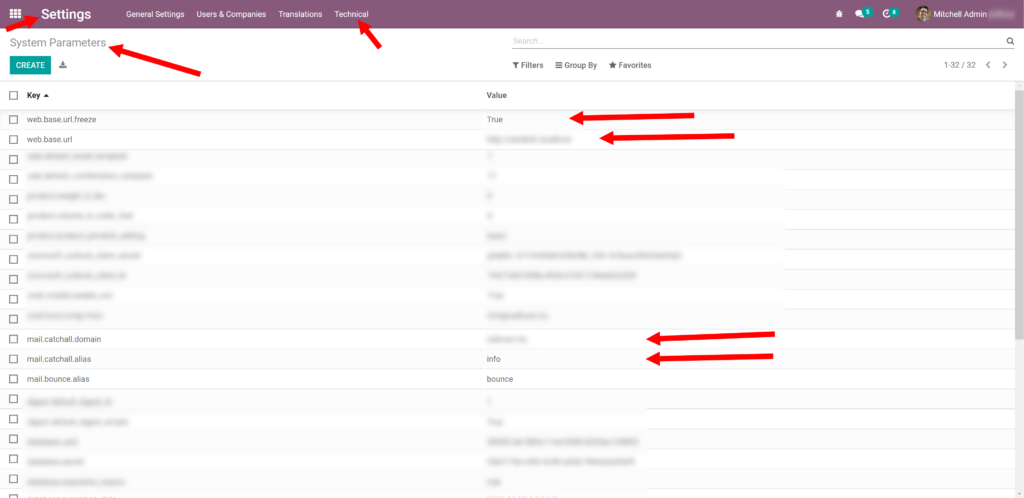
- Then go to the menu “Settings -> Technical -> System Parameters”. And make sure that the properties below are set up correctly:
- web.base.url – should be equal to the URL of your Odoo instance. It is needed in order to include a proper URL in all your emails
- web.base.url.freeze – we recommend to add this parameter also with the value “True”. Odoo ERP’s default behavior on login of administrative user is to replace web.base.url parameter with the current url used by the admin. In most cases it is not desired behavior and we want to preserve the URL we have added
- These settings should be checked if Odoo version is less than v17:
- mail.catchall.domain – this parameter should have your-domain.com
- mail.catchall.alias – enter here part of the email previously configured. For example “info” in case you have previously configured the email info@your-domain.com
Testing of Incoming Mail Server in Odoo
- As Administrator or any powerful user go to menu “CRM -> Sales -> Teams” and open any team’s configuration. On the sales team details, enter the following data:
- Email Alias = “sales” (you can enter any)
- Accept Emails From = “Everyone”
- Team Members – add some real users with real email addresses
- Followers (in the chatter, optional) – add users that should automatically receive mail notifications when a new lead is coming.

- Now send something from your personal email address to the mail address specified in Sales Team. Wait for at least 5 minutes. That is the period that Odoo is configured by standard to download incoming mails.
- Now go to menu “CRM -> Pipeline” and You will see that a new Opportunity was automatically created from the incoming email with the name which is the same with email subject. If you already configured Outgoing Mail Server you can start conversation by chatter from this Opportunity.

Bingo! You are done with your configuration of Office 365 and Odoo ERP.
If you think that this article is helpful, please, share it on social networks. Sharing Icons are
available below the article. Subscribe to our newsletter and follow Ventor.tech twitter to be kept up to date.
If you need help in configuring your Office 365 properly with Odoo ERP or found some issues / mistakes in the article, please leave your comments down below. We will be happy to assist.
